


2nd Floor Bathtub leaking thru ceiling to kitchen; Emergency?
14 years ago
Featured Answer
Sort by:Oldest
Comments (7)
 14 years ago
- 14 years ago
Related Discussions
Height of Joist between 1st floor ceiling and the 2nd floor?
Comments (15)There is no absolute set answer. The necessary joist height (thickness) depends in part on the distances you are trying to span. It also depends on the load you will be putting on the joist, how widely you space your joists, and the type of wood your joists are made of. A good grade of 2X10 lumber might be used for joists spaced 16 inches apart where the longest clear span is no more than say 15 feet. If you needed to span a room that is 20 feet across with lumber of the same quality, you might need to use 2x12s that were spaced no wider than every 12 inches. You mentioned a 7000 square foot home. I would lay odds that you intend to have large open rooms downstairs. That fact alone means you will need thicker joists. The whole issue of space between the floors for can lights and ductwork is secondary compared to making sure that your joists will support the load that is put on them. This is NOT an area that a novice should be playing around in. I have an undergraduate minor in physics and despite having recently read far more about joist loads and span table that I ever wanted to, and I can barely comprehend the subject. I would NEVER trust myself to actually try to determine the proper size joists for a house without help from a structural engineer. And frankly, I rather doubt most architects - who are only required to take a very minimal amount of physics to get their degrees - really understand span load tables either. I suspect (pray) they confer with qualified structural engineers whenever they are designing anything out of the ordinary. But, let me give you two examples and tell a cautionary tale... In our current house, the joists are 2x12 lumber. (I know b/c several years ago I repaired the sheetrock in the dining room after we had a leaking pipe.) However, our current house is a very simple rectangular shape of only 1900 sq feet. It has a central staircase with rooms on either side. The joists between the 1st and 2nd floor run perpendicular to the staircase and the widest room they have to span is only 14.5 ft wide. The HVAC unit also sits in the middle of the house (behind and just to one side of the staircase) so the AC ducts run parallel to the joists (i.e., each duct lies between two joists) to reach the rooms on either side of the staircase. A soffit over my kitchen cabinets houses a duct that runs perpendicular to the joists from the HVAC unit to the back of the house. Parallel ducts T out of the top of this to reach the rooms that are at the back of the house. No holes had to be cut thru the joists to accomodate the ductwork. Meanwhile, all our upstairs plumbing is centralized over a single "wet wall" so all the drainage pipes run straight down. Again, no need to cut holes thru those 12 inch joists. The only holes drilled through our 12 inch joists are little tiny ones that accomodate electrical wiring. Now the second example and the cautionary tale... Our new home - still under construction - is a 3200 sq ft house with a much more complex design with much larger rooms downstairs. I will also have two large cast-iron bathtubs upstairs and wanted to be sure their weight, when filled, would not be a problem. My architect and his engineer specified 18" deep open-web trusses spaced 16 inches on center. To save money however, my builder elected to use 18 inch i-beams joists made of oriented strand board (OSB) instead. (Actually OSB is stronger than real lumber when used for ibeams.) The engineer at the lumber store where my builder bought his lumber package told the builder he could place safely place the OSB ibeam joists 24 inches apart. I was out of town for several days while framing was going on so first time I saw the i-beam trusses, my builder was already framing up the second floor. I immediatley insisted that he stop what he was doing and verify with his engineers that he would be able to cut large enough holes thru the ibeams to accomodate my HVAC ducts BEFORE he went any further. I should have just told my builder he had to follow the specs but I was trying to be reasonable. I told him that IF holes could be cut through those ibeam joists large enough to accomodate HVAC ducts without compromising their structural integrity, he could go ahead and use them. But, if not, he needed to back up, take down the second floor framing, and replace the ibeams with the open web trusses specified in the plans. Two days later, in one of many many lies he told me, my builder said he had checked with his engineer and that the HVAC ducts would be "no problem"... that I should "trust him" and "let him do his job" because he was a professional. Foolishly, I did so. Later - after my house was fully framed, sheathed, roofed, shingled, sided with Hardie, had all windows and doors installed, and the exterior was painted - I learned for the first time what my builder meant by "no problem." It meant he had unilaterally decided that he would move the two HVAC units and ductwork up into the attic so holes would not have to be cut thru the ibeams for the ductwork! He completely ignored the fact that this decision meant the HVAC would no longer be in the heated and cooled envelope of the house which would increase my utility bills AND require him to purchase larger and more costly HVAC units; that running flex duct down from the attic to the first floor rooms required chases which took significant amounts of space out of each of my bedroom closets; and that positioning two HVAC units and a spiderweb of flex duct in the attic made it completely impossible to ever consider putting in an attic bedroom - which was the whole reason I had elected to have a 12/12 stick built roof in the first place! But my cautionary tale continues... It then turned out that the necessary holes for the plumbing drainage pipes was too much for the joists! In some cases the joists span distances of 25 feet. Once the plumber cut a 4 inch diameter hole through several joists to accomodate a toilet drainage pipe, the joists started bowing inward. I noticed rather quickly that the sub-floors on the second floor were no longer level. My builder tried to tell me that it was "normal" for the subfloors to bow a little but that putting the final layer of flooring on top would correct the problem! HAH! By this point, I was long past trusting anything the man said. We are building out in the country where no inspections are required except for septic systems but I had included in my contract a provision allowed me to call in an independant third-party inspector at any point. The contract stated that the third-party inspector's finding and recommendations regarding the safety or structural integrity of any element in the house would be controling. In other words, if the inspector said something needed to be done, builder had to do it at his cost. The inspector required my builder to go back and put an additional 18 inch i-beam joist between every pair of existing joists that had had a hole cut thru it. So now the joists are spaced every 12 inches instead of every 24 inches and the second floor no longer bows. I don't know what it cost my builder to put in the additional joists and then to replace the drain pipe he had to cut... but I'd lay odds the total cost was more than if he'd used the open web trusses in the first place. In case you're wondering, we ultimately fired the builder and filed suit against him after even more issues reflecting his incompetance and dishonesty. Now I'm the GC to finish the build... and believe me, I'm relying heavily on my third-party inspector to help me get things done right! The bottom line, simply by asking "10 inches or 18 inches? which one is the correct answer?" you reveal that you have a lot to learn before you proceed. You might start by reading this link. Here is a link that might be useful: Tutorial on joist design...See More2nd Floor Layout- Critique please!
Comments (30)Sure, the city might have noticed the stair error but they would have had no obligation to you to do so; they could have issued a permit and then flag it as a violation after it had been built, so never rely on an inspector for code compliance, that's your responsibility even if you hire a designer and a builder. Regarding the future room square footage, are you asking about zoning ordinance, building code, sewer/septic, or HOA regulations? I can't think of any maximum square footage restrictions in a building code; it is primarily concerned with safety and energy conservation so if you show a door to the space you must give it a use and design the floor structure for that use even if it is only storage. So call it storage so you don't need emergency escape windows and design the floor structure for a bedroom/living loading. You would probably show exterior insulation, a utility light, subflooring and omit all finishes. Are you suggesting that you might build above the Great Room later? Incidentally, a two-story space on a corner of a building needs additional attention for lateral bracing because wind forces are greater at corners and it is the floor that provides bracing for exterior walls so be sure to hire a good structural engineer....See MoreContractor used grout not caulk around the tub
Comments (67)I am a DIY'er and did a pretty significant bathroom remodel where I did all the tile work. On my shower, I used Laticrete Hydroban and durock for my walls. At all corners and at the tub flange, I used fiberglass tape embedded in thinset, sort of like your video. Much cheaper I imagine. The Schluter Band is water and vapor proof I believe. You will be using Redgard to achieve the same water management goal, so I don't believe you would need the Schluter product. All changes of material and planes will be covered with the fiberglass tape and thinset. All the fasteners will be covered with thinset. All valves are set with tape and thinset, or the product included with the valves. My valves came with a taping product that I thinset into place. Then everything is coated in the water management membrane such as Redgard or Laticrete. I filled in all small voids with thinset. I don't have a picture of the bottom of my shower pan and Durock, but I think I taped it with the fiberglass tape. It has been some time since I did this job. Below, is my thinset and taped cement board. True Confessions, I don't think I have enough fasteners, nor the right kind, in my wall, and I worry about this flaw in my shower. I had drywallers hang this for me when they did the rest of the room. I assumed they used the correct fasteners, but they didn't. They started out with galvanized nails, which I believe would have been ok, but I wanted screws, so they switched to the drywall screws. I had the Durock screws, but didn't give them to the workers, assuming they had their own. They didn't. So after they left and I saw the, I tried adding my Durock screws into the wall. I couldn't do it, I just wasn't strong enough. DH was out farming and wasn't available to drive more in for me. So I proceeded. My mistake, as I learned later the drywall screws deteriorate in cement board over time because of the alkaline conditions. I confessed to DH that the walls might fall down in a few years. He said, "well when they do, we'll just fix it." What a relief I felt, I no longer carried this burden of knowing that I flubbed up: Here is the bottom where the coating is onto the shower pan. It hard to see, but the pan and walls are totally sealed in the Hydroban. Click it open to see the bottom of the walls at the shower pan, where I taped a plastic sheeting to protect the pan. Be sure to follow the recommendations for thickness with your Redgard. This is Laticrete Hydroban: If you click the picture open you might be able to see the valves sealed with the Hydroban. This green tape is by 3M and is very strong used for taping concrete I believe. It was great to use to hold hanging tiles into place until the thinset cured. You will want this tape for your tiling job, I loved it:...See MoreDuet Sport Whirlpool 2nd floor *Continued* V3
Comments (108)I'm glad I found this thread! I have wanted a Duet washer and dryer for three years now. We'll be buying a house / condo after the beginning of the year and was basing my desire for the Duet on my father-in-law's set that I've used. Sounds like the Duets were "de-contended" over the years to reduce their "cost" to produce. What a shame. I certainly have noticed FL washers becoming more popular over the last two years or so. After seeing people mention Bosch in this thread, I've decided to jump ship before I even board it. I've been looking through the Bosch and Lowe's web sites, although there are a number of Bosch dealers here in Anchorage. My two requirements in an appliance are A) Energy Rating and B) Noise. Our Kenmore (really Whirlpool) fridge was actually below the U.S. Energy Guide rating a few years ago. It was almost to the bottom of the energy usage on the Canadian guide, even. I don't mind mixing brands. Just as with employers, there's NO reward in brand loyalty. They can change design or build quality practically overnight to satisfy the holly stockholders. Now to go try to dig up some 'dirt' on the Bosch white goods. We use a Bosch dishwasher at work (residential level machine) and it's shockingly quiet. The prices are in line with Duet-class Whirlpool goods and the energy use seems quite low (not to mention attractive styling)....See More- 14 years ago
- 14 years ago
- 14 years ago
- 14 years ago
Related Stories

KITCHEN DESIGNKitchen of the Week: Tiny, Fruitful New York Kitchen
Desserts and preserves emerge from just a sliver of counterspace and a stove in this New York food blogger's creatively used kitchen
Full Story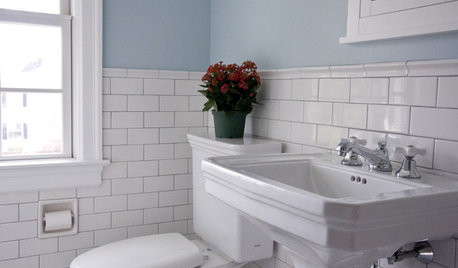
BATHROOM DESIGNRoom of the Day: Renovation Retains a 1920s Bath’s Vintage Charm
A ceiling leak spurs this family to stop patching and go for the gut
Full Story
MATERIALS10 Modern Marble Looks
Marble has broken free of the standard kitchen countertop slab and is showing up on bathtub backsplashes, modern dining tables and more
Full Story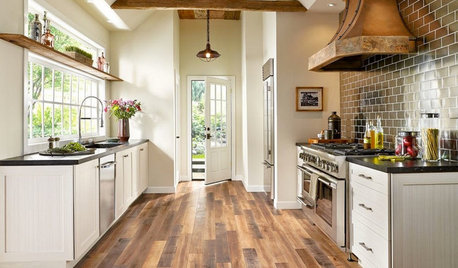
MOST POPULARPros and Cons of 5 Popular Kitchen Flooring Materials
Which kitchen flooring is right for you? An expert gives us the rundown
Full Story
BATHROOM DESIGN14 Bathroom Design Ideas Expected to Be Big in 2015
Award-winning designers reveal the bathroom features they believe will emerge or stay strong in the years ahead
Full Story
KITCHEN WORKBOOK8 Kitchen Amenities You'll Really Wish You Had
Keep kitchen mayhem and muck to a minimum with these terrific organizers and other time-saving, mess-preventing features
Full Story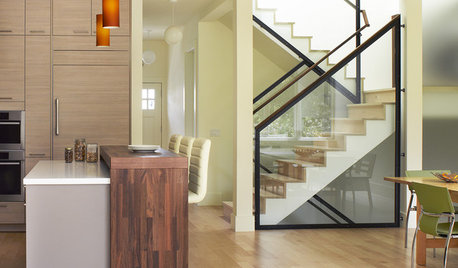
FLOORSIs Radiant Heating or Cooling Right for You?
Questions to ask before you go for one of these temperature systems in your floors or walls (yes, walls)
Full Story
KITCHEN STORAGEPulling Power: Clever Drawer Tactics for a Kitchen
It’s not how many drawers you have in your kitchen; it’s how they work for you
Full Story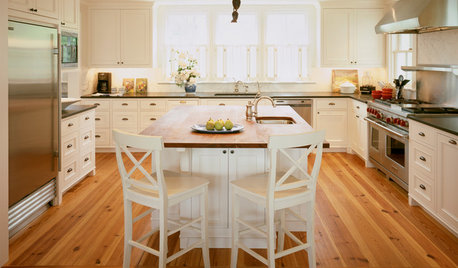
KITCHEN DESIGN3 Steps to Choosing Kitchen Finishes Wisely
Lost your way in the field of options for countertop and cabinet finishes? This advice will put your kitchen renovation back on track
Full Story
HOUSEKEEPINGGot a Disastrously Messy Area? Try Triage
Get your priorities straight when it comes to housekeeping by applying an emergency response system
Full Story
heimert