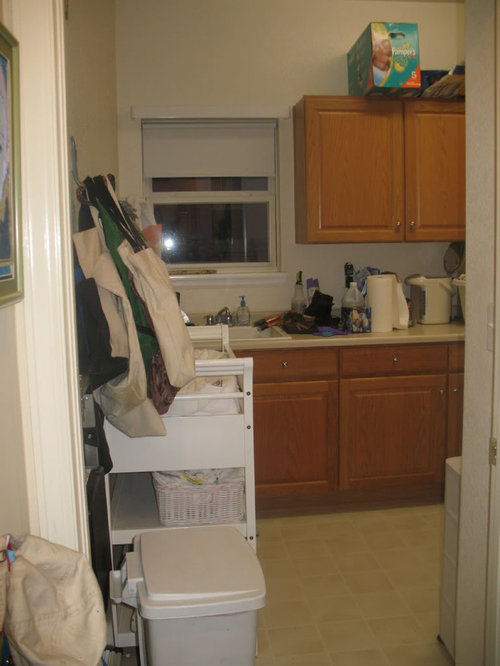
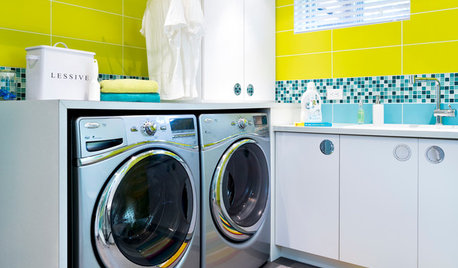
Okay don't be jealous! This was our laundry room / diaper changing area:
I have been working working working away on it. I'm not yet done but I really want to share it with you. I appreciated so much all your kind, encouraging words when I shared the photo of the tile laid out in the garage!
The tiles were laid a few weeks ago:
and they look great! Before they were laid I'd sealed them twice with that Miracle 511; after they were laid but before grouting I sealed them again. Then it was a lot of waxing (paste wax and a buffer), trying to figure it out.
As they're cement they had to be soaked in water first before being affixed (so they didn't suck the moisture right out). El Guapo really, really wanted to "help," so excited about our beautiful tile man (who is truly beautiful inside and out) and so excited about being someplace off-limits (which he doesn't understand). So Nate the tiler and I used the big cooler to soak the tiles and block the entrance to the laundry, and the small cooler was for El Guapo to use.
But after the tile was in I wasn't as delighted as I'd thought I'd be, and it was that seriously sad builder's grade oak cabs which were bringing me down.
See what I mean?
So I lightly sanded them, primed and painted. And painted. And painted -- three coats! I was ticked -- I mean, three coats for a laundry room? But I did it. They're in BM's Calming Cream, high gloss, which is the color and finish used on trim throughout (most of) the house.
The walls and ceiling had been smoothcoated by our awesome drywallers. If it'd been up to me that process would seriously have taken close to a year and no, I am not joking. When I did our powder room it took me a few months and even then a) it is imperfect and b) I gave myself radial tunnel and an arthritic middle finger (which I do love, admittedly). It took the drywallers three+ days. It was the best $400 I have ever spent. Ever.
My partner had taken out the ginormous fluorescent fixture -- it did a great job lighting but wasn't the look I was after. I painted the ceiling a beautiful and happy golden tangerine (BM Oxford Gold in semi-gloss), and the walls in the same Calming Cream but in an eggshell finish. I'd primed and painted the beefy crown but the guys who installed it inexplicably chose an unprimed piece to put over the hardest section to reach (over the w&d). They felt bad but still laughed when I pouted. Whatever. My partner hung up this old tole floral chandelier we've had -- it was in the nursery in our California house.

Years and years ago -- I think pre-children? -- anyway, I watched BBC America's "Changing Rooms" (the Carol Smilie years) and have saved on our kitchen TiVo one episode. It's the Peckham episode where Linda Barker did a nursery and painted a huge gingham effect on the wall. I LOVED it. So that's what I wanted to do in the laundry.
Do you know how much work that is? I didn't! Going around, measuring every five inches horizontally and vertically, and then using that farchadat chalk line. Hate it! That's what Linda used so I thought "okay." It's messy and you have to really, really wipe it up before painting. If you look closely as the first section I did it doesn't look great but live and learn.
So I'm not even close to being done but this wall is mostly done and I think it looks pretty great!
Which was this:
I found lime green knobs at Anthropologie which I like but I am not paying $8 per knob (x 13) for laundry room knobs! So I went to Lowe's and got plain wood knobs which I shall paint BM's Citron (bought a little sample of it for $4). But otherwise, it's just painting squares for me and then the baseboard. It's a v. chipper room!


cooperbailey
allison0704
Related Discussions
encaustic tiles, wowee!
Q
If you had a laundry room...what would be its decor theme?
Q
Encaustic/cement tile backsplash
Q
can anyone school me on encaustic tile?
Q
User
grlwprls
Stacey Collins
Boopadaboo
deeinohio
timber.j
kitchendetective
franksmom_2010
User
pricklypearcactus
barb5
laxsupermom
Diane Smith at Walter E. Smithe Furniture
Valerie Noronha
rmkitchenOriginal Author
busybee3
mahatmacat1
punamytsike
User
bestyears
sundownr
amysrq
Bethpen
cat_mom
lizbeth-gardener
User
rmkitchenOriginal Author
User
mahatmacat1