


Cabinet Coat VS Cabinet Rescue
pcanyon
17 years ago
Featured Answer
Sort by:Oldest
Comments (11)

erinluchsinger
17 years ago
Michael
17 years agoRelated Discussions
Cabinet Coat vs Fine Paints of Europe
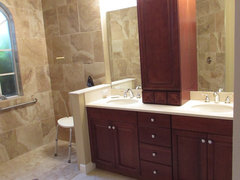
Comments (15)Sorry, missed the questions (and the compliments, thanks!) Pleased with the outcome, but that is a job I shall not likely tackle again in this lifetime. Well, maybe wait a few more years and I might change my tune... Pardon the length, I have answered your questions and also point out mistakes I made, so you won't make the same, not worth it ; ) I did this job (all twelve days of it) in a state of total burnout and aching muscles from repainting the entire house, and staining/poly coating stairs/railing that DH had installed after he installed our hardwood floors. House was in total disarray. It's been 2 years I still find things in boxes I didn't know I had. So a job like cabinets in that frame of mind led me to mistakes and shortcuts and I knew better. Weariness clouded my judgment. So if you're doing an overhaul, save the a cabinet job for when it is your sole focus and you've got lots of stamina. First, clean well. Really well. Think of the years of built up oil-based polishes, airborne stuff from cooking, etc. Oils absorb into woods, and a half-hearted wipe with a rag and Dirtex doesn't cut it. My first mistake, should have scrubbed the dickens out of them with Dirtex and #0000 steel wool. Second mistake: I did not scuff sand to get even more gunk off outer surface of wood and prepare for better adhesion of primer/paint. Third mistake: I did not use oil-based primer. I love Bullseye 123, has served me well on all types of jobs. But because of mistakes 1 and 2 above, an oil-based primer probably would have covered my tracks. I have a couple chips here and there where something has bumped the paint, the tiny chips go right down to the old finish. That tells me my primer is not adhering well which tells me my prep was too lame. (I am not in any frame of mind to tackle fixing this at the moment, but will be forced to this year, so plan to turn to Michael for his infinite wisdom if he's willing ;) The reason I know I failed in several areas with prep on the cabs is because the interior room doors pictured above (new and pre-primed) are still pristine. No pin head size chips, nada. bud_wi, my hinges were a nightmare. Somehow, we got The Most Unique Hinges Known To Mankind. I shopped everywhere for replacements, none to be found (even online). I could easily have replaced them with like kind by myself (stick to the existing holes, go easy with the drill so screws don't strip). However, I did not want to remove and replace with a totally new style, which as Michael suggests is best choice (and I agree). The reason I did not switch hinge styles is because it would involve a bit more work and DH's participation. He was equally burned out, and my request to add yet another job would have been met with his favored 'have you lost your mind' look. Now I am married to one of the handiest guys, and he is a perfectionist. Trick is to get him motivated. Because he is also the last great procrastinator. So when he's burned out but says 'I'll get to it next weekend', that means I could be facing months and months of cabinets with no doors. Couldn't bear the thought. So I painted 'em. Mistake number four (I am up to four now, right?). Two years, four months later hinges are flaking (I primed with Bulsseye 123 first) primarily where hinges rub. That really accelerated just in very recent past to where it's noticeable, and will only get worse. I cannot put off addressing this development much longer, as old brass peeking through bright white is not attractive. Oddly enough, back when I was doing this job, someone suggested auto touch up paint. (Comes in a 3" tall bottle ala nail polish.) Unfortunately, I had already painted all but a few hinges when I got that tip. The hinges with auto touch up paint (in a white I picked that closely matched CC) are holding up well. For now. For anyone who needs to remove paint from hinges, I just saw a tip on This Old House: get a cheapy crock pot (not ever meant for food), put water in, turn it on low, let hinges soak for 12 hours (or overnight) and paint will fall off in a big glob. (Not sure if that applies to oil-based.) Whether I go that route and buff them out (I don't like brass) or ask DH for new is a nasty toss up. Replacing our deck is pending this spring, so for new hinges I might as well ask him to hang the moon ;) I left the doors up. I did not paint the insides of the cabinets (good condition = no need). I used a Purdy XL Dale 1 1/2' angle brush (my favorite) for tight nooks, small areas. I applied paint to doors with a 4" foam roller (speedier and better control) and followed up with a final single stroke, top to bottom, with a half-loaded brush (Purdy XL Dale 3" flat). I say half-loaded because fully loaded brush with CC would only create excess paint which then runs everywhere as it seeks it's level. Dry would drag through existing paint leaving a gummy trail. So half loaded pulls out any bubbles from the foam roller, keeps the work surface sufficiently wet but not drowning in paint, and paint will then level well. Learn from my mistakes, so that you do not stand in your kitchen 2 1/2 years from now and see what I am beginning to see....See MoreAce Cabinet paint vs. Aura for Kitchen cabinets
Comments (2)Some good points in your post Liz! Considering your 2-coat 123 priming, neither paint should be raising the grain. Were these trials over the primed surface, or on "bare" wood doors? They are 2 different paints obviously... * For a new painter, the Aura will seem finicky/fast set-up times. You could add some of XIM's Latex Xtender to help it level better, and slow the set-up time. * The ACE Cabinet paint is a "Hybrid", meaning it's "Both" Latex paint, AND a harder-resin Alkyd polyrethane paint. * The ACE requires 24 hrs. between coats to level itself out, and harden-off enough for the 2nd coat. * Aura would be ready for 2nd coat in 2-3 hours. * I did my ACE sample-boards on some primed/sanded pallet boards. They still look very nice! Faron...See MoreCabinet Coat vs other acrylic paints
Comments (4)Cabinet Coat is a Urethane Acrylic. It will finish much nicer than an acrylic latex paint. It will be more durable too. If the store hasn't used CC, they won't understand why you want it. Typically, they want to sell you the shelf paint. Follow the instructions from CC as to how to finish. Michael Here is a link that might be useful: How to...See MoreBM Advance vs BM Cabinet-Coat
Comments (37)Perfect timing for me, this thread. We've replaced our 2'x11' kitchen bench seating area (termite damage -- caught early, but still...), and I just finished priming with Stix. In all my reading, I didn't anticipate how thick the primer would be, fresh out of the can -- my stir stick, jammed into the primer, stood at attention without issue! I contacted INSLX customer svc and was told I could thin with water. I did so, but it was still too thick to level well (I didn't want to exceed the amount of water recommended). I had to sand a fair bit to knock down the ridges. (I've repainted every door, spindle, baseboard and trim in this 26 y/o house of ours by now, using Lowes' American Tradition semi-gloss, and always got a smooth finish.) I have a can of Cabinet Coat at the ready, but am concerned about obtaining a flat finish: foam roller vs quality brush. How does one keep a wet edge when painting such a large swath, even if the paint levels well? (And I've read CC dries rather quickly.) I'm crossing fingers that CC will be the proper consistency (after a good stirring), so I won't have to worry about buying an extender (such as Floetrol or whatever INSLX might recommend). Whizz high-density foam rollers were recommended on one DIYer's site. Though, she was painting only cabinet door surfaces and wasn't dealing with the surface area of a wall-to-wall bench....See Morepcanyon
17 years agoloomis
17 years agoMichael
17 years agomoonshadow
17 years agohockeynana_10_hotmail_com
13 years agopaintplus
9 years ago PRO
PROTrudy Connor
8 years ago
Bob Lux
3 months ago

Related Stories

ECLECTIC HOMESHouzz Tour: Design Harmony for an Animal Rescue Ranch
Once dark and slapped together, this Malibu home now has balance and connection while keeping its jeans-and-boots comfort
Full Story
REMODELING GUIDESHouzzers to the Rescue: Users Solve Design Dilemmas
The proof is in the painting — and the pond. As Houzz users hit 100,000 discussions, see some of the results of their advice and ideas
Full Story
HOUZZ TOURSHouzz Tour: Creative Design Moves Rescue an Island Cottage
Facing down mold and nicotine, two industrious Canadian designers transform an uninhabitable wreck into an artful getaway
Full Story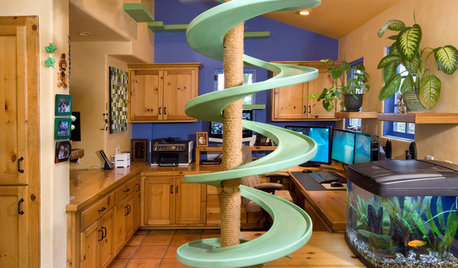
PETSHouzz TV: Watch These Rescued Cats Make a House Their Playland
Spirals, catwalks, tunnels and platforms create a superhighway inside this home in Southern California
Full Story
HOUZZ TOURSMy Houzz: Rescue Success for a Historical Rotterdam Home
A neglected three-story apartment becomes a strikingly modern family home with swinging hammocks and clever storage solutions
Full Story
TRADITIONAL HOMESHouzz Tour: Historic Coastal Home Is Rescued From Neglect
A designer lavishes TLC on a splendid Normandy revival house in Laguna Beach, embracing its original style in the renovation
Full Story
HOUZZ TOURSMy Houzz: Rescued New Jersey Victorian
Five years and one major renovation later, a historical home finds its place in the present
Full Story
KITCHEN CABINETSKeeping Cabinet Color on the Down Low
Give just base cabinets a colorful coat for a kitchen sporting character and a spacious look
Full Story
MOST POPULARHow to Reface Your Old Kitchen Cabinets
Find out what’s involved in updating your cabinets by refinishing or replacing doors and drawers
Full Story
DECORATING GUIDESQuick Fix: Update Bookshelves With a Coat of Color
Hungry for quick color? Turn your shelves into a mini accent wall
Full Story


Peakmom