


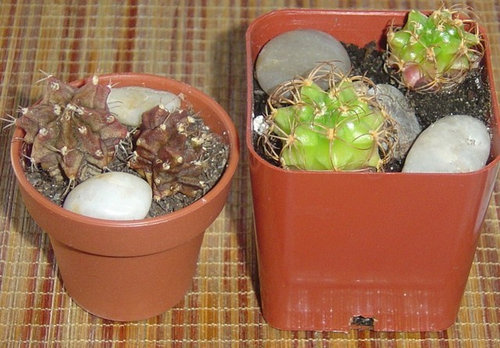
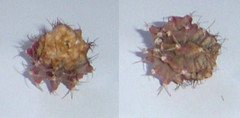
Gymnocalycium not rooting - Your input, please
Maria Elena (Caribbean - USDA Zone 13a)
10 years ago
Featured Answer
Sort by:Oldest
Comments (9)

Maria Elena (Caribbean - USDA Zone 13a)
10 years agoMaria Elena (Caribbean - USDA Zone 13a)
10 years agoRelated Discussions
Next Video - Your input please
Comments (12)I have always wondered what potting mix/soil mix to use in pots when potting them up. Also, the feeding question. When to fertilize? With what? How much? etc. A time progression in regards to size is a great idea. And I would be very interested to see you demonstrating planting into the ground, the entire process. Size of the hole, do you add any ammendments to the hole and how much, planting, backwatering . . . the entire process. I'm never quite sure if i'm doing it right :) Where can i find a link to all these videos?...See MoreWould like your input
Comments (8)To clarify some of the questions so far, what I mean is seeing the root start to emerge from the seed. I have then taking these seeds and put them into potting soil, peat pellets, and rock wool media, and in one to two days, seen the leaf part sprout out. The seeds I am trying to grow were the Ferry Morse Organic Evergreen Bunching Onions, which for me typically takes a minimum of 7 days to see anything regardless of previous attempts at sprouting them using all the methods listed here and elsewhere that I have found. I took a seed pack and split it out on different seed sprouting methods. Under the same conditions I tried: the wet paper towel trick, the heat trick, the tea trick, and even Hydrogen Peroxide treated water trick. The new method I found cuts the sprouting (root immersion) time down in half. Since I am still playing with it, I do not want to get too excited, and make statements that are not true. I also want to try different seeds, especially hard to sprout seeds like some of the hot peppers, peppercorn, and spinach. What I have found so far, is that this may be an incredible way to grow tubers. However, this is just the infancy stage of these seeds, and tubers; so who really knows what other issues may crop up. To give you an idea of some of the growing conditions, I have purchased a florescent bulb (one of those new bulbs that is bright blue light, uses 25 watts and has more lumes than a 100 watt incandescent light); and put this light into the range light above my electric cooking stove. My house keeps at 70 degrees F, and there is little natural light coming in during the day. Since I do not use my stove to cook with (hey I am a bachelor and prefer restaurant food).; it makes good use of space. :-) The point to the above paragraph is to show that the seeds and tubers are being started under this low light situation, which I have no idea if it helps or not. No this is not the new method of trying to get the seeds and tubers to sprout, just an idea of what the environment is like. Rest assured if there is no marketability in this, I will share everything with everyone on this site. I would just like to have some real notes to compare to first....See MoreFull sun: need your input.
Comments (18)Thanks again to all who replied. Everyone's thoughts (plus my own) were passed in unedited form to owner and I got some feedback. A lot of ideas that was expressed by you was accepted and we both, Jennifer and myself realy appreciate your help and welcome all comments and criticism for our future plans. Project most likely will be done in a two stages: -stage #1, fall'06. -stage #2, spring-summer-fall'07. stage #1. One large free form bed will be created on a right side at the curve of the driveway, which is coincidently at about middle of it, 90' from the road and 100' from the garage. Tentative lenght of this bed is 45' and at widest point it will be about 30' while majority of the planting area will be in 15-22' width range with 3' clearance (meaning no shrubs) from the edge of the driveway for the snowplowing provision. It will be slightly (6-8") raised bed with some medium to large size rocks incorporated mostly in the back side of it to serve practical purpose of sort of retaining wall and to match another 'rock composition' they already have there. Jen and her husband will start work on a bed preparation ASAP as time and weather permit and they hope to make it ready this fall. Then they'll plant some spring bulbs, namely daffs and tulips and call it a year. They (we?) will have a whole winter to plan and think of what they'll plant there next year during the stage #2. Also, they both (and me too) like the Martie's idea of planting one medium sized tree at the bottom of the driveway on a left side. I suggested something red/burgundy leaved and idea was accepted. What would you think would be better, Bloodgood maple or Prunus cerasifera (Purple-Leaved Plum, Cherry Plum) or something else? Tricia's idea about clump of the white birch to the right of the garage was met with a round of applause and despite birch borer potential problem it probably will be implemented this fall if they'll found decent speciman (I suggested Young's as a first place to look for it.) For the privacy in a backyard I suggested to plant 2-3 viburnums (V. tomentosum 'Shasta' or 'Mariesii') to the left of garage line to the woods leaving at least 8' space from the side of the house for the future gate or arbor to backyard. As those large viburnums will grow they'll provide protection from the westerly sun and in a future could be underplanted with hydrangeas from the backyard side. Any objections to this idea? stage #2. Despite runktrun's warning about avoiding temptation to use bold colors, I brought to them idea (and even named easy to find and care for plants for this sceme) of yellow-burgundy/purple bed and for now idea stands, but I could easily divert them from this direction. They still have the whole winter to think about. Meadow....I didn't mentioned that before, but on a left side of the driveway starting from the edge of the woods and going parallel to the driveway there is a huge NATURAL meadow though it's partially ruined by construction activity and need a restoration. Jen visited yesterday Whie Flowers Farm to see their C. Lloyd-inspired meadow border and came back with all inclinations to do 'the same thing or better'. LOL, she's a brave girl! One more time thanks to everyone and I'm looking forward for comments and criticism. TIA, George...See Moreneed your input please
Comments (8)WOW did I drop the ball here. In spite of my best efforts to provide all necessary info I left out alot of stuff, which I felt was unimportant to keep the post shorter, but it may change things. This 12 x 30 area was basically a sparse weed patch, to start off with, we had tried for several years to get grass to grow it simply would not. When I tilled this area for the first time I had to water it before I could till, and then I could only till several inches at a time. I repeated the water and till I had tilled as deep as the tiller would go. I took a Soil sample to the garden center before I started planting. There first suggestion was to make an 8-10" raised bed, over the existing soil with 100% new soil. Since that option was cost prohibitive, they recommended I put at least 3" of compost made up of different types for the next several years tilled into a depth of around 6", after I had already tilled the soil. I too questioned the 6" depth, what they told me was the you only need to go 6" as when you till next year the remaining will be tilled deeper, and in several years you will have a deep loom; Hope I explained it right. To get a depth of 3" on a 12 x 30 area you need 90 cubic feet, which I am close to. The peat is being added for water retention and will only be around 1/2". If this is still all wrong please tell me what I need to do so i can get my plants in....See More
succulentlife
10 years agoMaria Elena (Caribbean - USDA Zone 13a)
10 years agoMaria Elena (Caribbean - USDA Zone 13a)
10 years agoMaria Elena (Caribbean - USDA Zone 13a)
10 years agosucculentlife
10 years agoMaria Elena (Caribbean - USDA Zone 13a)
10 years ago
Related Stories

ARCHITECTURERoots of Style: Meet Your Traditional Home's Classical Ancestors
Traditional architecture's genes began in ancient Greece and Rome — discover your home's style forefathers here
Full Story
ARCHITECTURERoots of Style: Does Your House Have a Medieval Heritage?
Look to the Middle Ages to find where your home's steeply pitched roof, gables and more began
Full Story
FARMHOUSESHouzz Tour: German Tradition Deep in the Heart of Texas
Rooted in architecture from the 1800s, this award-winning home mixes history with the vernacular of today
Full Story
Sales Secrets for Interior Designers
Pro to pro: Learn 3 proven techniques to please clients and increase revenues, developed by a designer with 40 years of success
Full Story
HOUZZ TOURSHouzz Tour: Sweetness and Light in a Swedish Family Home
Generous doses of white make a bright background for energetic wallpaper patterns, splashes of bright color and playful accessories
Full Story
CONTEMPORARY HOMESHouzz Tour: A London Townhouse Lightens Up
A dramatic redesign of this multistory home transforms its dark 1970s-era interior into an all-white Scandinavian idyll
Full Story
DECORATING STYLES18 Ways to Bring English Country Charm Home
From topiaries and climbing roses to toile and tea, these design ideas can skew cozy casual or manor formal
Full Story
DECORATING GUIDESSay 'I Do' to Beautiful Wedding Memory Displays
You'll love and cherish these creative vignettes, artwork and more that keep the happiness of your special day at hand
Full Story
NATIVE PLANTS5 Ways to Keep Your Native Plant Garden Looking Good All Year
It’s all about planning ahead, using sustainable practices and accepting plants as living organisms
Full Story


cactusmcharris, interior BC Z4/5