


I spoke too soon...wasn't thinking clearly
caterwallin
17 years ago
Sort by:Oldest
Comments (18)
Related Stories
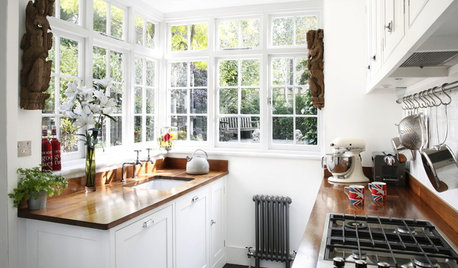
SMALL KITCHENS10 Things You Didn't Think Would Fit in a Small Kitchen
Don't assume you have to do without those windows, that island, a home office space, your prized collections or an eat-in nook
Full Story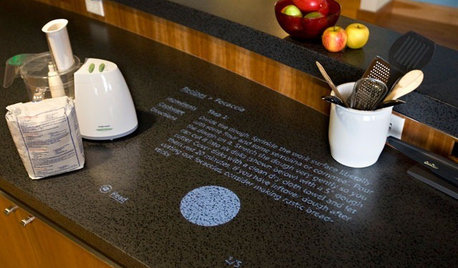
HOME TECHComing Soon: Turn Your Kitchen Counter Into a Touch Screen
Discover how touch projection technology might turn your tables and countertops into iPad-like devices — and sooner than you think
Full Story
DECLUTTERINGDecorate with Intention: Clutter Clearing 101
Fearlessly face disorganized areas to find the home of your dreams
Full Story
GREEN BUILDINGLet’s Clear Up Some Confusion About Solar Panels
Different panel types do different things. If you want solar energy for your home, get the basics here first
Full Story
DECLUTTERINGYour Clutter-Clearing Plan for the New Year
Tackle these tasks month by month for a decluttering strategy that will really pay off
Full Story
EVENTSNew Rug Designs You Can Expect to See Soon
This September, home professionals will gather at the New York International Carpet Show, where it’s all about floor decor
Full Story
DECORATING GUIDESPro to Pro: Learn Your Client’s Thinking Style
Knowing how someone thinks can help you determine the best way to conduct an interior design presentation
Full Story
ARCHITECTUREThink Like an Architect: How to Work With a Design Wish List
Build the home of your dreams by learning how to best communicate your vision to your architect
Full Story
DECORATING GUIDESHere's How to Steer Clear of 10 Top Design Don'ts
Get interiors that look professionally styled even if you're taking the DIY route, by avoiding these common mistakes
Full StorySponsored
More Discussions
sandwhy
rjj1
Related Discussions
Comtesse du Cayla: spoke too soon
Q
well i spoke too soon
Q
I think I may be carrying this imaginary friends thing too far.
Q
do you think I am too strict with my daughter?
Q
susanlynne48
caterwallinOriginal Author
susanlynne48
caterwallinOriginal Author
caterwallinOriginal Author
sandwhy
caterwallinOriginal Author
larry_gene
caterwallinOriginal Author
susanlynne48
caterwallinOriginal Author
caterwallinOriginal Author
susanlynne48
caterwallinOriginal Author
larry_gene
caterwallinOriginal Author