


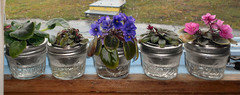
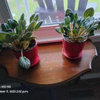
Mini Wick Pot Solution Found!
Robin
13 years ago
Featured Answer
Sort by:Oldest
Comments (90)

Bill
8 years ago
Rosie1949
8 years agoRelated Discussions
oyama pots vs wicking
Comments (2)Hi Andrew, I went back and reread your intro etc. I think the best thing you can do for your AV's is to lay off on the TLC. From what I read you are killing your plants with kindness and I want to second the suggestion that you should give your plants a rest. Personally I prefer wicking to Oyama pots. I have tried them and found that they are a pain to water. You have to lift each plant up and refill the reservoir up to a specific line. This plus the fact that they look awkward whcn showing them at a show. Plus they are expensive. I wick water all my av's using a standard mix of 1-1-1 proportions of pro mix B or commercial potting mix with equal parts of coarse vermiculite and coarse perlite. I don't add any dolomite lime or anything else. I've tossed in a handful of horticultural charcoal if I have it on hand but otherwise I keep it simple. My pots are all plastic andd are squat pots except that I use plastic 3oz. Solo cups for all my minis, semis and leaf starts. I use 4 ply acryllic yarn for wicking my standards and separate it into two strands for my minis and semis. My reservoirs are left over deli containers (pint size) with two holes cut in the lid, one for the wick and the other for filling. I try not to let the plants go dry as that promotes suckering and changes in culture that can lead to a culture break in the crown. I pot all my plants with a dry mix and set them into a sink to start the capillary action. I try not to leave them sitting in water for more than 30 minutes. From there they go to a reservoir which has been filled with a urea free fertilizer about half the recommended dosage and water. From there they go onto my plant stand to grow and recover from the repotting process. If the plant is new to my collection, I Isolate it for about 3 months. I know that sounds a bit extreme but it works for me. Just don't give up trying. This voice of experience and many others like me have all suffered setbacks till we found our own personal method of growing things. I know that I do a many strange things to my plants which contradict all the proper growing instructions I have read over the past 25+ years of growing. You can try numerous things with your plants but once you have found success it will be your unique way of growing. Just use good common sense when growing. HOpe this will help. Fred in NJ...See MoreSoil For Wicking in Oyama's
Comments (4)MGT - welcome back to the growing hobby! First - are you sure you got the smallest Oyama pots available for your minis? I think they have 2,5" pots too. I just looked at your pics and yes - your minis look overpotted. You can grow the smallest ones in your own contraptions - think about 3 oz plastic Solo cup with a wick sitting on a reservoir of the baby food jar. Anyway - have no idea what they sell in avplanters for soil - but i take 1:1:1 soil and add 1/3 of perlite to it. I used some Promix HP soil recently - seems it will work straight- it is very light. The way to prevent the rot- is to make sure the soil is never too wet. Since some of your AVs are overpotted - when you add water - do not feel it to the rim, use half of the maximum and make sure that the pot is getting light before you refill. Give it a chance to dry a bit, not to crisp, but to the stage when there some humidity in a soil , but not on a surface. The good part about Oyamas - you can give your AVs a treat of a fish emulsion solution every so often - and do not stink the house. Since you have not urea free fertilizer, it is a good idea to leach the pots every month or 2. A very weak solution of fish emulsion can be used for it. Next time get DynaGro or Optimara. Amazon is a very good place to buy, but they are not in business of growing violets, so their advice can be biased, and recommendations can come from people who are not well informed. Means - urea is not the end of the world - and using Shultz is better than using nothing. But using urea free stuff will give you slightly better results. Good Luck Irina...See MoreNew idea on wicking
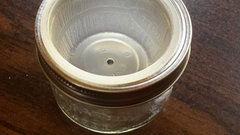
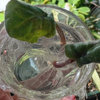
Comments (11)That is beautiful! Thanks for sharing! I love that idea. I found that some of those antique glass "tobacco cups" work splendid for a 2" pot. I'm using that for my baby standards... but I love the idea of the tealight holders! I've also been using some 1/2 pint canning jars for the baby standards... which also fits my 2" pots. You said that you use the 2.5 oz cups? how tall are they? I'm using the 2 oz ones, and they just seem a little shallow. In my photo post a while back I showed my plastic condiment cup reservoirs, and I was all excited because I thought that perhaps this would be a cheap alternative for the violets that weren't on display. But, for some reason, either my 2 oz condiment pots aren't draining properly, or there's not enough air getting to the drainage holes.. or SOMETHING. But all of my minis that were on those reservoirs were NOT happy...and the ones that were in the canning jar reservoirs were growing like mad, and no mold or anything in sight. so I ended up buying another 12 of those tiny canning jars. I am leaning toward only wick watering when on vacation... and just watering from the top while I'm around home. I discovered that my home tends to have a very high humidity percentage... even when we run two window AC units periodically. My bedroom - where I have my window shelves and the majority of my baby violets - is usually about 70% humidity, maybe dipping to 68% when the AC runs all night. My living room/dining room is about the same... and I'm wondering if that is why my violets aren't happy on constant reservoirs because the humidity tends to run high? I don't know. :) Anyhow! Sorry - that was a huge ramble!...See MoreBest practices in wicking: still confused!
Comments (27)Oh thanks Joanne! And Begonia I also enjoyed reading what I call "the back story!" It is interesting to read these things. But I think you are doing a little better than you realize with your plants. You have reached out for information and that is the first step. We are here to help you achieve your goal---nice plants! Like all of us,,,,,you are impatient for that spectacular flush of bloom time after time. Hey we all want that. BUT that is not the reality. I think you are finding that out if you take these posts seriously. And I think you are. Start out slooooooow. Get all the knowledge you can. Love those plants and forgive them for not being picture perfect. Remember, when you bought them they were not lovingly hand raised (the way you and I do from leaves), t hey started out on a production line and finished in a dark box on the way to the store and unpacked and plopped on the shelf. Then you and I found them. Now they have to readjust and regroup to get on a normal growing schedule and THERE is where we say "oh that is not the bloom it had when I bought it". That could be true. But this poor plant has to reschedule itself. Like an adopted dog from the pound. He doesn't know the rules of your house. He has to regroup and adapt. I think your plants will do well, keep posting, keep asking, and keep growing! It will all make sense one day! I call that my "AHA moment"! I have them frequently! You will also! Here is something no one has brought up yet about blooms. I am starting with a leaf so I can explain it correctly. Plant a leaf, pot the baby, it starts to grow. It puts out leaves in a rosette pattern. When the time is right (based on fertilizer, care, etc) flower buds form under the TOP set of leaves. (remember this is a very young violet putting up its first blooms.) Fast forward. Flowers now die, you trim off flower stalks. Plant is still putting out leaf rosettes. More flower buds are forming. POINT! flowers will never again form where the first flowers came from. Under that first set of leaves. NEVER AGAIN. 2nd set of flowers are forming under that NEXT set of leaves! And they bloom and as that is happening leaves continue to form and,,,,,,,,, POINT! flowers will never again form where the second flowers came from. Under that second set of leaves. NEVER AGAIN. 3rd set of flowers are forming under the NEXT set of leaves! And the process goes on and on and on. I wanted you to know this blooming process because eventually if you never take off outer leaves or don't turn your violets every so often so they don't "lean" or reach toward the window or center of the light tubes your violet will keep growing UPward and you will suddenly find yourself with a possibly necky plant. (topic for another thread!) That is why we eventually trim off the outer leaves (and of course plant them) which gives the next set of leaves a way to have room to flatten and be the "first row". And light gets way in there. And more blooms come! But never will flowers ever form again from the same "row" they were in prior. I hope I explained this correctly. Kinda like where to babies come from? Well now you know where do flowers come from? Hope I didn't confuse you with all of this. Rosie...See More
westerly pacific
8 years ago PRO
PROMona Mathews
8 years agoirina_co
8 years agoRosie1949
8 years agoirina_co
8 years ago
bragu_DSM 5
8 years agolast modified: 8 years agoirina_co
8 years agoRosie1949
8 years agoJulia (1meanmop)
8 years agoirina_co
8 years agoRosie1949
8 years agoirina_co
8 years agoRosie1949
8 years agoirina_co
8 years agoRosie1949
8 years ago
AnneCecilia z5 MI
8 years agoirina_co
8 years agoRosie1949
8 years agolast modified: 8 years agoirina_co
8 years agolfs222
7 years ago
bttrflii
7 years agoirina_co
7 years agobragu_DSM 5
7 years agoKim
7 years agolast modified: 7 years ago
Karen Shirley
7 years agoRosie1949
7 years agoskysong4
7 years agolast modified: 7 years ago
Robin
7 years agoKaren Shirley
7 years agoskysong4
7 years agoskysong4
7 years agoKaren Shirley
7 years agoskysong4
7 years agohappystamps
6 years agoskysong4
6 years agoRosie1949
6 years agohappystamps
6 years agoRosie1949
6 years agohappystamps
6 years agoRosie1949
6 years agohappystamps
6 years ago
joyfulsu
6 years agoRosie1949
6 years ago
Andrei Scherbak
5 years agoirina_co
5 years agoAndrei Scherbak
5 years agoRosie1949
5 years agoirina_co
5 years ago


Related Stories

FUN HOUZZGardening Happiness Found ... in Potholes
Imperfections in roads and sidewalks become miniature works of art — and unlikely sources of joy — at the hands of a London gardener
Full Story
ORGANIZINGOutside the Box: 18 Unconventional Storage Solutions
You might never think to use household standards in creative ways like these, but you’ll be glad we did
Full Story
KITCHEN DESIGN9 Popular Stovetop Options — Plus Tips for Choosing the Right One
Pick a stovetop that fits your lifestyle and your kitchen style with this mini guide that covers all the basics
Full Story
GARDENING GUIDESHow to Keep Your Citrus Trees Well Fed and Healthy
Ripe for some citrus fertilizer know-how? This mini guide will help your lemon, orange and grapefruit trees flourish
Full Story
KITCHEN DESIGNPopular Cabinet Door Styles for Kitchens of All Kinds
Let our mini guide help you choose the right kitchen door style
Full Story
LIFEA Quick Downsizing Quiz for the Undecided
On the fence about downsizing? We help you decide whether that fencing should encircle a mansion or a mini trailer
Full Story
HEALTHY HOME18 Ways to Allergy-Proof Your Home
If you're itching to reduce allergy symptoms, this mini guide to reducing allergens around the house can help
Full Story
THE HARDWORKING HOMEMake the Most of Your Window Wall
The Hardworking Home: Put that area under your window to work as a mini library, a crash pad, a workspace, storage and more
Full Story
KITCHEN DESIGNCreate Your Own Checklist for a Well-Stocked Kitchen
Personalize the kitchen with your own must-haves from our list of top cooking tools, small appliances, pots, pans and more
Full Story
FARM YOUR YARDHow to Grow Vegetables in Containers
Get glorious vegetables and fruits on your patio with a pro’s guidance — including his personal recipe for potting mix
Full StorySponsored
More Discussions

RobinOriginal Author