


General craftsman tiller gearbox question.
bliackbeard
17 years ago
Featured Answer
Sort by:Oldest
Comments (50)

bill_kapaun
17 years agobliackbeard
17 years agoRelated Discussions
Craftsman mowers... why all the hate?
Comments (20)"Personally, I think the dislike of Craftsman equipment is based upon the total image of Sears. They sell about anything you can imagine, and I'll bet everyone has bought 'something' from Sears that they were not happy with, so they associate the word 'junk' to all of Sears merchandise." That association is well deserved. Craftsman used to make many quality products. They are now strictly a value line (even most of their "Professional" series), but their regular prices usually don't reflect that. Their sale prices are closer to what the products are actually worth, and often you can find their products under the product manufacturer name brand for significantly less. Ryobi is a good example of that. A Craftsman mower not on sale is probably overpriced, and people will think they are getting better quality than they actually are. I despise these sales tactics Sears uses, so I usually avoid buying anything from them. I prefer to buy quality products that will last 15-20 years from locally-owned dealers who can service what they sell. In the long run, I feel that is more cost effective, better for my local economy, creates less trash, and the equipment is more enjoyable to use. I had a Yardman mower, it only lasted about 6 years before falling apart and really just does not compare at all to my new Toro in terms of performance or quality. I am much happier mowing now. Happier being a relative term of course ;) I'll never buy another cheap mower. All Craftsmans are not necessarly junk, and a good deal is still a good deal provided you know exactly what you are buying. But if you can afford it, I feel a quality mower is a good investment. I do own some Craftsman tools. But I didn't pay anywhere near full price for them. For $120, and considering you don't expect it to last 15 years, I don't really see why you shouldn't think you got a good deal. People who try to claim Craftsman is just as good as the premiums mowers are a different issue....See MoreBig thanks to this site Sears reartine tiller
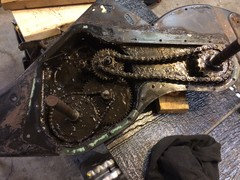
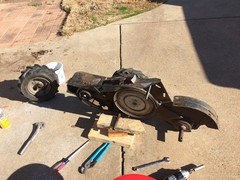
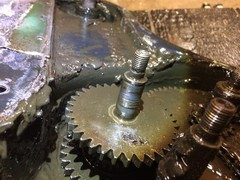
Comments (13)That tear down isn't so bad, if you believe in blank stickers or taped on notes. Seriously. If you just tape a note to each screw, bundle like screws together and don't mind drawing crude schematics, it's not all that bad. I've been on a mission for some time, to not let guys get ripped off on that deal with Sears. But,,, the pictures weren't taken until most of the tear down was complete. They will show you the tranny disassembly process and that's the most important part. Tiller comes apart by 'section' (think factory assembly floor ) and you just need to type notes and small drawings of every single thing you take off. You'll start on all cables and those have to be drawn as to the correct re assembly, there's a particular 'grip clip' midway up the handle and it has a couple grated clamps, and is vital that it be put back where it started, so that's one you give special attention to, placing electrical tape on the cable for later hook up ( all this advice is for not, if you have a good owner's manual or service manual ) At the carb, same thing, firmly placed tape will save hours, again and again. Even the front weight 'axle' has a particular system of it's own, take a bolt off, draw it, tape drawing to any space of frame where it won't get scrapped off later. Everything comes off and though that seems daunting, it isn't. One thing at a time, drawing, then tape drawing. Cables are off. Whole handle comes off. Then, pull wheels, weights and engine, with the intervening pully cover and pully being of utmost importance, especially the 'key' so involved there, that it has to go back right. It's real easy if you draw as you go, even if you have a manual, I wouldn't do it any other way. So, look at that pully cover and pully real close. Keeper 'ring clip' has to go back, of course. I guess I'm just saying that unless you do it for a living, this is one where you better take intricate notes, or you'll have a pile of junk. With emphasis that if you do notes and tape them around, even drawing a decent bolt pattern for the main tranny housing, with the exact number of holes for exact number of bolts, you will find this a cakewalk. If you plan to 'remember things', take it to the scrap yard and buy a new one. When you're down to the tranny, with the axles sticking through, the real surprise is that everything stays in one place, since the central axles are fixed to one side of the tranny's housing, from inside. Lot of guys tried pounding them out, but it's not that way, you spread the housing apart and one side slides up the axles and you can raise it pretty high for visual. So, one side of the housing, up on wood blocks, so the few inches of axle extending out don't touch the table below, but rest a half inch or so above the table, with the housing resting on the blocks. So, you removed the main bolts and now you're going to spread the housing apart. Flat head screwdriver, fitted in the crease and you pry around the seam and it'll slide upward. What you're looking for is the 'gravity gear' ( my name for it, they used a lot of them on old farm equipment which I seem to live inside of). It's dead center below the actuating arm hook from your shift lever, where it meets the center top of the housing. You know, the arm that would bend if you tried to shift any harder. Sear's contractor used passable gasket but was too cheap to add a little RTV goop to finish the job. So, you won't need a new gasket, I tried not to tear it too much and just laid it back together later, with the new addition of a dollars worth of RTV on the rim. Point is, if you look at the machine before you take it apart, the thing sits so it creates a 'pool', directly above the internal shift mechanism, that 'low spot' is right above an internal sliding 'gravity gear' which of course, gives all forward, reverse and the rest. Guys broke bolts, bent steel rod arms, snapped handles, you name it. Understandable really, the directions tell a guy to 'adjust, adjust, adjust'. Okay, you're spreading the housing and you have notes taped everywhere and since it's a $600 plus machine, it's worth every cent, if not just principle alone. Your goal is the gravity gear and you won't miss it, since it will be what looks like a hopelessly rusted mass. It's not. But it's to be respected, since yes, you can remove it just by lifting it out. But don't. DRAW it. Draw it first and do not turn it upside down, don't turn it around, just be very careful of 'top' versus 'bottom'. Because it will and can, go back together wrong, it will reassemble upside down if you want it to. If you do that, you will 'bench test' it and it will work fine on the bench. It will shift, wheels will turn, you'll think you have it. You'll put it back together and fire it up, but standing upright now, it will be the same. I'll just say, that at this critical juncture, if top from bottom has gotten away from you, the only way to know is process of elimination, that is, risk it backwards and then tear the whole machine down again. You'll likely find red grease, rusty looking, just leave it, there's no internal hydraulics anyway and no internal pressure. I mean if you want to dig the grease out and change it fine, I just stirred mine up. It doesn't get heated to burn level, ever and I can't go dumping old still workable never heated grease out of the machines I repair, it's just too costly. The 'Gravity Gear'. It's rusted. I used an equal mix of WD 40 and Brake Fluid and some cheap rust loosener fluids you get at bargain stores. Soaked the thing for three days. Tapping, very lightly, several times a day. Guy could just order the gear, I suppose and save this step. After three days, it just decided to fall loose and yes it's real obvious once it starts to move, but it most certainly does. Then, you slide the center pin out and sand and sand and sand. Use light sand paper, be patient and once it's smooth as porcelain, you put it back in. If you aren't a patient type guy, just fork over the cash for a new gear. Because if you don't make it real smooth it will hang up and same problem, these type gears need to be very 'fluid', very smooth, Mine, though visibly pitted, smoothed out just fine and the tiller is brand new, runs and tills great. here is the links. http://tinypic.com/r/25ann09/5 [IMG]http://i41.tinypic.com/25ann09.jpg[/IMG] http://i41.tinypic.com/25ann09.jpg Here is a link that might be useful: tinypic tiller pictures....See MoreHelp with Tractor and Tiller for Community Pumpkin Patch
Comments (12)I would "echo" the previous comments about JD or Kubota, you've got the $$ don't buy cheap!! Sears is good for the ''weekend" gardener, not "commercial," which from your description you are. About "extended warranties," I'm sure the "kid" who sells you this will sell you the warranty, the first time you have a service call and the tech sees you're using it "commercially....." e.g. Most warranties have comments like "2 years residential, 30 days commercial." You might ask wherever you end up buying. The links to the sears site show a "reasonable" Garden Tractor and would probably hold up just dragging a tiller at "cultivate" mode which is the shallowest depth setting. The tiller on the other hand is a belt drive and IMHO would not last routinely being used on a two acre plot. Don't know if Sears offers extended warranties on "non powered" equipment? Being old, cranky, and opinionated, (not necessarily in that order :-) ) I still think a good rear tine tiller would work well. Actually buy two since you have $$ and volunteers. I have a rear tine MTD which I've used for 11 years for soil prep and cultivating in a 50 X 70 garden. In that time, other than air filters, plugs, and oil changes have done nothing to it at all. I don't consider that a "good" tiller, but "adequate" for the price point. In "tines forward and depth gauge at 1" it gets rid of weeds and moves right along. If you really want the sears unit, go to www. my tractor forum . com have to spread it out like that as these two sites don't like each other. Look for the Sears or Craftsman forum and post your question including the links. You'll get responses from folks who actually have these units and can provide input based on "seat time." Let us know what you end up getting and why. Good luck, Ev...See MoreStihl MM55 mini-tiller or Mantis??
Comments (37)As many seem to be doing, I am weighing whether to purchase the Stihl MM55 tiller or a Mantis. My online research has revealed the opinion on the various blogs and message boards to be that the Stihl is a good tool and comparable in performance and quality to the Mantis in most every way. Opinions vary from person to person, but adjusting for this, the two seem to be in a statistical dead heat. However, I have noticed something which I feel may be the fatal flaw of the Stihl. Whether in Facebook video clips, or even in the demo video clips on the official sites of both brands, it looks like the Stihl just doesn?t dig down anywhere near as far as the Mantis. In the multiple clips I have viewed, rarely is the Stihl to be seen in up to the "axle"; that is, the rotational axis of the tines; but the Mantis can often be seen buried right up to the fender. Hence, the Stihl seems to only be providing half or less of the tilling depth on average as does the Mantis. Has anyone else noticed this? I have a theory as to why this tilling depth disparity exists? The in-line configuration of the Stihl; i.e., the engine being between the operator and the tines; combined with the design of the handlebars, which induce the operator to lean forward or hunch over, results in the tiller being held at a severe angle to the ground. If you envision the thing laying on the ground and call this "zero degrees" and imagine it standing perfectly vertical and call this "ninety degrees" it appears that in most Facebook clips of the tool in use and even the demo video clip on the official Stihl site the tiller is usually only 20-30 degrees from horizontal. I am not a physicist or a degreed engineer, but I have to believe this takes a lot of the Stihl?s weight off the tines and forces the operator to carry it. After all, the engine is between the end supported by the ground and the end supported by the operator, thus, the operator has to be carrying some of it. The closer to horizontal the tool is held the more weight is carried by the operator. For a nominally 20 pound tool, I would not be surprised if only 12 pounds or so was working to push the tines down into the ground. By contrast the configuration of the Mantis puts nearly all of its 20 pounds above the tines. I suspect the operator of the Mantis carries none of its weight, but rather only holds it up in operating position. This then accounts for the greater tilling depth I see the Mantis achieving. Any physicists out there care to comment?...See Morebliackbeard
17 years agobill_kapaun
17 years agobliackbeard
17 years agobill_kapaun
17 years agobliackbeard
17 years agobill_kapaun
17 years agobliackbeard
17 years agobill_kapaun
17 years agohosss
17 years agomissionary
17 years agocontrols1
17 years agomhilbig_netzero_net
16 years agosouthgoldhill
15 years agothefew-brave-andbald
15 years agobuckelliott007_comcast_net
13 years agomla2ofus
13 years agorustyj14
13 years agoCalifornia4060_aol_com
13 years agooutwest_yahoo_com
13 years agomla2ofus
13 years agoslowpoke_gardener
13 years agosydvway_aol_com
12 years agomla2ofus
12 years agojaroslaw
12 years agomla2ofus
12 years agojaroslaw
12 years agojaroslaw
12 years agorustyj14
12 years agocboneill
12 years agoslowpoke_gardener
12 years agologer_gw
12 years agocboneill
12 years agoslowpoke_gardener
12 years agojgb605
11 years agopastro
10 years ago
lindamarie
9 years agothe_0utsider
9 years ago
John Obeidin
9 years agojmccord1010
8 years agorustyj14
8 years agoJohn Obeidin
7 years agoJohn Obeidin
7 years agoJohn Obeidin
7 years agoJohn Obeidin
7 years agoJohn Obeidin
7 years agoJohn Obeidin
7 years agoHU-320583090
2 years ago


Related Stories

REMODELING GUIDES8 Lessons on Renovating a House from Someone Who's Living It
So you think DIY remodeling is going to be fun? Here is one homeowner's list of what you may be getting yourself into
Full Story
rdarrah32