


Need tip help for drilling china cups, etc.
jitterbug4756
14 years ago
Featured Answer
Sort by:Oldest
Comments (13)

grandmathyme
14 years ago
dcarch7 d c f l a s h 7 @ y a h o o . c o m
14 years agoRelated Discussions
Neglected Schefflera in need of some help (prune/repot/etc)
Comments (30)Hello again everyone, I have completed my repotting and would like to share a couple pictures. Here's a pic of the roots; as you can see the spiraling of the roots had this guy very pot bound (I was shocked to see so few roots overall however): Here's the finished plant: So I removed the plant from it's old pot and got to chopsticking. The dirt removed easily and was definitely very powdery (seemed like pretty much 100% peat moss and very fine). After working all of the old substrate out I washed the roots gently to remove anything trapped. Then I trimmed the roots, and applied a thin coat of rooting hormone to the cut root ends. I mixed a 25/75 orchid mix/ OilDri substrate, put a thin layer of this in the pot, made a little mound of substrate at the center (after finishing I wish I would have made it a bit higher in the center), and then proceeded to add the rest and work it around well. Then I gently submerged the pot in water for 10-15 minutes, then let it drain. As you can see in the final pic I have a weight on the opposite side that the plant is leaning. While it wasn't going to fall on it's own, I decided that since I didn't anchor the plant I'll just keep a bit of weight on this side for a couple weeks until I'm confident new roots have formed to firmly hold the plant. I hadn't originally planned to have the plant tilted, but the combination of that and my pruning has it a bit less balanced than I would like. In the future I would have anchored the roots, but live and learn. :) Thanks again everyone for your help and advice, and I'll report back to this post in a couple of weeks, hopefully with good results and 3 new plants to be trained as actual bonsai from the cuttings!...See MoreNew USA quality drill bits challenged drilling China's Steel
Comments (35)Loger: No flack intended just general information. We all have to learn somewhere. I still remember my 1st welding experience , during my Diesel Apprenticship in the early 60.s . It was Gas torch fusion welding back then with appropriate filler rod. My bib tops had more filler rod tip burn holes then a sprinkler hose . Baymee should remember this trial and tribulation during his learning stages . My second Welding upgrading was during my College upgrading during my Stationary Engineering 3rd Class Degree. We used 550 volt 3- phase Lincoln Industrial Welder in the early 70,s and it was required to weld 8 inch x 8 inch test coupons from 1/4 inch hot rolled steel plate in position. 2 complete 8 pass welds in all 4-positions (flat / horizontal / vertical / overhead) I really had a problem initially in horizontal position with undercutting the weld from to hot a heat setting . Most beginners have trouble with adequate penetration in overhead from to cold of a setting. Once completed we cut the coupon into 4 separate strips (vertical band saw) and bent them into a U within a hydraulic bender . If any of the welds cracked we flunked our CWB Exam. My second testing was again Stick welding during my Pressure Vessel Certification U-69 we were required to fabricate a 4 inch x 4 inch x 1/2 inch metal box from 1/8 plate complete with a 1/4 inch weldolet coupling. Once the fabrication was done the box was pressurized 600 psi until it ballooned and then was submerged in water to check for any weld failures (bubbles) identified and again you failed this 1st phase of testing . Before you even got into the Boiler Pipe Weld testing . So yeah have burnt a few sticks of Rod in my Day . Really liked 5/32 Jet Rod , lazy Welders Rod only for flat position welding . Hated Low Hydrogen nasty flux fumes very hazardous. Anyhow been a few yrs since I stick welded , most of my projects are with a Miller Mig these days. Like riding a bicycle you never forget but it will take some practice to get quality welds after a few yrs absence. I remember some of the best welders I worked with during my Industrial Days were the laziest , they could weld on their head once they found a comfortable position. Please take our advice in the fashion (constructive) it is intended all the best Bro :) This post was edited by ewalk on Mon, Oct 14, 13 at 20:06...See MoreHow do you dry your tupperware/sippy cups/etc?
Comments (8)I've got 4 soon to be 5 kids so we have lots of plastics around here. I can't imagine not having the heated dry function on my dw. I run it twice a day a lot of times so I would find it annoying if I had to wait for everything to dry. That being said some of the plastic stuff does still need to air dry a bit and I just stack it on the counter for a while. Is it an elegant solution? No, but my life with young kids isn't very elegant right now so I'm not too concerned. I do have a cabinet to put water bottles in to dry with their lids off though and in my new kitchen there is a deep drawer dedicated to tupperware type stuff and another for water bottles. As far as the heated dry function warping plastics, ours doesn't seem to hurt the plastic stuff if I put it on the top shelf. The ziploc throwaway type food containers I do wash by hand though because they do warp in the wash but that's the only thing I wash by hand....See MoreNeed help with bulk dried foods, tomato, etc...
Comments (16)Here are some hints/tips for using freeze-dried foods.... 1. You can eat it as-is, but make sure you drink extra water. 2. Hydrate it with less water than you think. I like to cover the bowl with a plate to keep the steam in when rehydrating vegetables. Fragile food (fruit and cheese) place in a bag or bowl and spritz with water. Place in refrigerator and stir every few minutes. Rehydrate cheese (by spritzing with water) and let it sit in refrigerator overnight before eating/using (and yes, it will melt on your pizza ;-). Spritz/add only "enough" water - NO puddle of water in the bottom of bowl. Pour any extra water off before it's fully rehydrated. 3. You don't always need to hydrate first.... Rule: If it's covered with liquid at least 15-minutes how it's used in the recipe, don't hydrate first. Just add 2-4 T. extra water for every cup of freeze-dried food. 4. If you are using freeze-dried meat, DON'T overcook it. Hydrate in warm or cold water and then add to what you are cooking. If making chicken salad, don't add much water at all to rehydrate because you also add mayo. 5. Antioxidant phytochemicals found in the fruits' fresh state are retained at levels almost as high after freeze-dried. 6. A #10 can = 10-20 pounds of produce - depending on type. 7. At camp, when you heat water be sure to heat enough to fill a Thermos or two. You will have "instant" hot water for rehydrating freeze-dried foods. If you take several Thermos bottles, you can also "cook" in them. http://www.thermoscooking.com/ ____________________ Tomato powder: Storage: Place in small jars (user-friendly amounts) with airtight lids. Store in-use jars in the refrigerator, which is a dry environment due to the frost-free feature. Don't leave the container open any longer than what it takes to take out a measured amount. I also place moisture-absorbing packets in the top to help prevent clumping. Even a folded white paper towel placed on the top of the tomato powder will help absorb moisture. If the tomato powder begins to clump, you can grate it on a grater or microplane to make a powder again. Tomato powder has an indefinite shelf-life, when properly stored. Quick Pizza Sauce (for 12" pizza) 1 T. tomato powder 3-4 T. hot water (it will mix with cold water, as well, but you will get a better consistency with hot) Italian or Pizza seasonings to taste "shot" of vinegar sweetener of choice, to taste (optional) pinch of salt Mix together. Allow to sit for a minute or two to absorb the liquid. Mix again and add more water if it's too thick. ~~~~~ For 1/2 c. tomato sauce: Mix 1/8 c. (2 T.) + 1/2 c. water ~~~~~ For tomato juice: Mix 3/4 c. powder + 8 cups of water = 64 oz. bottle of tomato juice. You can make it as thick/thin as you like. Add some Fruit Fresh and a dash of salt (also Tabasco and/or Worcestershire). ~~~~~ THRIVE Spaghetti Sauce 1/2 c. THRIVE tomato powder 1-1/2 c. water 1 t. salt 1 t. garlic powder 1 t. basil (dried) 1 t. Italian Seasoning 1/2 t. pepper pinch of sugar 1/8 t. baking soda Combine tomato powder and water in a medium sized bowl. Once mixed, add in dry ingredients with the baking soda last. Add the baking soda to reduce the acidity of the tomatoes. If you like the more "crisp" taste you can omit the baking soda. Don't worry about the sauce foaming or getting lighter when you add the baking soda, it will settle down....See More
Marlene Kindred
14 years agonmgirl
14 years agojitterbug4756
14 years agodcarch7 d c f l a s h 7 @ y a h o o . c o m
14 years agoflowers12
11 years agopetalstx
11 years agoflowers12
11 years agotoxcrusadr
11 years agoluvidaho_2010
11 years agopetalstx
11 years ago

Related Stories

MOVINGRelocating Help: 8 Tips for a Happier Long-Distance Move
Trash bags, houseplants and a good cry all have their role when it comes to this major life change
Full Story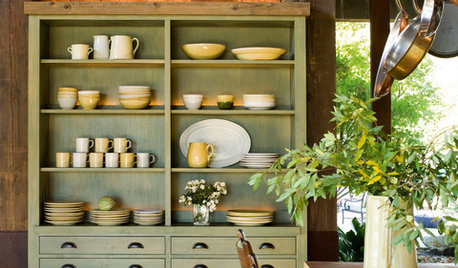
DINING ROOMSHow to Organize and Style Your China Hutch
Whether you reserve your cabinet for your good china or stock it with everyday tableware, here are ideas for arranging it
Full Story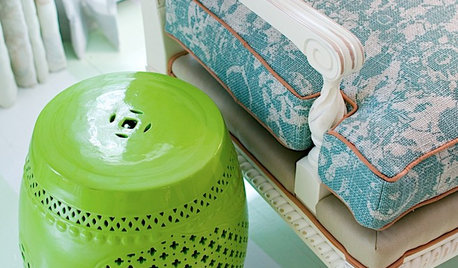
DECORATING GUIDESThe Most Helpful Furniture Piece You May Ever Own
Use it as a table, a seat, a display space, a footrest ... and indoors or out. Meet the ever-versatile Chinese garden stool
Full Story
MOST POPULAR7 Ways to Design Your Kitchen to Help You Lose Weight
In his new book, Slim by Design, eating-behavior expert Brian Wansink shows us how to get our kitchens working better
Full Story
ORGANIZING21 Tips for Organizing Your Stuff
Restore order at home with these ideas for tidying up cupboards, shelves, doors and more
Full Story
KITCHEN DESIGNHere's Help for Your Next Appliance Shopping Trip
It may be time to think about your appliances in a new way. These guides can help you set up your kitchen for how you like to cook
Full Story
PETS6 Ways to Help Your Dog and Landscape Play Nicely Together
Keep your prized plantings intact and your dog happy too, with this wisdom from an expert gardener and dog guardian
Full Story
DIY PROJECTSCreate a Pretty Jewelry Stand From Vintage China
Give treasured dishes new life as a beautiful jewelry stand with this DIY project
Full Story
ORGANIZINGDo It for the Kids! A Few Routines Help a Home Run More Smoothly
Not a Naturally Organized person? These tips can help you tackle the onslaught of papers, meals, laundry — and even help you find your keys
Full Story
HOUSEKEEPINGWhen You Need Real Housekeeping Help
Which is scarier, Lifetime's 'Devious Maids' show or that area behind the toilet? If the toilet wins, you'll need these tips
Full StoryMore Discussions
lindasewandsew