


Maax Utile system review?
Stephanie
7 years ago
Featured Answer
Sort by:Oldest
Comments (109)

Simon Uden
5 years ago
Dennis
5 years agolast modified: 5 years agoRelated Discussions
Air Tub Reviews?
Comments (67)I recommend against the Kohler Underscore Bubblemassage acrylic bathtub. My experience indicates Kohler has a high defect rate with these tubs. I've had *three* 60" x 36" Underscore jetted tubs sent to me in a 2-1/2 month span and ALL have been defective. The first and third tubs leaked. The first tub leaked heavily in at least six places, despite the shipping box and the tub itself appearing pristine. The third-party repair company Kohler sent could not fix all the leaks. Kohler explained this as a "rare" defect in "channels" within the tub, a flaw that cannot be caught through mere visual inspection. Apparently, the flaw also does not show up in Kohler's quality control checks at the factory. Kohler said this happens because the factory fills and drains each tub within minutes, and sometimes it takes hours for these leaks to appear. The second tub Kohler sent me was so poorly packaged that it arrived scratched and with interior stains. The distributor said that was a common occurrence with Kohler's "express ship" program, that they don't spend the time to package the tub in the typical way. The third tub also leaked, this time through a factory-installed tube connecting the body of the tub to the air jet motor. I am awaiting a Kohler-appointed repair person to come out a fix it. We hope the defect can be corrected so I don't have to pay for installation a third time. Each time I call, Kohler's representatives reassure me these defects are "rare" and they apologize for the inconvenience. Inconvenience aside -- my bathroom project has gone from a 3-week timeline to a 3-month timeline because of the delays incurred by waiting for replacement bathtubs -- the cost of ripping out and disposing of the first defective tub and reinstalling yet another defective tub has *almost doubled* my costs for this bathtub. Kohler has paid for the replacement tub and shipping, but that does not approach the personal cost of these delays. Kohler claims defects in this tub are rare, but I've had 3 delivered to my home, and my experience indicates their defect rate is 100%. Furthermore, Kohler's people, while polite and apologetic, have done NOTHING to expedite either the attempted repairs or the shipping of replacement tubs. This is what is most unacceptable: I understand that mistakes happen. No manufacturing process is perfect. But Kohler's customer service has been equally disappointing: lengthy remediation processes with no follow up, empty apologies with no expedited assistance and all costs borne by me. The tub looks beautiful, but I wish I never bought it. So much trouble....See MoreUtile by Maax
Comments (2)haven't used utile, just like the look of it when I looked in stores. I HATE grout, fixing broken tiles, and love how easy it looks to maintain! We ended up going with Avonite solid surface walls for our shower as utile didn't come in long enough sections for our shower....See MoreMAAX uTile Product Quality and Installation
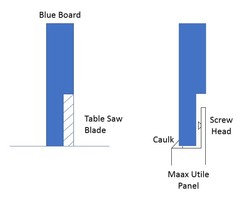
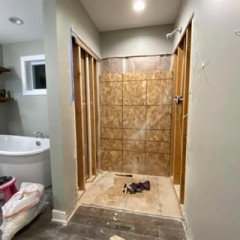
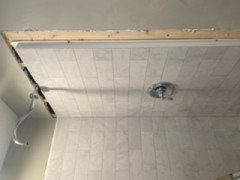
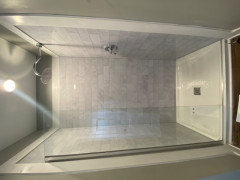
Comments (0)We recently added a MAAX uTile shower system to an existing basement 1/2 bathroom. Below is a detailed review of our experience. We are pretty experienced DIY’ers, have previously completed remodeled a bathroom down to studs including 80% new plumbing and electrical, and have many other framing, plumbing, electrical, and cabinetry projects within our experience. For this project, we were looking to “go fast and limit cost” in adding the new shower. uTile seemed a good solution to us: the system has only three main components to install: a shower base/pan; the uTile walls; and, a shower door. a minimum number of pieces should equal a fast installation consistency of manufacture should ensure relatively good quality the product was available at basically “all” the major big-box home improvement stores, lending it some credibility MAAX is generally recognized as a mid-tier quality company, so pretty safe to deploy. Our only hesitation: reviews of the product were mixed. Still, there was not a lot of fear-mongering about the product. Frankly, there was generally less information on the internet than we expected to find, except for MAAX’s own promotion. The team at Menards (where we purchased) was positive about the product line, so we proceeded with our plan. Before you continue to read, here’s the punchline: The project turned out to be NOT fast, NOT easy, and NOT particularly low cost, though we probably did complete at about 25% lower product cost than a traditional tile shower installation. There was no savings on time - we likely spent more time than on a traditional shower install. We would NOT recommend this product except in very specific circumstances. Our experience with a MAAX UTile installation was quite frustrating, though we eventually completed the project and all seems watertight for now, but we are not confident in long-term performance of the system. Now, our story and the gory details: DELIVERY AND QUALITY Product delivery was difficult. We ordered through Menards, with a 6 week delivery promise. The order was delayed by an additional 6 weeks (to 12 weeks). The Menards team helped, providing an in-stock, same model shower base ahead of the delivery, to keep our overall basement renovation job moving. When the order did arrive, a wall was missing (a MAAX delivery error). Menards worked diligently to expedite the missing piece. When the last wall arrived (an additional 2+ weeks delay) and we brought the boxes home, we discovered one wall had a surface crack and each wall had some cosmetic defect. MAAX tech support offered good support in this moment: they collected our damage report and quickly shipped a replacement for the cracked wall (we decided to work around the other cosmetic issues). Quickly = add another week of delay. Total delivery time: 15 weeks. Unfortunately, quality was challenging beyond the walls. The base, an Olympia model base, is built by gluing a molded plastic floor to a styrofoam, formed under-layer. The system as-manufactured SQUEAKED when stepped on. We had to evaluate if this was caused by a non-level floor issue (no), related to movement before the system was permanently secured (no), or something else. We determined the problem was between the surface and styrofoam layers, where the two surfaces rubbed together. This may be because the layers were not glued together well, or may just be a bad design: weight on the base’s surface creates friction between the layers which creates squeaking. With some research and good advice from the internet, we resolved this by pouring real talcum powder in the poorly-glued gap between the layers, completely around the base edge - no more squeaking! We hope this will be a lasting fix. A note: you need real talcum powder, not baby powder - talc is bad for babies and ladies, and thus is no longer used in baby powder, but it was needed for this part of this project. Baby powder is now a corn-sugar-based product, this has many potential problems. INSTALLATION MAAX indicates that the uTile system should be installed within an effectively perfect space - level and plumb in all (specific) dimensions except floor-to-ceiling height. Two “buts”: the instructions are not perfectly clear on how the pieces must install relative to the space, and the actual product quality does not match the demand for space construction quality. This created a cascade of problems for us. Shower base location - We placed the shower base prior to the walls arriving, including setting the drain pipe location. We followed the very specific instructions for a uTile installation (which are different to the shower base’s standard instructions). These say, absolutely, “Install the base pushing it completely against the studs” (page 7, step 2). Um, NOT true, as we only found out later, after the plumbing was set. Setting the back of the shower base completely against the studs creates a later problem with alignment of the uTile shower walls with the front edge of the shower base. We were completely screwed on this one, I’m afraid, since we installed before testing fitting everything (due to delivery delays). We ended up with about a 1/4” overhang of wall beyond the edge of the shower pan. It doesn’t look terrible, but it is not right. You WILL need to shim the shower pan off the back wall by about 1/4” to get perfect alignment on the front edges. This is a significant error in the install instructions. Installing the walls - As we placed the walls, in our nearly-but-probably-not-perfect opening, we encountered what seemed to be odd panel alignment issues. We noted different-sized gaps on the back wall between the top and bottom of both the right and left sides of the wall; in testing fitting all the wall panels, this created an exaggerated gap in both corners where the wall panels met, and seemed to pull the front edge of the side walls away from the studs. We checked our level and plumb on all walls, they were good (we only expected minor shimming). A bit of evaluation revealed that the back wall was slightly warped in the middle, by about 1/4”, from the center to the bottom of the wall. With no way to attach the center and bottom of the wall to the studs behind, we resolved this, as best we could, by attaching the back wall to the side studs about 6” from the bottom of the studs on both sides of the panel - an action definitely not in the instructions, which do not call for any screws-to-studs on the sides of the back wall. This resolved the warping problem enough that the corner gaps mostly closed up, and the side walls mostly squared up and touching their framing studs. We proceeding to “permanently” install the walls, per installation instructions, and sealed up the corners. Installing the corner shelves - This task seemed so simple, but was in fact a challenge. The walls must be completely square for the shelves to fit relative to the shelf mounting template. We used the template. I expected there would be some allowance for adjustment in the alignment of the shelves. I was wrong - no play here at all. With slightly imperfect wall square, the screw openings to attach the shelves to the shelf mounts were off by 1/16” and could not be adjusted, so would not install. The mounts were already in, so I had to make the shelves work! I dealt with this by cutting off the bottom of one of the two screw sleeve fittings for each shelf, and tossed the related screw liners, creating the play we needed to fit the shelves. They are secure, no worries there. My best guess is this was ultimately related to the slight lack of square caused by the warped back panel; I don’t think it is an error in the template, but really there should be more tolerance in the shelf’s design. With the base, walls, and shelves installed - and if everything had arrived on time, without defects, warp, etc - I might say that UP TO THIS POINT, a uTile install was relatively easier than a traditional tile shower install. After this point in the installation, however, I would NOT be able to say this. Why? The instructions are silent on how adjacent surfaces should attach/align to the “edges” of the shower - which becomes a time consuming, ridiculous “finishing” challenge with the product. In our case, uTile wall installation left about a 3” gap between the (low) ceiling and the top of the uTile panel, and wall finishing was needed along the front edges of the uTile panels. The panels themselves have a 1/8” thick, 1” wide “lip” that is used for securing the panel to studs. The finished panel surface is raised a little more than 1/2” (maybe 9/16”?) above this surface. Moisture-resistant drywall or some other water-resistant material needs to be wrapped over the lip, and you must decide how much reveal of the (finished) side edge of the raised panel you want to see. (Note: the finished side edge does NOT look like tile, it is simply color-matched to the tile as a flat surface.) To create a level-with or parallel surface to the wall panel face, you must install the material by first shimming behind the material to deal with the thickness of the panel’s lip, and then attaching the material to the nearby wall structure in a way that leaves a clean finishing line with the wall panel, and then deal with (in our case, due to the lack of proper base installation instructions) the overlap issue at the panel edge / shower base edge. Simply put, this work is a total pain in the $%#. In our case, with a 48x32 shower, the total amount of drywall to install was probably less than 4 square feet, but was spread along 24 linear feet, and had 48+ linear feet of related edge-finishing bead, outside corner bead, inside corner bead, etc. The drywall work, to make this all look good, took 2 additional days, including drying time for mud. THIS TOTALLY WIPED OUT ANY INSTALLATION TIME VALUE FOR UTILE. Relatively, the shower door went up quickly, but even this was a bit difficult with the uTile panels. Typically, you would drill through your tile into a backing stud for mounting the shower door framing (ours was a sliding door with side framing). In the case of uTile, you must attach the shower door framing to the uTile panels using screws and plastic expansion plugs, because there is an air gap between the back of the uTile panel and the studs behind. You cannot just use a longer screw to get to the stud and torque it down, or you risk cracking or breaking the uTile panel. We drilled the holes for the plugs to the MAAX spec, but these turned out to be too large to keep the MAAX-supplied plugs from turning in the relatively thin panels as screws were installed. So, we visited Menards one more time to find plugs that would work better and hold firmly in the MAAX-specified holes. This is, again, an issue with the uTile design - more thickness at these locations on the panel would prevent this kind of issue and allow for a proper attachment through to the studs. THE WRAP UP Now that it is all finished, it looks “ok”, but I wish we had simply installed a traditional tiled shower without all the hassles associated with uTile as a system, and of course without the quality and delivery issues. We have limited reasons to expect the system will perform poorly as a shower, but do have concerns about the system’s rather complete reliance on the integrity of the large number of silicone seals at every panel edge for water protection. We will update this post if our experience turns negative as the system is used over time. So: Kudos to Menards for helping us solve delivery problems. Kudos to MAAX tech support for owning their (worst) quality problems as reported by us Negatives for product quality, installation instruction accuracy, and lack of product tolerance for real world conditions. Negatives for promise v. reality of installation effort, time, and cost. Overall, I cannot recommend this system to a DIY’er who could just as easily install a traditional tile shower system. I am happy to address any questions about our experience, if it will help you with your own!...See MorePLEASE REVIEW HVAC REPLACEMENT QUOTES (HIGH ALTITUDE COLORADO)
Comments (39)If you're using a copy of the Standard that is 20 years old, you're not following best practices. I'm not surprised. I sense you're struggling with it. I sense you're struggling with what I laid out here... to show you that standards change, the homes that were built 20+ years ago do not. Did I not tell you Charles that all you do is build new... yet even with that warning you plod straight ahead without "thinking" about it. Then because you're struggling with it you go on to say that if I am using a standard that is 20 years old that I merely used as a reference point to rope a dope. So you can go back and re-read this to fully understand what I put here... I know how to use Google Search. You've proven in the past you don't know how to use it. I have a unique set of skills. Anyone can beat a nail to death... they even make nail guns now so even a hac like me could do it. So if I were to not be a HAC as in heating and AC, I would then be prescibed to rip the house down the foundation and become someone like you? Thanks I know which lane I'm in, nail beater. I am not in a thread for nail beaters am I? Heating and Air Conditioning is the name of this location on the internet. I know you're not an avid fan of reading and understanding what you read..... I don't think you will convince many to rip a house down to it's foundation. Usually it starts with a gut job down to the studs, then you say... hey look what we found? Yeah we've already come this far might as well just take it right down to the foundation. I own two homes built in late 70's... a bit on the drafty side in that era. You won't convince me to rip these homes down to the foundation Charles. Nice try. ha, ha, ha, ha as in LOL....See More
Gordo Paton
5 years agolkihlk hiffmpequt
5 years agoSimon Uden
5 years ago
tartanmeup
4 years agoJill George
4 years agotartanmeup
4 years agoJill George
4 years agotartanmeup
4 years agoJill George
4 years ago
Marina Patey-Littlejohns
4 years agoJill George
4 years agolkihlk hiffmpequt
4 years ago PRO
PROHarold Emmerson Design
4 years agolast modified: 4 years agoM S
4 years agolast modified: 4 years agoSimon Uden
4 years agolast modified: 4 years agoMarina Patey-Littlejohns
4 years agoJill George
4 years agoMarina Patey-Littlejohns
4 years agoJill George
4 years agoHU-900336198
4 years agolast modified: 4 years agomplut
4 years agojeff112748
4 years ago
CW
3 years agoDennis
3 years agoCW
3 years agoGordo Paton
3 years ago
Johnnie Enrile
3 years agoGordo Paton
3 years agoHU-371278444
3 years ago
Stephanie Leonard
3 years agoCW
3 years agoPeter Olenoski
3 years agoPeter Olenoski
3 years agolast modified: 3 years agoJill George
3 years ago
Sara Gronseth
3 years agolast modified: 3 years agoRyan Richard
3 years agolast modified: 3 years ago
Ricki Rettell
3 years agoM S
3 years ago
Jeff LeBlanc
2 years agoDennis
2 years agoEric Brown
2 years agoJill George
2 years agoPhilo
last year
Becky Glasgow
12 months agoHU-925057878
12 months agoHU-80366202
9 months ago
David Diehl
17 days agolkihlk hiffmpequt
11 days ago


Related Stories

ARCHITECTUREThink Like an Architect: How to Pass a Design Review
Up the chances a review board will approve your design with these time-tested strategies from an architect
Full Story
CONTRACTOR TIPSBuilding Permits: What to Know About Green Building and Energy Codes
In Part 4 of our series examining the residential permit process, we review typical green building and energy code requirements
Full Story
MOST POPULARHow to Refine Your Renovation Vision to Fit Your Budget
From dream to done: When planning a remodel that you can afford, expect to review, revise and repeat
Full Story
CONTRACTOR TIPSBuilding Permits: The Final Inspection
In the last of our 6-part series on the building permit process, we review the final inspection and typical requirements for approval
Full Story
FLOORSIs Radiant Heating or Cooling Right for You?
Questions to ask before you go for one of these temperature systems in your floors or walls (yes, walls)
Full Story
HEALTHY HOMEA Guide to Indoor Air Purifiers
Get the lowdown on air filtration systems for your house and the important ratings to look out for
Full Story
DISASTER PREP & RECOVERYMore Power to You: How to Pick the Right Generator
If your home's electricity goes, don't let it take your necessities with it — keep systems running with this guide to backup power
Full Story
GREEN BUILDINGWhat's LEED All About, Anyway?
If you're looking for a sustainable, energy-efficient home, look into LEED certification. Learn about the program and its rating system here
Full Story
BATHROOM DESIGNWarm Up Your Bathroom With Heated Floors
If your bathroom floor is leaving you cold, try warming up to an electric heating system
Full Story
BATHROOM DESIGNGreen and Clean: Sleek Water-Wise Bathroom Fixtures
By choosing ecofriendly faucets, showerheads and even toilets, you can save loads of water and money without sacrificing style
Full Story


ritsuko22