


Decorating Guides
Weekend Project: Easy, Funny Halloween Tombstones
Create your own clever DIY gravestones to add to your Halloween decorations

Many times when I'm working on a new project without the help of a materials list or instructions, I find myself feeling somewhat overwhelmed. What starts out as a great idea can quickly evolve into a bit of a nuisance, leaving you wanting to scrap the project entirely. Multiple trips to the hardware store are not uncommon, and the original budget always seems to go out the window.
It's for these very reasons that I enjoy doing projects that are simple, stress-free and best of all, cheap. Taking a break from projects that require a lot of attention to detail is a huge relief, and being able to find all the necessary materials in the garage is even better. Feeling the need for a project that fit these parameters, I decided to make a set of DIY Halloween tombstones. They turned out to be the perfect weekend project, and I would encourage anybody with kids to let them in on the fun as well. It's a great project for the whole family and one that you can reuse for years to come.
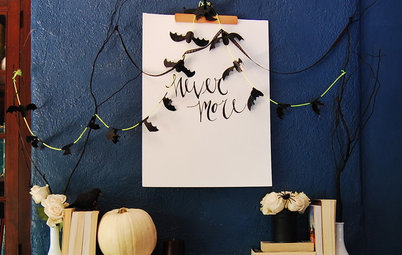
More: 36 Spooky and Stylish Halloween Decorating Projects
It's for these very reasons that I enjoy doing projects that are simple, stress-free and best of all, cheap. Taking a break from projects that require a lot of attention to detail is a huge relief, and being able to find all the necessary materials in the garage is even better. Feeling the need for a project that fit these parameters, I decided to make a set of DIY Halloween tombstones. They turned out to be the perfect weekend project, and I would encourage anybody with kids to let them in on the fun as well. It's a great project for the whole family and one that you can reuse for years to come.
More: 36 Spooky and Stylish Halloween Decorating Projects
Step 1. The first thing on your to-do list is to find a few scraps of wood, and feel free to use pieces that are in rough shape, as long as they're not rotted. I found that I cleared out a good portion of my scrap wood pile in the garage when doing this project. Bonus: If you go this route, you've now officially started Fall Garage Cleanup 2011. Nice work.
Step 2. Once you've collected the wood, you can start drawing your gravestone designs. I suggest drawing large rectangles onto the wood first, creating a predetermined form to work with as a guide. Use the edges of your rectangles as the edges of your stones and sketch the rest inside.
Once everything is drawn, find your safety glasses and jigsaw so you can cut them all out.
Step 3. As soon as everything is cut, you can begin painting. We used spray paint leftover from another project.
Step 4. Watching paint dry is always a drag, so this is a good time to start scheming some names for your gravestones. This was my favorite part of the project and I kept wishing that I had more wood to use all the names I had written down!
Once the gravestones are dry, you can start painting the words on. I decided to make some impromptu designs on a few of them as well, which was fun.
These are the six different Halloween tombstone designs and the names I came up with for them. A few of the names didn't make the cut, but I have them saved in case I make more.
Step 5. I chose to use pipe sleeves on the back of each piece of wood rather than nailing a stake directly to it. They are easier to store if they can be taken apart as well. I used rebar for the brace and pounded it into the ground and then slotted the gravestone right onto it.
This is what my graveyard looks like in all its glory in my front yard. We're hoping to get a little more creative and add a few novelty things like a skull and a vulture or something.
So that's that: A super-easy Halloween decorating project the whole family can enjoy. Try it this weekend and show us your photos in the Comments section below!
More: 36 Spooky and Stylish Halloween DIY Projects
9 Easy Ways to Decorate With Autumn Leaves
25 Favorite Halloween Decorations from the Fall Catalogs
Halloween Style for Your Kitchen
Pick Up Some White Pumpkins for Elegant Fall Decorating


In order to complete this Halloween decorating project, you will need the following: