


How to Keep Water Vapor From Ruining Your House and Your Health
We help you find out when it’s happening, what it means and how to fix it

Few things can wreak havoc on indoor air quality quite like moisture. If water vapor is not effectively removed from your house, or a particular room, you risk the formation of mold, condensation and an increase in dust mites. Here’s what you need to know to spot and fix moisture problems.
How Can I Spot Water Vapor Damages?
There are three types of moisture intrusion that you should know about.
1. Formation of mold or condensation on the interior surface of your walls and windows.
How do I know this is happening?
You may notice water drops forming along the edge of the glass on your window or streaks of mold forming at the corner where your wall and ceiling meet. You may also feel that the room is muggy or humid. You may even smell mildew. All of these are bad signs.
What does this mean?
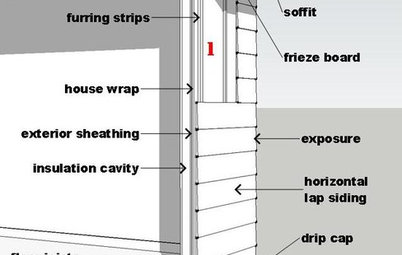
This means that you have a poorly designed building envelope with thermal bridges. A thermal bridge is a weak point in the insulation of the assembly that allows heat to escape more quickly. At this weak spot, condensation forms and is often visible to the naked eye.
How do I fix it?
Ideally, a home remodel or renovation would include consulting a building science professional to address thermal bridge mitigation. This consideration of the building envelope, however, should always be in conjunction with a ventilation strategy for future moisture management. Only when the envelope and the ventilation are designed in harmony can you avoid moisture problems like these.
Shown here is the interior of a window in a Colorado mountain home. In the winter, because of poor moisture management in the building envelope and low performing windows, you can see condensation forming along the edge of the glass, which is the weakest point of the window. On severely cold days, ice would actually form on this interior surface.
There are three types of moisture intrusion that you should know about.
1. Formation of mold or condensation on the interior surface of your walls and windows.
How do I know this is happening?
You may notice water drops forming along the edge of the glass on your window or streaks of mold forming at the corner where your wall and ceiling meet. You may also feel that the room is muggy or humid. You may even smell mildew. All of these are bad signs.
What does this mean?
This means that you have a poorly designed building envelope with thermal bridges. A thermal bridge is a weak point in the insulation of the assembly that allows heat to escape more quickly. At this weak spot, condensation forms and is often visible to the naked eye.
How do I fix it?
Ideally, a home remodel or renovation would include consulting a building science professional to address thermal bridge mitigation. This consideration of the building envelope, however, should always be in conjunction with a ventilation strategy for future moisture management. Only when the envelope and the ventilation are designed in harmony can you avoid moisture problems like these.
Shown here is the interior of a window in a Colorado mountain home. In the winter, because of poor moisture management in the building envelope and low performing windows, you can see condensation forming along the edge of the glass, which is the weakest point of the window. On severely cold days, ice would actually form on this interior surface.
2. Widespread condensation forming inside your walls, roofs or slabs where you can’t see it.
How do I know this is happening?
This is probably the hardest phenomenon to spot as a homeowner. This type of moisture intrusion is called interstitial condensation, and it occurs on the inside of your wall assemblies.
What does this mean?
Basically, the moisture is trying to escape by moving to a cooler environment on the other side of your wall. However, depending on the permeability rates of the various materials it has to pass through, that vapor can sometimes get stuck at a bottleneck and form into a water droplet. When this is happening on a widespread basis, throughout the assembly, it can cause short-term reduction in the efficiency of your insulation and long-term degradation of the structure.
How do I fix it?
Again, ideally a home remodel would afford you the opportunity to have a building professional redesign the wall assembly to address this situation. As a stopgap measure, though, a suitable ventilation scheme can help mitigate the effects of this widespread condensation.
For air tightness and moisture control in the project pictured here, a Passive House in Italy I designed along with Emu Building Science, we installed a vapor open membrane (the white sheet you see on the left side). This will help prevent interstitial condensation by constraining, yet allowing, the natural flow of water vapor through the assembly in a manner that will prevent water droplets from forming inside the roof assembly.
3. Concentrated condensation at one particular point in your wall, roof or slab assembly.
How do I know this is happening?
You may be able to spot localized areas in your assembly that are visibly wet. Keep in mind that a wet spot is more often linked to plumbing issues than airtightness.
What does this mean?
This kind of moisture intrusion is caused by a localized air leak (unlike Type 2, which is caused by a widespread low volume migration of water vapor alone). This means that in one spot, there is a crack or a hole where air can escape to the outside.
How do I fix it?
Assuming you can identify the location of the leak, you should be able to open your assembly and address the problem directly by fixing the error in the airtightness layer.
Shown here is the same roof as in the previous example, showing a detail of a chimney punching through the roof assembly. At the base of the chimney, you can see blue tape. The blue tape is there to guarantee that the entire package is airtight. If you have a concentrated escape of hot air from the inside of the house to the outside (which, in this case, would be between the concrete of the chimney and the insulation), then this hot air would carry out moisture that would cool and condense at this junction.
Not Sure What the Relative Humidity Is in Your House?
So maybe you can’t identify any of these problems specifically but you’re concerned about how moisture is affecting your indoor air quality. Consider purchasing a hygrometer, such as Stadler Form’s Selina, to keep you informed on the levels of relative humidity in your house. Ideally, you want to see 30 to 50 percent relative humidity, with 40 percent as the goal.
Honestly, the most difficult step in these mitigation strategies is finding a professional with advanced understanding of not only building envelopes or mechanical ventilation, but the two together as an integrated strategy. If you have any special circumstances in your home, such as an open aquarium or pool, a living wall, or any other source of moisture that may be out of the ordinary design scope, you’ll want to pay particular attention to ventilation.
When looking for the right professional, it’s essential to make sure that the breadth of his or her knowledge in building science covers envelope design (including thermal bridge mitigation) and moisture management design. Ideally, this professional also has experience in ventilation system design.
Generally speaking, this person will be an external consultant, although architects and contractors who have been trained in the Passive House standard often will also have a basic understanding of this kind of science. If they don’t personally, they will at least know where to direct you and can often bridge the communication gap and interpret the calculations for you.
Find a building science pro
More: Remodeling After Water Damage: Tips From a Homeowner Who Did It


You may be surprised to learn that people are the main culprits when it comes to water vapor and moisture in a home. Despite the sheer volume of environmental water vapor that penetrates the walls of a house, even in a hot and humid climate, it’s far less than the amount of moisture we produce from activities such as breathing, showering and cooking.
A family of four produces about 3 gallons (10 to 14 liters) of water vapor per day, according to the American Society of Heating, Refrigerating and Air-Conditioning Engineers.
And if you think opening a window will do the trick, think again. One thing to keep in mind for hot and humid climates is that cooling by natural ventilation may be counterproductive. It could bring more moisture into the house, which then should be removed through an active dehumidification process. Other strategies, such as shading, could be more effective.
See more on indoor air quality