


Replace Your Windows and Save Money — a How-to Guide
Reduce drafts to lower heating bills by swapping out old panes for new, in this DIY project for handy homeowners
Meg Padgett
February 21, 2013
Houzz Contributor. Meg is a budget-minded DIY lifestyle blogger at Revamp Homegoods (http://www.revamphomegoods.com). Her design philosophy is based on the concept that combining thrifty finds with a little blood, sweat and (sometimes) tears a stylish home can be achieved without breaking the bank
Houzz Contributor. Meg is a budget-minded DIY lifestyle blogger at Revamp Homegoods... More
Energy-efficient upgrades to your home can save you money in utility costs and help attract prospective buyers, too. Our century-old home has a laundry list of items that need attention. But for all the things that need to be updated, we lucked out in the window department; we have only four single-paned windows to replace. The four old windows were a break from the new, builder-grade vinyl windows that had been updated by the previous owners, and they had become a drain on our pocketbook as the months grew colder.
Some energy-effiicent updates are quite simple — replacing incandescent lightbulbs with LEDs, for example. Others, like replacing windows, take a little more know-how. We took advantage of nice weather being forecast and finally replaced the last of our windows — just in time for our winter rains to return.
Some energy-effiicent updates are quite simple — replacing incandescent lightbulbs with LEDs, for example. Others, like replacing windows, take a little more know-how. We took advantage of nice weather being forecast and finally replaced the last of our windows — just in time for our winter rains to return.
To do prior to installation:
- Check your local building codes for specific requirements.
- Check with your local utility companies and the federal tax code for rebates or tax write-offs for any energy-efficient upgrades.
- Review your window manufacturer's installation guide.

Materials and tools we used:
- Jeld-Wen Flanged Window
- Jeld-Wen Vinyl Window Installation Kit (includes sill drain mat, self-adhesive flashing tape, backer rod, galvanized stainless screws, sealant and instructions)
- Polyurethane low-expansion window and door foam
- Three-hour rain-ready paintable silicone caulk
- 2- by 4-foot framing lumber
- Caulking gun
- Utility knife
- Construction stapler
- Drill with drill bit
- Hammer
- Tape measure
- Level
- Putty knife (you can also use a J-Roller)
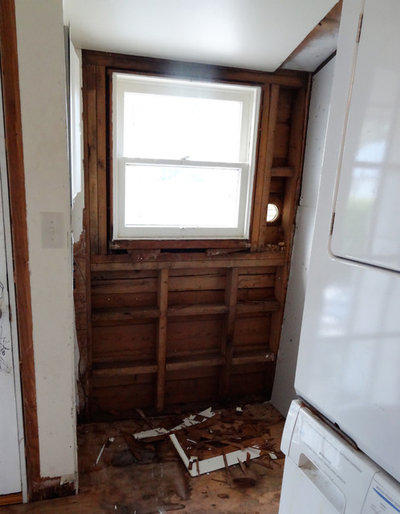
Carefully remove the trim from the existing window, inside and out. Set it aside; you can use it later if you are installing the same size window or you can cut it to fit if the new window is smaller.
Our old windows were wood-framed built-ins. We used a reciprocating saw to cut through the nails that held it to the opening. We were able to remove the window completely intact in the hopes of recycling it at our local salvaged-goods store.
Tip: Get a helper to hold the window and keep it from falling out of the opening as you remove the fasteners that hold it in place.
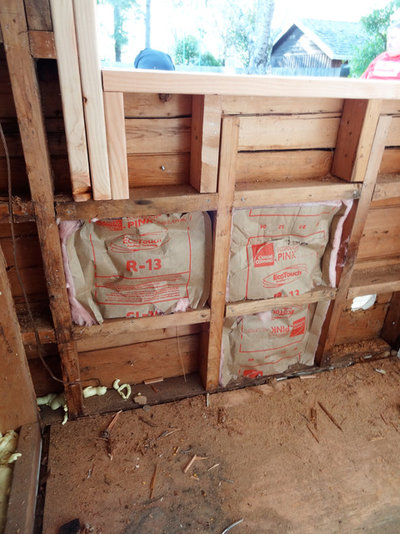
Our old windows had odd dimensions, so we had to frame in a rough opening. This was actually a blessing in disguise, because even though it was extra work, we were able to frame an opening that was actually square and exactly the right dimensions for the new window. We also added sheathing and tar paper to match the existing moisture barriers under the original siding. Sheathing is the layer of wood between the frame of a building and its exterior skin. The tar paper attaches directly to the sheathing.
Because our home is older, many of our exterior walls are not insulated. With this wall open, we took the opportunity to insulate and shore up any weak and damaged beams.
Because our home is older, many of our exterior walls are not insulated. With this wall open, we took the opportunity to insulate and shore up any weak and damaged beams.
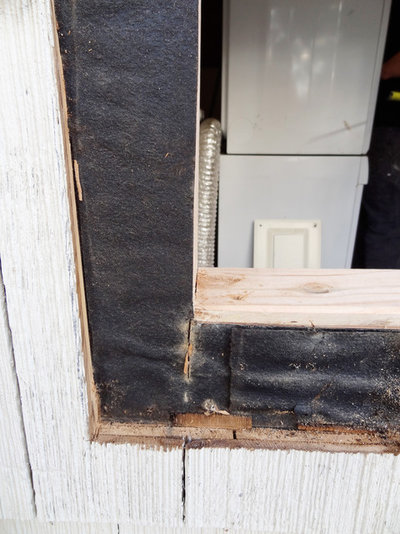
After much research on retrofitting flanged windows, we decided to cut the current siding back to make room for new exterior window trim. We added new sheathing and slipped as much of the moisture barrier behind the current barrier as we could. You must know what size your window trim will be before cutting back the siding.
Tip: Use a chute board (also known as a shooting board) to create a flat surface for guiding the circular saw when you're making vertical cuts on uneven siding.
Tip: Use a chute board (also known as a shooting board) to create a flat surface for guiding the circular saw when you're making vertical cuts on uneven siding.
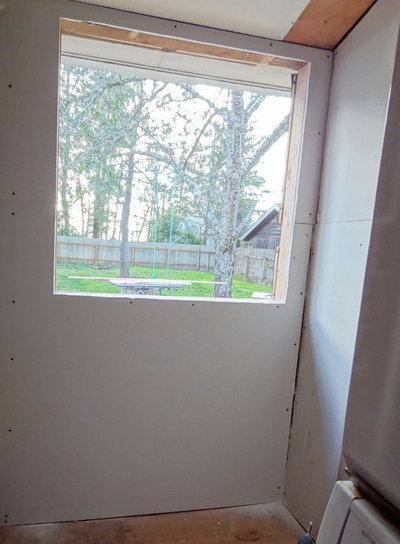
After dry fitting the window and ensuring that the rough opening was correct, we installed the Sheetrock on the interior wall. The rough opening made installing and cutting the window hole much easier, since there was no window to get in the way of our drywall knife.
Once the new drywall was in place, we attached the self-adhesive flashing tape to the exterior of the opening, folding over the flashing material onto the bottom of the rough opening and on the side of the tar-papered exterior wall. After the flashing was in place, we attached the sill drain mat to the bottom of the rough opening, per the manufacturer's instructions.
Once the new drywall was in place, we attached the self-adhesive flashing tape to the exterior of the opening, folding over the flashing material onto the bottom of the rough opening and on the side of the tar-papered exterior wall. After the flashing was in place, we attached the sill drain mat to the bottom of the rough opening, per the manufacturer's instructions.
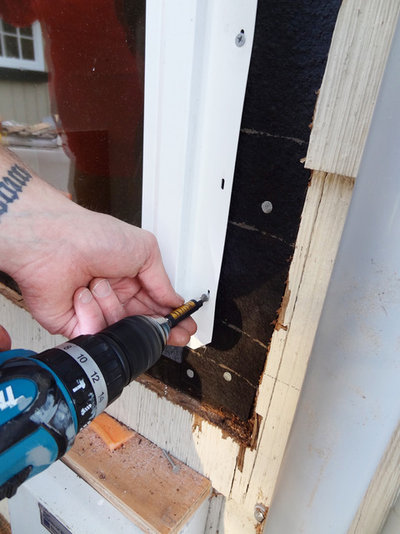
Next we centered the window in the rough opening and used a level to check the top, bottom and sides. We also used a tape measure to ensure the diagonals were of equal length. Stainless steel screws provided in the installation kit secured the window through the flanged nailing fin (as shown in the photo). We made sure that the window remained level and centered as we secured it to the frame, starting from the bottom and working around the rest of the window.
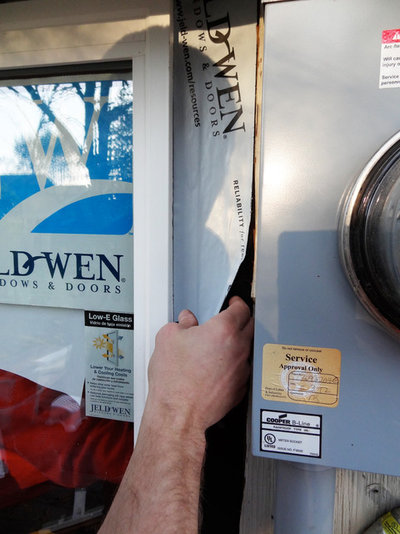
Before we installed the interior trim, we applied the window and door foam sealant to the gap between the window and the window frame — creating additional insulation from the elements and eliminating any drafts.
Before we installed the interior trim, we applied the window and door foam sealant to the gap between the window and the window frame — creating additional insulation from the elements and eliminating any drafts.
Before adding the exterior trim, we sealed the window with the self-adhesive flashing. Place the flashing over the window's nailing fin and fully cover the exposed wall beneath. Use a J-Roller or putty knife to fully seal the flashing and remove any air bubbles.
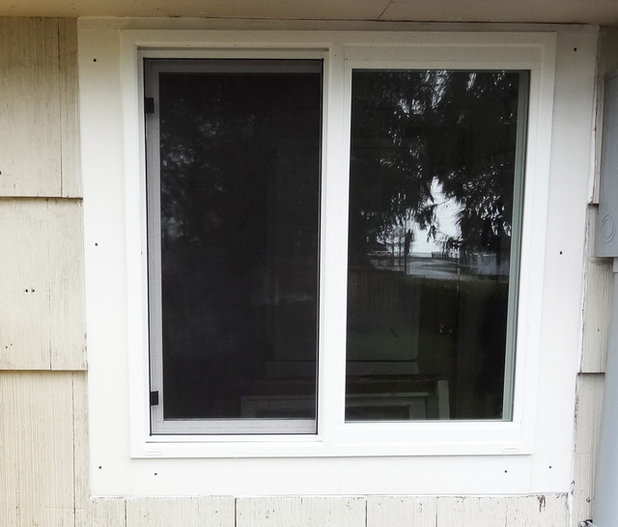
We finished the window by trimming out both the exterior and interior. We attached primed and painted exterior trim boards to the outside.
Tip: Always add primer to any cut ends to protect against moisture damage.
To seal the window and trim, caulk the gap between both the window and the trim, and the trim and the siding. We ditched the provided sealant and used three-hour rain-ready silicone caulk, because here in Washington, you never know when the clouds will roll in.
For tips on how to add interior window trim, check out this how-to guide.
We strive to create spaces that are not only aesthetically pleasing, but also functional and comfortable. We work... Read More
What are you working on?


Related Products


Dave Fox is a design/build remodeling firm with a customer focused process, an incredible staff and a close knit... Read More
Related Stories
New This Week
4 New Kitchens With Wonderful Wood Cabinets
Pros share how they used various wood species, styles, stains and details to create warm and welcoming kitchens
Full Story
Bathroom Design
5 Secrets to a Smooth-Running Family Bathroom
Pros say these are the must-have features for creating an efficient shared bathroom
Full Story

Kitchen Makeovers
Kitchen of the Week: Beer, Shuffleboard and Pizza Bring the Fun
Entertaining features and a warm industrial style create a lively atmosphere in this revamped Craftsman bungalow space
Full Story

Trending Now
The 10 Most Popular Bedrooms So Far in 2024
By Becky Harris
Feather your nest in style with inspiration from Houzz readers’ most-saved bedroom photos
Full Story

Working With Pros
Which Pro Should You Hire for Your Project?
Find out whether you need a contractor, an architect, an interior designer or another professional for the job
Full Story
Bathroom Makeovers
Bathroom of the Week: Accessibility and a Relaxing Vibe
By Becky Harris
A design-build firm uses universal design principles when expanding a family bath
Full Story
Housekeeping
How to Clean Your Windows and Keep Them Streak-Free
Try these tips, tricks and tools to wash your windows so they’re crystal clear
Full Story

Entryways
The 10 Most Popular Entries and Mudrooms So Far in 2024
Get ideas for storage setups, color schemes and special details from the most-saved entry photos so far this year
Full Story

Kitchen Design
30 Bold and Beautiful Range Backsplashes
Get ideas for eye-catching tile and stone backsplashes inside stove alcoves and behind cooktops
Full Story

Porches
Porch of the Week: Catching a Breeze in Austin, Texas
By Becky Harris
The new screened-in space has a beautiful fireplace as a focal point and includes lounging and dining spaces
Full Story
Old windows are usually made from old-growth wood--a quality that just is not available today at an affordable cost.
Old windows were made to be repaired. If something breaks, you can fix it. The same is not true of vinyl windows, which usually require replacement of a whole unit.
Most energy loss occurs at the foundation and attic--it's called the "stack effect." Your investment dollars are better spent adding insulation to your attic, sealing up cracks around your foundation, installing an efficient furnace, and adding storms to your historic windows.
Old windows have character that is impossible to recreate without spending a lot of money--individual panes of wavy glass divided by muntins that have a profile and depth--all of this adds architectural character.
DON"T buy the lies of the replacement window industry if you live in an older home. It is an industry designed to sell you things you don't need. It amazes me that people so willingly buy into the ideas of that industry and dismiss the facts shared by those who have no financial profit in encouraging the repair of old windows.
As others have suggested; do an energy audit of your home with a blower door test. You might be surprised what you find.
Long Island, would you like to replace your windows
this winter? Concerned about your home being opened up to the cold
during the installation process? If you’re getting Royal Windows, you don’t need to be worried. Ourspecial winter window installation process
minimizes the heat loss in your home during the installation of your
new windows. Whether you are getting one window replaced or an entire
houseful, the experts installing your Royal Windows have your comfort in
mind every step of the way.
Our expert window installation teams start by closing off each room
receiving new windows from the rest of the house to minimize your
exposure to the cold and snow.
We install one window at a time to minimize the cold air entering
your home. Typically, each window is only out for approximately 5
minutes or less. Complete opening alterations will take a bit longer,
but our experts work quickly, keeping the amount of time without a
window in place to a bare minimum. All trim work on the interior and/or
exterior of your windows only happens when the new window is properly in
place.
We also utilize a two crew installation team! One installer remains
on the inside of the home and one installer remains outside during the
entire process Our installation process keeps your home in tip-top shape
by eliminating mud, snow and debris from being tracked in.
Want to learn more a bout winter window replacement Long island? Contact us today for more information about Royal Windows and Doors,
our options and our installation process. We would be happy to
personally review the process with you and provide you with a custom
quote. Schedule your free in-home estimate today.