


How to Make an Enchanting Kids' Play Kitchen
To delight your little one this holiday season, give an adorable wood oven and sink you build with love

Does the word "woodworking" make you think "that's for someone else" and give you flashbacks about using the jigsaw in your junior high shop class? Ana White, the creative and handy blogger behind Ana-White.com, wants to change your mind. The master do-it-yourselfer's first book, The Handbuilt Home, includes projects for eager DIYers of all skill levels in a range of styles and scales.
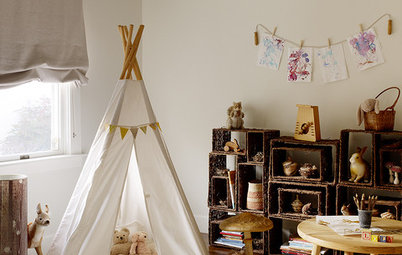
To celebrate the book's release, White is sharing instructions and plans for this darling children's play kitchen, sized for kiddos ages 2 to 10. It could be just the time of year to get started on a play kitchen to give to your budding chef as a holiday or birthday gift.
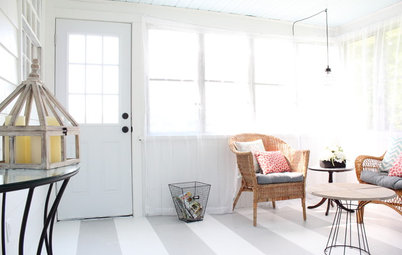
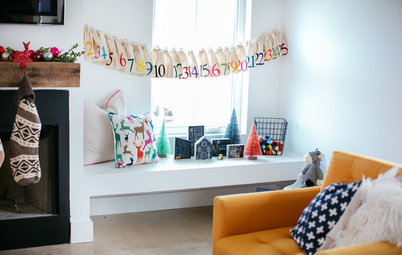
The children's play kitchen in these photos was designed by White and built by Kristen Wright. "My simple play kitchen design took a new turn when Kristen built it, painting it a beautiful shade of turquoise and adding a hand-sewn skirt for the sink," White says. "Even as the mother of four, Kristen found time to make what is sure to become a family heirloom."
Motivated to get cracking on your own heirloom-quality kids' play kitchen? Here's how.
To celebrate the book's release, White is sharing instructions and plans for this darling children's play kitchen, sized for kiddos ages 2 to 10. It could be just the time of year to get started on a play kitchen to give to your budding chef as a holiday or birthday gift.
The children's play kitchen in these photos was designed by White and built by Kristen Wright. "My simple play kitchen design took a new turn when Kristen built it, painting it a beautiful shade of turquoise and adding a hand-sewn skirt for the sink," White says. "Even as the mother of four, Kristen found time to make what is sure to become a family heirloom."
Motivated to get cracking on your own heirloom-quality kids' play kitchen? Here's how.
How to Make the Oven and Sink
Cutting list for 1 unit:
Cutting list for 1 unit:
- Two 19 1/2-inch-long 1-by-12s (sides)
- One 13-inch-long 1-by-12 (bottom shelf)
- One 13-inch-long 1-by-2 (footer)
- One 13-inch-long 1-by-3 (header)
- One 14 1/2-inch-long 1-by-12 (countertop)
- One 14 1/2-inch-long 1-by-3 (backsplash)
- One 13-inch-long 1-by-10 (shelf)
- One 14 1/2- by 20 1/4-inch piece of 1/4-inch plywood or hardboard (back)
- Two 12 3/4-inch-long 1-by-3s (oven door)
- Two 9 1/2-inch-long 1-by-3s (oven door)
- One 9 3/4- by 11 1/2-inch sheet of 1/4 inch acrylic
To Make the Base Cabinets
Bottom shelf. Mark the sides 1 1/2 inches from the bottom. Attach the bottom shelf to the sides, with a 1 1/2 inch space under the bottom shelf, using wood glue and 2-inch finishing nails.
Bottom shelf. Mark the sides 1 1/2 inches from the bottom. Attach the bottom shelf to the sides, with a 1 1/2 inch space under the bottom shelf, using wood glue and 2-inch finishing nails.
Footer. Apply glue to the top and side edges of the footer. Set inset, approximately 1/4 inch under the bottom shelf, and attach with glue and 2-inch finishing nails from the sides and top.
Header. Apply glue to the ends of the header. Nail it in place at the project’s front top, using 2-inch finishing nails.
Countertop. Attach the backsplash to the countertop with wood glue and 2-inch finishing nails.
Assembly. Attach the countertop to the base with wood glue and 2-inch finishing nails.
Shelf. Mark the shelf’s placement by measuring 9 1/4 inches up from the bottom of the project. Attach the shelf, flush to the back, with wood glue and 2-inch finishing nails.
Back. Apply glue to all the back edges and place the plywood on the back. Nail the plywood down with 1 1/4-inch finishing nails.
Oven door (optional). Build the oven door from a 1-by-3 frame, drilling two pocket holes in the frame board ends. Attach the frame with wood glue and 1 1/4-inch pocket hole screws.
Acrylic panel (optional). Cut acrylic to size if necessary. Attach it with adhesive or mirror clips.
Install the completed stove door with hinges so that the stove door has an even 1/8-inch gap around all edges. You may need to install a clasp to keep the door shut.
How to Turn a Base Cabinet Into a Sink
You can use the same base unit plan to create a play sink. When making the countertop, place your metal bowl facedown on the countertop. Trace. With the jigsaw, cut out a hole slightly smaller than the traced shape, testing the fit of the metal bowl. Remember, you can always cut more wood out, but it is very difficult to repair the countertop if you overcut.
When the bowl fits properly, with the lip flush with the countertop, apply adhesive and glue down the bowl. Add the faucet and handles to create the play sink.
Sink skirt. Ruffles cover the storage area under the play sink. The ruffles are sewn to a heavier fabric to help it hang straight.
Dimensions (before sewing):
To gather the fabric:
Dimensions (before sewing):
- Main heavier fabric piece: 15 1/2 inches wide by 17 1/2 inches long, with 1/2-inch seam allowances
- Each ruffle: 10 1/2 inches by 22 inches
- Circumference of the loop at the top: 4 inches, with a 1/2-inch seam allowance
- Note: The colorful fabric at the top was sewn on after the three ruffles, about 1/2 inch over the top of the pink ruffle.
To gather the fabric:
- Make two rows of basting stitches (long stitches) 1/4 inch from the top and about 1/4 inch apart, and leave long tails of thread on each end. Then pull the thread lightly until the fabric gathers evenly.
- Pin the ruffle to the main piece and sew a regular stitch between the two basting stitches.
- Pull the basting stitches out after the fabric is properly sewn in place, leaving the regular stitching line — slick!
- The bottom of each ruffle hangs about 3/4 inch over the ruffle beneath it.
- Sew the fabric over the loop (white, green, blue) over the pink ruffle about 1/2 inch.
- Sew the blue pom-pom row right where the top of the pink fabric and the colorful loop fabric join.
- The bottom ruffle hangs about 1 inch below the main piece of fabric. The edges and bottom of each ruffle hang free.
The Handbuilt Home: 34 Simple Stylish and Budget-Friendly Woodworking Projects
If you're ready for more projects (or want to start with one that's a little simpler), pick up a copy of Ana White's The Handbuilt Home, released Oct. 9, 2012.


You can use these instructions to make both the oven and sink area. Both components use the same base cabinets. (Find plans for the matching play refrigerator here.)
Materials (oven and sink):
- One 6-foot-long 1-by-12
- One 2-foot-long 1-by-10
- One 12-foot-long 1-by-2
- One 8-foot-long 1-by-3
- 1/4 sheet of 1/4-inch plywood or hardboard
- Wood glue
- 1 1/4-inch finishing nails
- 2-inch finishing nails
- 1 1/4-inch pocket hole screws (for stove)
- Knobs and pulls
- One 6-inch-diameter stainless steel bowl, with lip (for sink)
- One set surface-mounted inset Euro-style hinges (for oven)
- Acrylic sheet, 9 3/4 inches by 11 1/2 inches by 1/4 inch (for oven) and cutter
- Multisurface adhesive or one package mirror clips (for oven door, optional)
Tools: