

DIY Project: Pizza-Box Stencil Wall
Treat your wall to a giant graphic using paint and a pizza box

Have you ever finished off a pizza pie, stared at the empty box and thought, “This would be a great material for a wall stencil”? I did. I cut a 30-inch-long box (it fed a lot of friends) into a large circle and made a pattern across a wall. A pizza box is made of strong cardboard, so it will hold up well as a template. If you want to create a big statement inexpensively with paint and have a fun story to tell friends, this could be the perfect weekend project.
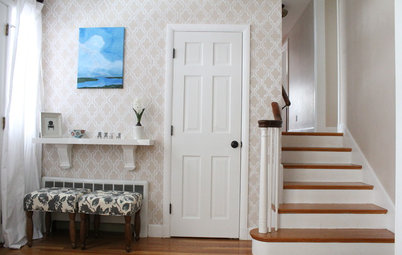
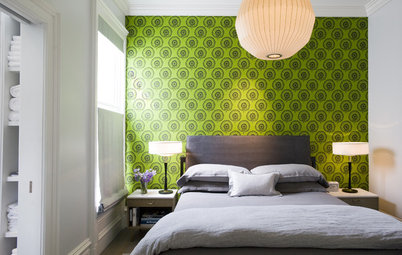
Look at what you can create using just paint. This wall of patterned circles took me two days to create. Prep your wall with your background color. I used Sherwin-Williams' Egret White.
Materials and tools:
• 1 pizza box (the one you see is the large rectangular one I used from my local Wegmans supermarket)
• A quart of your favorite paint
• Measuring tape
• Level
• Pencil
• Scissors
• Graph paper
• Painter's tape
• 2 paintbrushes: one fine-tipped and one medium-tipped
• 1 plastic pushpin
• Sewing thread (any color)
Here are the steps I took to create this look.
1. Eat a big pizza. Then empty out the box so it is as clean as possible.
2. Choose your circle size. Using your measuring tape, figure out the largest circle you can create with this piece of cardboard. (See step 5 for more on choosing your circle size.) Mine was 29 inches.
3. Draw your circle. Cut a piece of sewing thread 6 inches longer than the diameter of your circle. Tie one end of the thread to a plastic pushpin, leaving enough thread to equal half the diameter of your circle. Tie the other end to a pencil. Push the pin into the center of the box and, pulling lightly on the thread, drag the pencil around the box, drawing a circle. You just created the outside of your pattern.
Keep the pushpin and thread in place. Decide how thick your circle will be (mine was 3 inches), then shorten your thread by that amount by wrapping it around the pencil some more. As you did to create the outside of the circle, drag the pencil around the box to draw the inside edge of your circle.
Keep the pushpin and thread in place. Decide how thick your circle will be (mine was 3 inches), then shorten your thread by that amount by wrapping it around the pencil some more. As you did to create the outside of the circle, drag the pencil around the box to draw the inside edge of your circle.
4. Cut out the circle. It should look like this.
5. Create your pattern. Time to calculate where to place your circles on the wall. Using your measuring tape, find the length of your wall. Now measure the height of your wall. Take out graph paper and draw a box scaled to the length and height of your wall (I used 2 squares to represent 1 foot). Mark an X in the center. That is where the center of your first circle will go. Draw a scaled circle around the X, then keep adding more circles until your wall is full.
Use this as a guide when you take the next step.
Note: You can also use a grid like this to design your pattern. Just divide the width of your space by the number of circles you want. An odd number will look best.
Use this as a guide when you take the next step.
Note: You can also use a grid like this to design your pattern. Just divide the width of your space by the number of circles you want. An odd number will look best.
6. Find the center of the wall. Using the measurements on your paper grid as a guide, find the center of the wall. Place a piece of painter's tape there, put your circle around it and trace the circle with your pencil. I used painter's tape to hold my stencil on the wall as I traced it. At the top and bottom of the circle, place painter's tape on all four sides.
By starting with one circle in the center of your wall, your stencil will look great even if you end up with partial circles at the edges of your design.
By starting with one circle in the center of your wall, your stencil will look great even if you end up with partial circles at the edges of your design.
7. Transfer your guide to the wall. Keep adding pieces of painter's tape every circle's width apart from the last piece of tape. Do this across the wall, and up and down, as shown. Use a level alongside your measuring tape to keep the painter's tape lined up straight. You will end up with a grid made up of pieces of tape.
Now grab your stencil and, starting from the center again, between each row of painter's tape, trace your circle with a pencil. Make sure the widest part of each circle just touches the outer edge of its neighbors to the side, top and bottom.
When you get to the edges of your wall, you may not have room for full circles, and that's fine. Any partial circles still should mirror each other in size.
8. Time to paint the circles! I used Sherwin-Williams' Reflecting Pool, but you can use any color.
9. Outline your circles using a fine-tipped paintbrush.
10. Fill in your circles with your larger brush. I used two coats of paint for each circle.
This part takes the longest, but with some good music and water on hand, it's more like meditation hours!
You're finished, and it looks great. Are you hungry for pizza?
More:
Stencils: All Grown Up and Sophisticated
How to Use an All-Over Wall Stencil
How to Prevent Paint Leaks Under Your Stencil
More:
Stencils: All Grown Up and Sophisticated
How to Use an All-Over Wall Stencil
How to Prevent Paint Leaks Under Your Stencil