


Make a Cool Mail Organizer for Your Wall
With easy-to-find supplies and a little time, you can have a handy letter sorter with a custom look

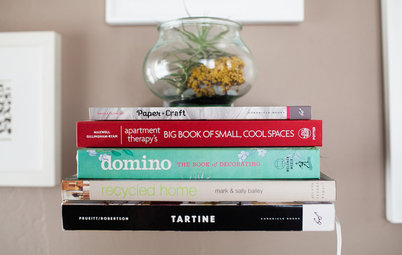
We have a small, narrow entry in our home that seriously lacks storage. So having a designated place (off the floor, that is) where we can organize mail, receipts and other important papers is vital to helping that area stay clutter free. A few hooks and a letter holder are an easy way to keep those everyday essentials accessible but out of the way.
1. Using your tape measure, measure the lauan for the desired width and length of the shelves. Mine measured 7¼ inch wide by 6¼ inches long. The width matched the width of the pine board, and the length worked well proportionally.
2. Cut the pine board to the marked length and width for the shelves. You will likely have some left over.
Tip: If you don’t have a table saw, clamp an extra piece of straight wood to the lauan to use as a guideline. This will ensure a straight line when you’re using a circular saw. Repeat for all cuts.
3. Prepare to cut the slots for the shelves in the pine board by adjusting the angle of the circular saw to 57 degrees.
4. Check the blade height of the saw by placing the circular saw on the pine board; it should go about halfway into the board so the shelf stays firmly in place and the board doesn’t break.
5. Adjust the blade if needed.
6. Measure your cuts. (Mine were 4¼ inches apart.) Since the saw blade is thinner than the shelf, you will need to make about three cuts per slot. To do this make one cut, then move the guideline down about 1/16 inch. Repeat until the lauan plywood fits in the slot.
7. From the last slot, measure 1 inch down and cut the length of the pine board. (Mine measured 14 inches total.) The total length is cut last for better control when you’re using the saw.
8. Sand all of the wood with 220-grit sandpaper and an orbital sander.
9. Prime and paint the shelves.
10. If desired, paint or stencil the pine board. I created my own stencil in Adobe Illustrator and had it cut at a shop; however, similar stencils are available at any craft store. Or you can create your own freehand design.
11. Once the paint is dry, place a little wood glue in the slots.
12. Insert the shelves.
13. Attach desired hanging hardware to the back. For a renter-friendly option, use 3M picture hanging strips. Make sure to follow the directions on the package to ensure adhesion.
Finally, start organizing your mail, receipts and coupons so they are easily accessible as you come and go.


- 1-foot by 8-foot pine board (14-inch section)
- 2-foot by 4-foot lauan plywood board, ¼ inch thick (available at any lumber store or big-box store)
- Wood glue
- Primer and paint
- Stencil (I made my own)
- Measuring tape
- Pencil
- Circular saw
- Clamps
- Orbital sander
- 220-grit sandpaper
Estimated cost for wood and stencil: $20Safety gear: