


Turn a Beat-Up Bar Cart Into a Thing of Beauty
Found a cast-off cart or table? See how to transform it into a stunning accent for your home
Sarah Dorsey
July 17, 2014
http://sarahmdorseydesigns.blogspot.com Houzz Contributor, Interior Designer and Blogger. I'm making a rental feel like our home, one budget friendly, DIY project at a time! I believe that you don’t have to spend a lot of money to make your home a place that you love!
Houzz Contributor, Interior Designer and... More
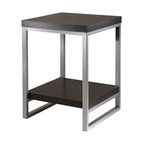
The other week at a furniture auction, I found a sad, beat-up laminate bar cart for just $2. (Yes, $2!) I was able to look beyond its scratches, dings and other signs of wear because I knew all it needed was a little TLC, wood filler, sanding and paint. And sure enough, within a few hours, my secondhand find was completely refreshed.
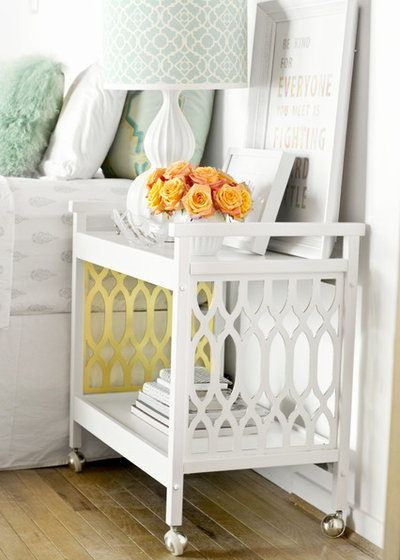
How to bring a piece of wood furniture back to life is one of the most helpful (and budget-minded) things I’ve ever learned as a homeowner. For just a few dollars, you can turn pieces that other people have cast off as unworthy into something that looks stunning in your home. I transformed my cheap laminate bar cart into a bright nightstand with gold accents, but these methods will work for any side table or small furniture piece in need of repair. Here’s how to do it yourself.
How to bring a piece of wood furniture back to life is one of the most helpful (and budget-minded) things I’ve ever learned as a homeowner. For just a few dollars, you can turn pieces that other people have cast off as unworthy into something that looks stunning in your home. I transformed my cheap laminate bar cart into a bright nightstand with gold accents, but these methods will work for any side table or small furniture piece in need of repair. Here’s how to do it yourself.
Materials and tools:
- Bar cart (or any piece of furniture that needs refinishing)
- Wood filler
- Putty knife
- Sandpaper (120 and 220 grit)
- Orbital sander
- Bonding primer (I used Kilz Adhesion)
- Paint (I used about ¼ quart of Sherwin-Williams’ ProClassic paint in semigloss Alabaster)
- Gold spray paint
- Scrap wood or cardboard
- Smooth 6-inch foam roller
- Paintbrush (for hard-to-reach spots)
- Microfiber cloth (to remove dust after sanding)
- Respirator and safety glasses (to use when sanding and applying spray paint)
Before Photo
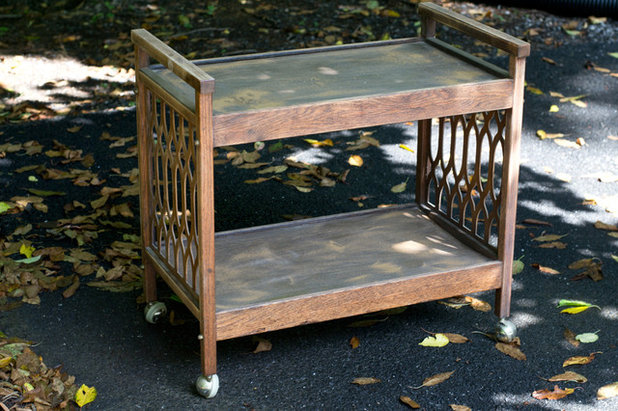
The bar cart was at least all in one piece when I found it.
Before Photo
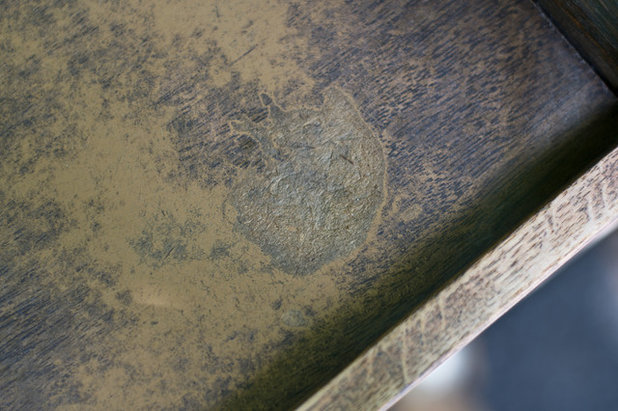
But as you can see, there were quite a few gouges in the laminate.
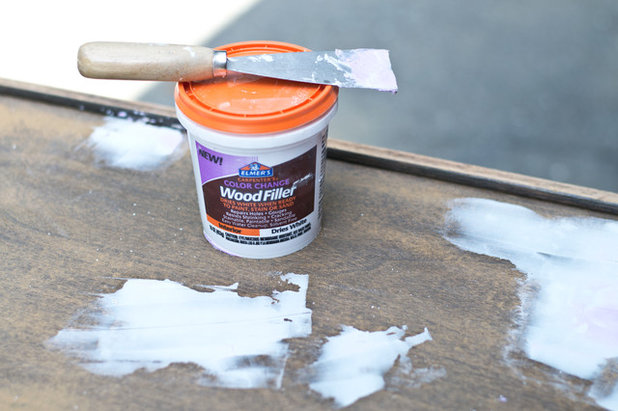
1. Use a putty knife to fill any scratches, dents and gouges with wood filler.

2. After the wood filler has completely dried, sand the entire piece with an orbital sander. Complete one pass with 120-grit sandpaper and finish with 220-grit sandpaper.
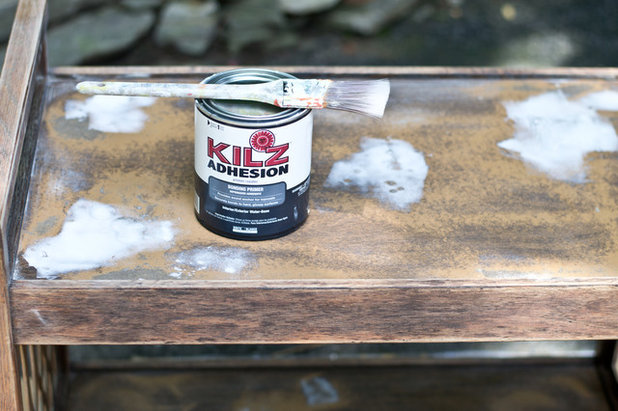
3. To prepare the piece for painting, use a microfiber cloth to wipe off any dust. Next, prime with a durable primer. If you’re painting laminate, using a bonding primer is especially important due to the slick surface.

4. Apply a first coat of durable paint, such as Sherwin-Williams’ ProClassic. This paint has a thick, durable finish, similar to that of oil-based enamel, but cleans up easily with water. Oil-based enamel is also very durable, but it needs to be cleaned with mineral spirits (or a similar product).
Once the first coat of paint has dried (this will take a few hours), apply a second coat.
Tip: Apply the paint thinly and don’t overbrush. This will help prevent drips and brush marks.
Once the first coat of paint has dried (this will take a few hours), apply a second coat.
Tip: Apply the paint thinly and don’t overbrush. This will help prevent drips and brush marks.
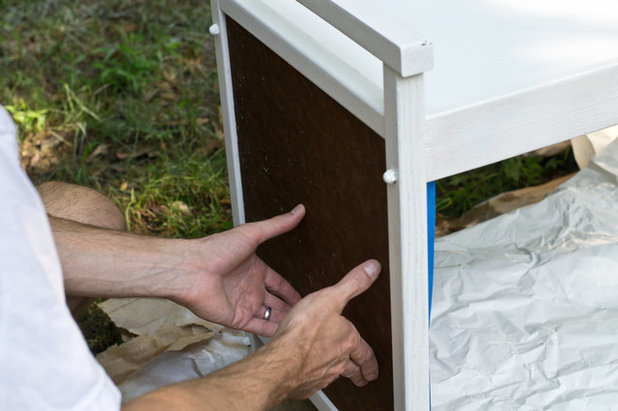
5. If your piece has cutouts, like mine, prepare to add a two-tone effect to the back and sides of the cutout. (If your piece doesn’t have cutouts, try painting just the inside edges.)
Cut a scrap piece of wood or cardboard to fit snugly inside the side frame. Enlist an extra set of hands to hold it in place firmly on the outside of the cutout.
Also, using tape and scrap paper, protect all areas that you don’t want painted gold (or whatever your accent color is).
Note: If your section is removable, take it out and firmly press it on a solid surface to paint the inside edges and back side.
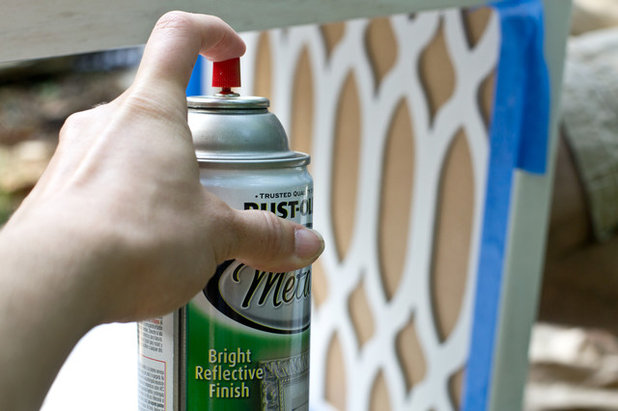
6. Using light coats (this prevents dripping), spray the back side of the cutout or inside of your piece. Make sure to get all of the edges.
Remove the excess tape and paper and let the paint cure for a few days, and you’re done! Then you can style your brand-new-looking piece of furniture with your favorite accessories.
Remove the excess tape and paper and let the paint cure for a few days, and you’re done! Then you can style your brand-new-looking piece of furniture with your favorite accessories.
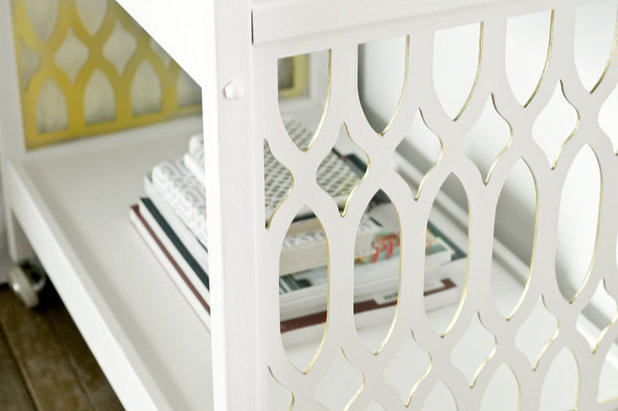
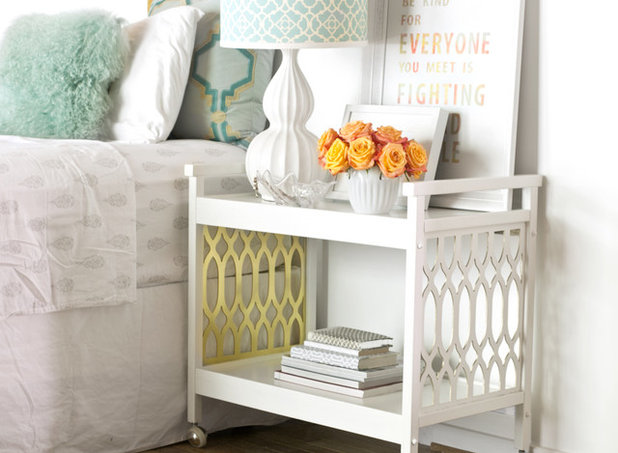
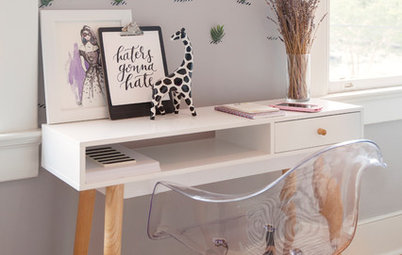
The gold edges make the cutout details stand out.
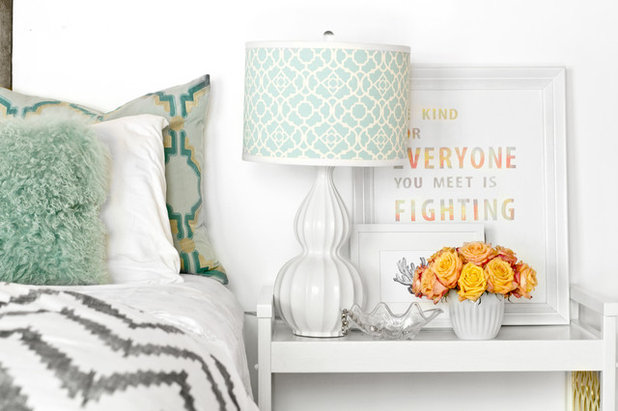
This bar cart isn’t just for serving drinks. It also makes a perfect nightstand, small desk or accent table.


Stylish, sophisticated living spaces only happen by design. Mary Shipley-Smith has over 20 years of residential... Read More
What are you working on?

Related Products
Related Stories
Fall and Thanksgiving
DIY: Make a Fresh Magnolia Wreath
Learn how to add a statement piece to your front door with these easy-to-find evergreens
Full Story
Bathtubs
10 Times When Painting a Claw-Foot Tub Refreshed a Bathroom
See how designers and homeowners use colorful paint to give tubs and bathrooms a fresh look
Full Story
Decorating Projects
6 Fun Ways to Decorate With ... Tape?
By Janet Paik
Add a new accent wall, a midcentury closet detail and more with this budget-friendly, multipurpose wonder
Full Story
Decorating Guides
How to Hang a Heavy Mirror
By Erin Carlyle
Here’s what to know about your mirror, wall and hanging hardware to do it right
Full Story

Mother’s Day
Surprise Mom With an Elegant DIY Bouquet
For Mother’s Day, use flowers and branches from your local market or backyard to create this pastel beauty
Full Story

Decorating Projects
12 Projects to Indulge Your Spring Fever
Get busy beautifying your home with one of these budget-friendly DIY decorating projects
Full Story

Entryways
DIY: Corral Your Boots With This Handy Entryway Tray
By Faith Towers
Follow along to make this easy and chic tray to protect your floors when it’s soggy outside
Full Story

Valentine’s Day
Put Together a Romantic and Whimsical Valentine’s Day Bouquet
By Becky Harris
Use American-grown branches and blooms for a truly individual way to show your love
Full Story
Crafts
Create a Festive, Colorful Mardi Gras Bead Wreath
Reuse collected beads from parades for an easy-to-make front door accent
Full Story
Organizing
DIY: Make a Wooden Wall Organizer to Curb Entryway Clutter
By Faith Towers
Create a hanging catchall for hats, coats, keys and phones
Full Story
Thank you ! there needs to be more articles like this :)
Nice article and very helpful.