


Take Better Photographs of Your House in a Snap
Let your home show its true colors with these tips for photographing with the right camera settings, lighting and more

Interior photography can seem like an art form limited to glossy magazines and flashy design websites. But even if your home is far from being featured in Dwell, you can still benefit from having a few quality photographs for future buyers, renters or your own enjoyment.
With a little bit of planning and setup, anyone can take inviting home shots by learning to navigate a few camera settings.
With a little bit of planning and setup, anyone can take inviting home shots by learning to navigate a few camera settings.
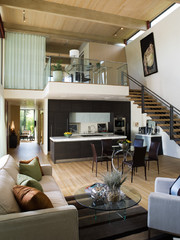
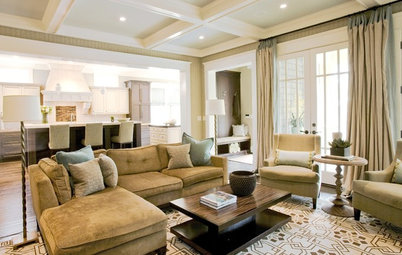
DO: Shoot with a wide-angle lens.
A wide-angle lens can capture more of your scene in a single shot and also make rooms appear more spacious. But too much of a wide angle can cause distortion — also known as the fish-eye effect.
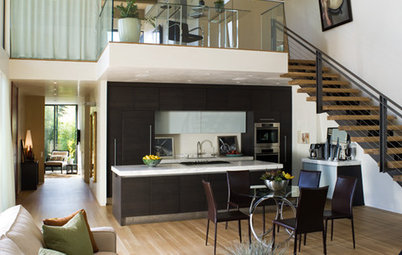
Use a lens that has a focal length of 14 to 24 millimeters and try to shoot only a few pictures at that extremely wide angle. In this picture, the entire kitchen is captured in a single image, which allows the viewer to understand how the kitchen flows into adjoining rooms. Wide-angle shots reveal a lot about a space.
A wide-angle lens can capture more of your scene in a single shot and also make rooms appear more spacious. But too much of a wide angle can cause distortion — also known as the fish-eye effect.
Use a lens that has a focal length of 14 to 24 millimeters and try to shoot only a few pictures at that extremely wide angle. In this picture, the entire kitchen is captured in a single image, which allows the viewer to understand how the kitchen flows into adjoining rooms. Wide-angle shots reveal a lot about a space.
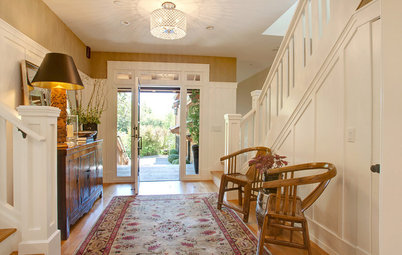
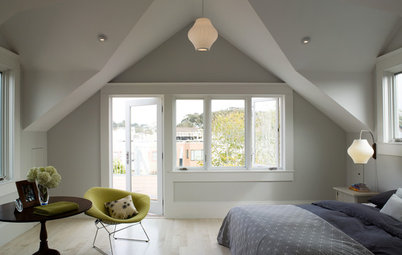
DO: Use natural light.
Pull back your curtains and draw up your shades so that as much natural light as possible gets into the room. Colors will stay true, and your picture won't have as much of that yellowish tinge.
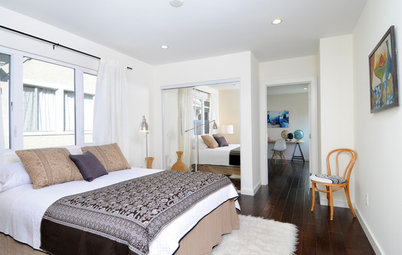
Ideally you'll be able to compose your shots around the light. Avoid areas that are very dark or bright. The natural light from this skylight is flooding the hallway, which is great since hallways often lack a strong light source. In this case the bedroom door is left open to bring in any additional light and to minimize shadows on the left side of the frame.
Pull back your curtains and draw up your shades so that as much natural light as possible gets into the room. Colors will stay true, and your picture won't have as much of that yellowish tinge.
Ideally you'll be able to compose your shots around the light. Avoid areas that are very dark or bright. The natural light from this skylight is flooding the hallway, which is great since hallways often lack a strong light source. In this case the bedroom door is left open to bring in any additional light and to minimize shadows on the left side of the frame.
DON'T: Use a flash.
In auto mode, camera settings may trigger the flash if the room is too dark. It's tempting to use it, but pictures look much better without it. Adjust your camera settings and turn off your flash. Let in natural light instead.
In this picture the flash creates a glaring hot spot in the center of the photo near the flowers and on the dark furniture. Neither are appealing features, and the room looks darker than it really is.
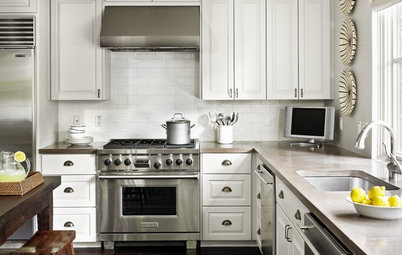
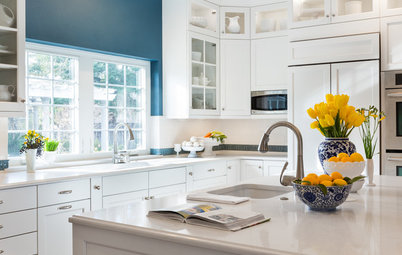
DO: Mix artificial and natural light.
Even in a space with a lot of windows, it can be advantageous to turn on a few lights to give the space warmth. This kitchen feels more real and cozy with the pendant and undercabinet lights turned on. But try to avoid excessive use of fluorescent lighting, which can give the photo a green cast.
If lighting is proving tricky for you, adjust your camera's white balance settings. Most digital cameras have auto features that will adjust for certain conditions.
DON'T: Rely on artificial light alone.
This picture was lit only with artificial light. Not only is the image dark, but the whites are very yellow and the colors are dull. This scene is not inviting.
This picture was lit only with artificial light. Not only is the image dark, but the whites are very yellow and the colors are dull. This scene is not inviting.
DO: Shoot mirrors at an angle.
Capture mirrors and glossy surfaces at an angle to avoid making an accidental appearance in your photo. In this example, shooting this bathroom at an angle is positive for two reasons: First, the photographer avoids showing up in the mirror. Second, the greater perspective of the room makes the shot. This bathroom feels spacious because of these adjustments.
Capture mirrors and glossy surfaces at an angle to avoid making an accidental appearance in your photo. In this example, shooting this bathroom at an angle is positive for two reasons: First, the photographer avoids showing up in the mirror. Second, the greater perspective of the room makes the shot. This bathroom feels spacious because of these adjustments.
DON'T: Intrude on the shot.
Well, hello there! Your image in mirrors or reflection in shiny surfaces is a distracting element to pictures, and it makes the shot feel amateurish. The flash can also cause problems in mirrors. Be extra wary of these obstacles in each room and adjust your position to find the most pleasing angle.
Well, hello there! Your image in mirrors or reflection in shiny surfaces is a distracting element to pictures, and it makes the shot feel amateurish. The flash can also cause problems in mirrors. Be extra wary of these obstacles in each room and adjust your position to find the most pleasing angle.
The most critical tool you can have when photographing your home is patience. Making adjustments to your space or figuring out settings on your camera can take time, but that practice will only make your shots better.
If the challenge of photographing your entire home feels overwhelming, take it on in pieces. Build your confidence by starting with one room and work to make that shot perfect. Only tackle the rest when you have successfully captured your first space.
Great shots are possible even with minimal equipment. With a little effort your home photos will shine.
More advice on photographing interiors:
How to Take Beautiful Home Photos
12 Ways to Style Your Interior Photos Like a Pro
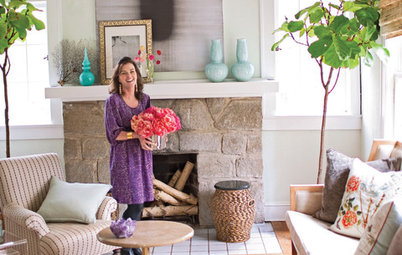


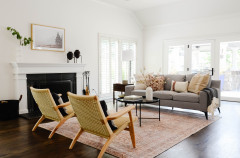
Before you get to shooting, spend some time arranging furniture and accessorizing to help tell your home's story.