


Small-Business Savvy: Photograph Products Like a Pro
Take impressive photos of your work for a website, a portfolio or packaging with any camera and these 5 tips

The world is a visual place, which means that if you are running your own creative business, one of the most critical jobs is to photograph your work successfully and then to present it online to your audience. It is no little matter. Captivating product photos can be the difference between a sale and a missed opportunity, and beautiful pictures will impress not only your prospective customers but also bloggers, editors and media outlets who can share your work and expand your audience.
If you are just starting out, hiring a professional photographer may not be a feasible option, but budding entrepreneurs can still take impressive photos of their work. You do not need the fanciest camera equipment, either. A regular camera and these techniques will greatly improve your photographs and shine a much better light on your amazing products.
If you are just starting out, hiring a professional photographer may not be a feasible option, but budding entrepreneurs can still take impressive photos of their work. You do not need the fanciest camera equipment, either. A regular camera and these techniques will greatly improve your photographs and shine a much better light on your amazing products.
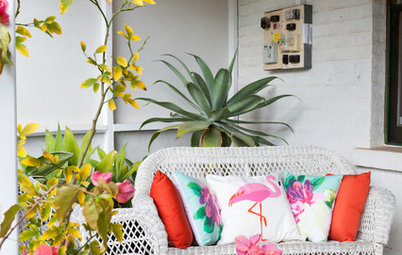
1. Use natural light. This is by far the most important tip. No matter what the camera or the lens, your products will look better in natural light. Artificial light can leave images looking yellow and dull. Colors do not appear as vibrant, and intricate details will not show up as well.
Positive example: A huge window is streaming in natural light to the right of this plant. The colors have vibrancy and are true to the real thing. It is important that customers know what they are getting when they look at your photos.
Positive example: A huge window is streaming in natural light to the right of this plant. The colors have vibrancy and are true to the real thing. It is important that customers know what they are getting when they look at your photos.
Negative example: Only overhead lamps provided light in this shot, and the outcome is an overabundance of yellow tones and very dark shadows. They take away from the beauty of the plant.
2. Eliminate harsh shadows. In photography, shadows are not always a bad thing. Sometimes they help an image by adding drama and by balancing the contrast between light and dark. But when you are shooting your artwork or handmade goods, harsh shadows can cover up details and prevent your customer from truly understanding your product. There will always be some shadows, but it is important to balance your composition and not have anything be too light or too dark.
Positive example: The detail of the vintage label on the can is an important focal point in this photo. Since light is coming in from the left, the label has the potential to be in a lot of shadow. By bouncing light back onto the can, the label can clearly be made out.
See how to set this next.
Positive example: The detail of the vintage label on the can is an important focal point in this photo. Since light is coming in from the left, the label has the potential to be in a lot of shadow. By bouncing light back onto the can, the label can clearly be made out.
See how to set this next.
The setup: You can buy professional equipment like reflectors and soft boxes, but a piece of foam core or white posterboard will get the job done too. In this example, the foam core is placed opposite of where the light is streaming in. Light is coming in from the left, so the foam core is placed to the right of the scene to bounce the light back in the direction it's coming from. This helps eliminate shadows and lightens up the overall composition.
Negative example: In this shot, no light is being bounced back onto the can, and the label is much too dark to appreciate. A customer cannot see all the details of this item and may therefore overlook it.
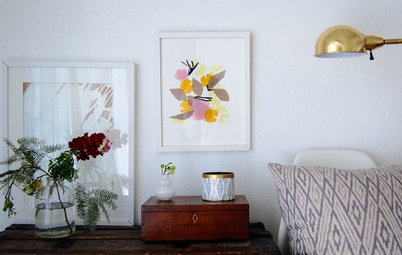
3. Simple backgrounds help your product pop. The whole point of product photos is to put your product on display. The last thing you want to do is bring attention to superfluous details or things in the background. Keep background textures or backdrops simple and fairly neutral. A busy photo can leave your customer visually confused.
Positive example: This backdrop is actually a piece of fabric. The texture adds something to the shot without overpowering it. By keeping the color of the fabric light and neutral, the focus is all on the mint cupcake stand.
Positive example: This backdrop is actually a piece of fabric. The texture adds something to the shot without overpowering it. By keeping the color of the fabric light and neutral, the focus is all on the mint cupcake stand.
Still want to bring in some pattern? A little bit is all right as long as it is not too busy. The very small floral pattern in this backdrop is a good example. Make sure the colors do not fight with the colors of your product.
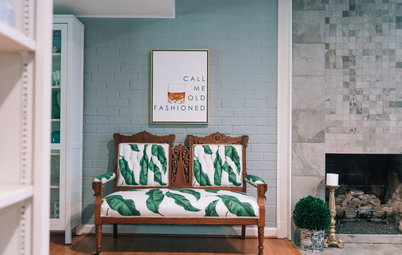
4. Dark colors can be distracting. If you are photographing on dark surfaces, remember they can be visually distracting, especially if the surface has a heavy wood grain. Experiment with the surface and lighting before taking your final shots to see which conditions make your product look best.
Positive example: A white surface is always clean and modern, and with no distractions, all the focus will be on your product. White surfaces are also natural reflectors, so they will help eliminate some shadows as well.
Positive example: A white surface is always clean and modern, and with no distractions, all the focus will be on your product. White surfaces are also natural reflectors, so they will help eliminate some shadows as well.
Negative example: This shot is not necessarily bad, but the wood grain does distract from the cup a bit. The orange color in the wood competes with the pastel tones of the cup and washi tape.
5. Experiment with different perspectives, vantage points and focus points. Your product photos should tell a story. By experimenting with different perspectives and focal points, you can highlight the materials and techniques used, and even suggest how customers can incorporate your work into their home. Having a wide range of shots helps to visually convey your product, increasing the chance your customers will be impressed by what they see.
Try zooming in close to capture details that often get overlooked.
Provide two- and three-dimensional perspectives. A single shot from a single angle may leave customers with questions.
When photographing your creative products, it is important to experiment. Test lighting conditions, backdrops, props, colors and even lenses on your camera. Spend a little time to adjust these variables and find the ideal conditions. This can give a new entrepreneur a real advantage in the online marketplace.
More:
12 Ways to Style Your Interior Photos Like a Pro
Pro Photo Styling: Say It With Flowers


Harsh shadows, use of flash, blown-out highlights, visually disruptive compositions and blurriness will draw all the attention. No matter how brilliant your work is, the viewer might leave with a negative opinion.
These five tips will minimize flaws and give your product all the attention.