


Neat Little Project: A Wooden Planter to Hang Anywhere
Dress up a drab wall or window with this planter box you make yourself. Or just set it on a patio for the easiest 'installation' of all
Chris Hill
August 25, 2013
Houzz Contributor. Chris Hill, of chiefs-shop.com, has been woodworking for more than 25 years and has family members who have been involved in nearly every aspect of home building. Chris also builds custom furniture and furnishings and restores and repairs pieces. You can find him on Houzz every week and at http://chiefs-shop.com.
Houzz Contributor. Chris Hill, of chiefs-shop.com, has been woodworking for more... More
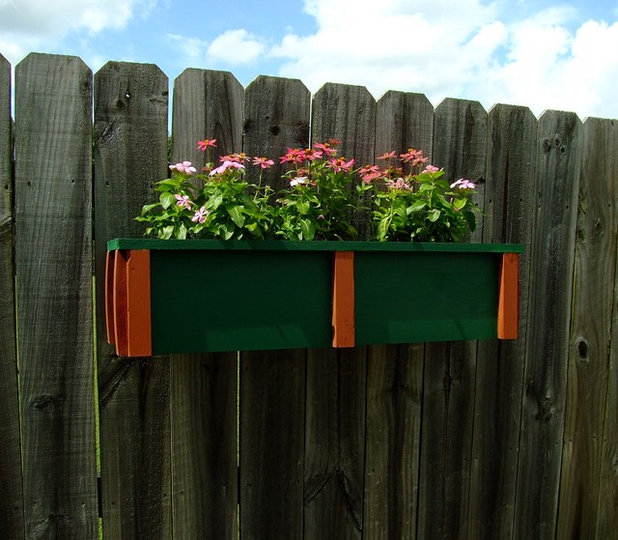
You'll recognize this project as a simple window box, but you shouldn't limit it to just a window. This planter can go in any spot where you can drive a few screws in, be it a wooden fence (as shown here), a blank wall or near that window.
If your outdoor space is a balcony and you don't want to mount it there, you can simply set it on the balcony floor, where it can get the best sunlight. (Check local codes first if you live in a multiunit building.) It's large enough that you can grow herbs in it, or you can fill it with seasonal flowers of your choice.
If your outdoor space is a balcony and you don't want to mount it there, you can simply set it on the balcony floor, where it can get the best sunlight. (Check local codes first if you live in a multiunit building.) It's large enough that you can grow herbs in it, or you can fill it with seasonal flowers of your choice.
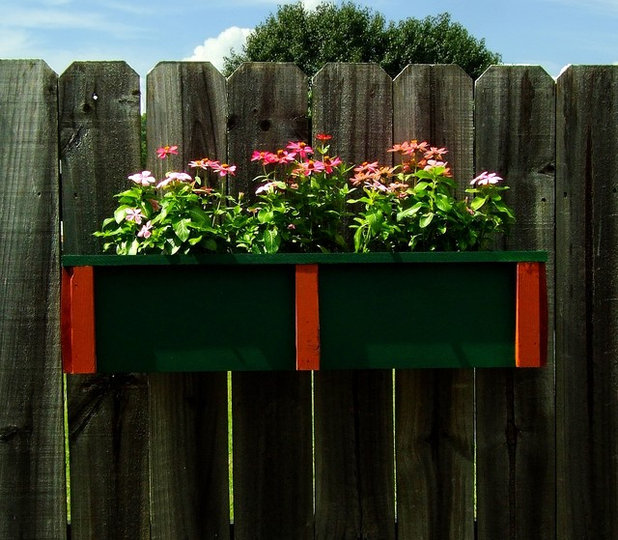
This planter box measures 33 inches wide, 8 inches high and 10¼ inches deep.
Materials:
Materials:
- (2) 1-by-8-by-8 cedar boards
- (1) 1-by-4-by-8 cedar board
- (2) 1-by-2-by-8 cedar boards
- (1) 2-by-2-by-8 cedar board
- 1⅝-inch deck screws
- 1¼-inch deck screws
- #18 x 1¼-inch galvanized brads
- Exterior wood glue
- Paint or solid exterior stain
- Table saw
- Circular saw or miter saw
- Drill or driver
- Measuring tape
- Square
- Level
- Paintbrushes
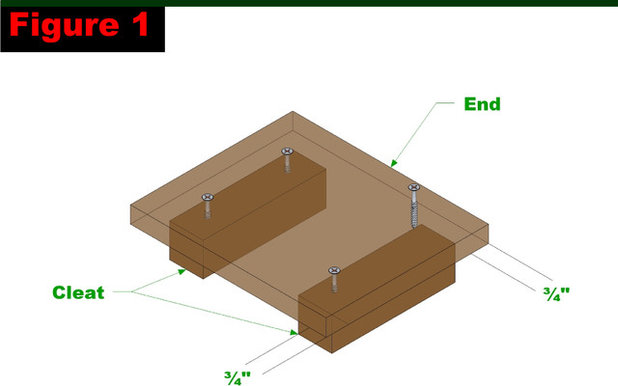
Create the End Assemblies
From the 2-by-2, cut the cleats (four total) to 5½ inches long. From the 1-by-8, cut the ends (two total) to 8¾ inches long.
Apply glue to one face of the cleats and position them as shown in Figure 1. Attach the ends to the cleats using 1⅝-inch deck screws.
From the 2-by-2, cut the cleats (four total) to 5½ inches long. From the 1-by-8, cut the ends (two total) to 8¾ inches long.
Apply glue to one face of the cleats and position them as shown in Figure 1. Attach the ends to the cleats using 1⅝-inch deck screws.
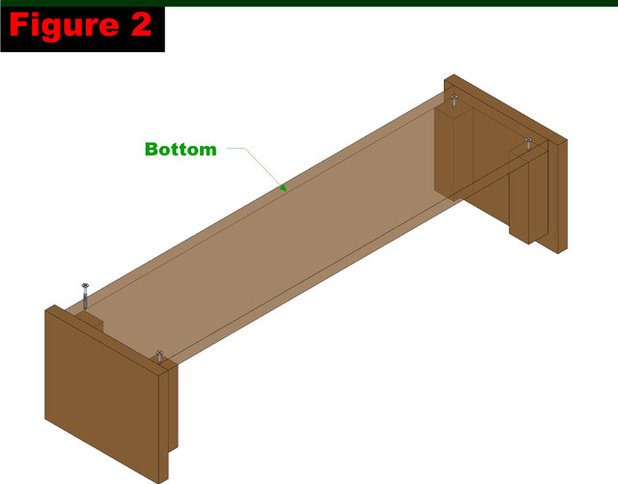
Attach the Bottom
From the 1-by-8 cut the bottom to 30 inches long.
Position the end assemblies so the ends of the cleats that are ¾ inch from the edge of the ends are facing up. Apply glue to those ends of the cleats and place the bottom as shown in Figure 2. Attach the bottom to the cleats using 1⅝-inch deck screws.
Drill several ¼-inch drain holes in the bottom.
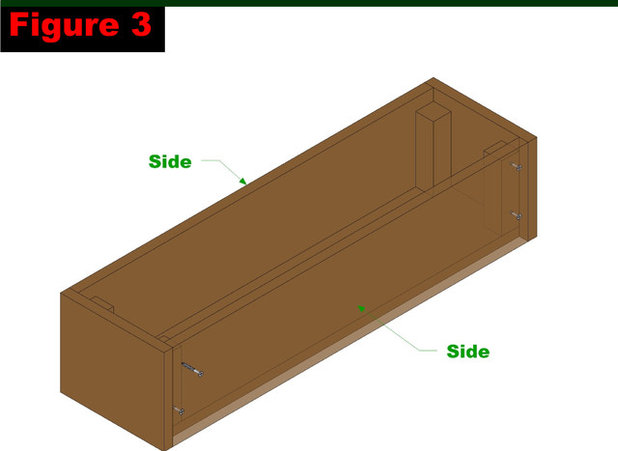
Attach the Sides
From the 1-by-8, cut the sides to 30 inches long.
Apply glue to the outside edges of the cleats and bottom, and position the sides as shown in Figure 3. Attach the sides to the cleats using 1⅝-inch deck screws. Drive a couple of #18 x 1¼-inch galvanized brads through the sides and into the bottom as well.
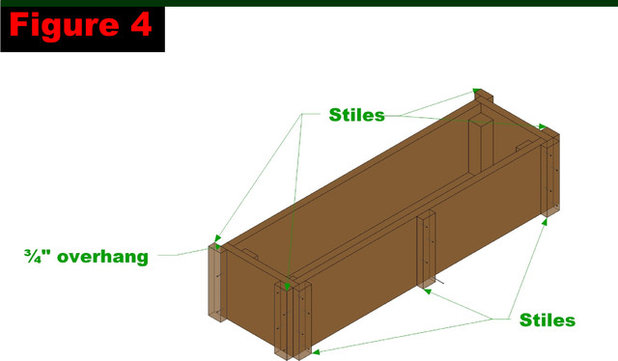
Attach the Stiles
From the 1-by-2, cut seven stiles to 7¼ inches long.
Apply glue to one face of the stiles and position the stiles as shown in Figure 4. Position one stile centered on one side as shown. The two back stiles should overhang the edge of the assembly by ¾ inch. The remaining stiles are placed flush with the front corners of the assembly as shown. Attach using #18 x 1¼-inch galvanized brads.
Create and Attach a French Cleat
A French cleat is essentially two interlocking boards that have been cut along their length at 45 degrees. Many cabinets are attached to walls with a French cleat, as it is sturdy and can support a lot of weight.
Mark a centerline across the end of the 1-by-4 board. Mark the center point of this line and draw a 45-degree angle that bisects this center point.
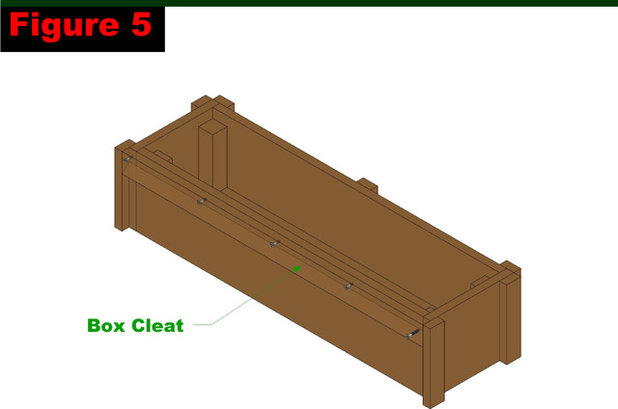
Set the saw blade on your table saw at 45 degrees, then set the fence on your table saw so that the 45-degree mark lines up with the saw blade. Rip the 1-by-4 into two long pieces, creating two interlocking boards — one for the planter box, the other for the surface to which you plan to mount it. Cut the box cleat to 31½ inches in length and the mounting cleat to 29½ inches in length.
Position the box cleat (with the point away from the assembly) flush against the side without the centered stile and attach it using 1¼-inch deck screws.
A French cleat is essentially two interlocking boards that have been cut along their length at 45 degrees. Many cabinets are attached to walls with a French cleat, as it is sturdy and can support a lot of weight.
Mark a centerline across the end of the 1-by-4 board. Mark the center point of this line and draw a 45-degree angle that bisects this center point.
Set the saw blade on your table saw at 45 degrees, then set the fence on your table saw so that the 45-degree mark lines up with the saw blade. Rip the 1-by-4 into two long pieces, creating two interlocking boards — one for the planter box, the other for the surface to which you plan to mount it. Cut the box cleat to 31½ inches in length and the mounting cleat to 29½ inches in length.
Position the box cleat (with the point away from the assembly) flush against the side without the centered stile and attach it using 1¼-inch deck screws.

Attach the Trim
From the 1-by-2, cut the two pieces of end trim to 7¼ inches long and the two pieces of side trim to 33 inches long.
Apply glue to the top of the assembly (sides, ends, stiles and box cleat). Position the side trim flush with the outer edges of the assembly and the end trim flush with the ends of the side trim. Attach the pieces using #18 x 1¼-inch galvanized brads.
Paint the box as desired.
Mount the Planter Box
Use a level to position the mounting cleat level on your desired mounting surface. Here the box is mounted on a wood fence, so the mounting cleat was attached to the fence using 1¼-inch deck screws.
To mount on other surfaces, you will need to match the fasteners to the surface — for example, masonry screws for concrete or brick walls.
Simply place the box by hooking the box cleat onto the mounting cleat.
Fill 'Er Up
Depending on your situation and how high you mount the box, you may fill it either before or after mounting it. You'll need slightly less than 1 cubic feet of soil.
What you need to know about potting soil
Depending on your situation and how high you mount the box, you may fill it either before or after mounting it. You'll need slightly less than 1 cubic feet of soil.
What you need to know about potting soil
Select the plants for your box depending on the amount of sun (hours per day) the location will receive.
More: The secret to grouping plants in a pot
More: The secret to grouping plants in a pot


Our talented staff can plan and manage projects anywhere, of any size, from interior design and space planning to... Read More
What are you working on?

Related Products

For more than 35 years, Re-Bath® of Pittsburgh has helped homeowners convert worn, outdated bathrooms into... Read More
Related Stories
Fall and Thanksgiving
DIY: Make a Fresh Magnolia Wreath
Learn how to add a statement piece to your front door with these easy-to-find evergreens
Full Story
Bathtubs
10 Times When Painting a Claw-Foot Tub Refreshed a Bathroom
See how designers and homeowners use colorful paint to give tubs and bathrooms a fresh look
Full Story
Decorating Projects
6 Fun Ways to Decorate With ... Tape?
By Janet Paik
Add a new accent wall, a midcentury closet detail and more with this budget-friendly, multipurpose wonder
Full Story

Decorating Guides
How to Hang a Heavy Mirror
By Erin Carlyle
Here’s what to know about your mirror, wall and hanging hardware to do it right
Full Story

Mother’s Day
Surprise Mom With an Elegant DIY Bouquet
For Mother’s Day, use flowers and branches from your local market or backyard to create this pastel beauty
Full Story

Decorating Projects
12 Projects to Indulge Your Spring Fever
Get busy beautifying your home with one of these budget-friendly DIY decorating projects
Full Story

Entryways
DIY: Corral Your Boots With This Handy Entryway Tray
By Faith Towers
Follow along to make this easy and chic tray to protect your floors when it’s soggy outside
Full Story

Valentine’s Day
Put Together a Romantic and Whimsical Valentine’s Day Bouquet
By Becky Harris
Use American-grown branches and blooms for a truly individual way to show your love
Full Story

Crafts
Create a Festive, Colorful Mardi Gras Bead Wreath
Reuse collected beads from parades for an easy-to-make front door accent
Full Story

Organizing
DIY: Make a Wooden Wall Organizer to Curb Entryway Clutter
By Faith Towers
Create a hanging catchall for hats, coats, keys and phones
Full Story
Could this type of planter be attached to a block wall? I want to create privacy above a five foot high block wall with some greenery like bamboo or Sansevieria (Mother in Law's Tongue). Thank you.