


A Couple Update Their Kitchen One Step at a Time for $8,047
DIY spirit, research, elbow grease and careful budgeting result in a Dallas family’s dream kitchen

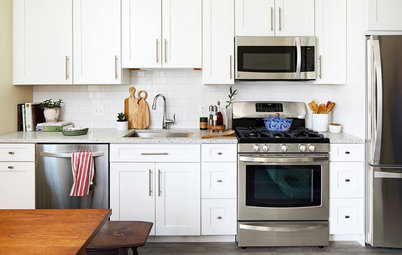
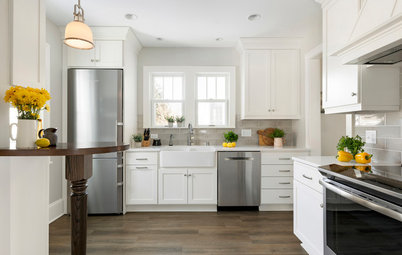
In summer 2014, before the Cannons moved in, Ryan Cannon and Brent Jones tore out the kitchen’s tile floor and installed hardwood flooring.
Phase 1: July and August 2014
Phase 1 Budget
Flooring: $200
Paint: $150 walls, ceilings, and trim
Baseboards: $40
Family name sign (seen in a later photo): $189
Total: $579
Phase 2: August 2014 to June 2016
They replaced appliances as they found good deals on new and gently used models.
Phase 2 Budget
New stainless steel range: $950
New stainless steel dishwasher: $650
Used stainless steel refrigerator: $350
New stainless steel microwave: $250
Total: $2,200
Phase 1: July and August 2014
- Purchased home
- Painted walls and ceilings
- Replaced tile floor with wood
- Added new baseboards
Phase 1 Budget
Flooring: $200
Paint: $150 walls, ceilings, and trim
Baseboards: $40
Family name sign (seen in a later photo): $189
Total: $579
Phase 2: August 2014 to June 2016
They replaced appliances as they found good deals on new and gently used models.
Phase 2 Budget
New stainless steel range: $950
New stainless steel dishwasher: $650
Used stainless steel refrigerator: $350
New stainless steel microwave: $250
Total: $2,200
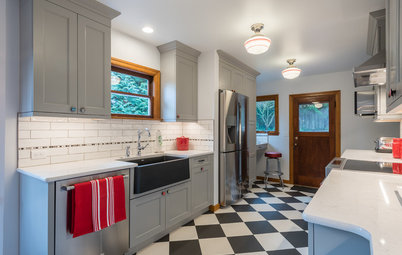
Michele Cannon painted the existing kitchen cabinets in fall 2017.
Phase 3: September 2017
So she went online, looking to Houzz and other sites for the best advice. “I love a white kitchen, but the more I heard about handprints from little ones, dirt and grease on lower cabinets, the more it made me decide to go with a dark color there,” she says. Though she usually likes blacks and grays, she found herself adding beautiful kitchens with dark blue lower cabinets to her ideabook. She chose a deep blue hue and got to work.
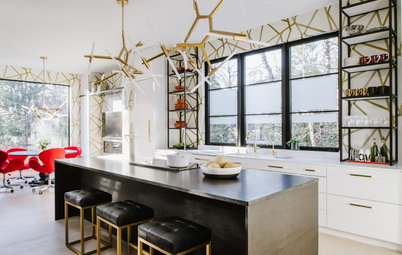
Here you can see the kitchen as it looked last November after Michele completed her cabinet paint job. The painting process took several weeks. The couple also added a butcher block island and a stylish pantry door, and Ryan installed LED strip lights over and under the cabinets and along the sides of the cabinets with clear doors. Months later they got rid of the raised bar, replaced the countertops and added a new tile backsplash.
The Cabinet Paint Job
Prep. Michele first got an estimate from someone to paint the cabinets for her. It was $3,200. “There’s a lot of things I can’t do and am more than happy to pay someone else to do and do it right. But I can paint,” she says. She began by removing the cabinet doors, drawers and hardware. She cleaned and degreased the cabinets thoroughly, attacking them with a trisodium phosphate, or TSP, cleaning product. “When I saw how much dirt and grease that wood was hiding, I was thankful I had decided to go with a dark color instead of white,” she says.
Lower cabinets. Michele knew that getting paint to stick to wood would not be easy. In her research she’d learned that chalk paint sticks to wood cabinets well, so the meticulous cleaning job she did and adding a chalk paint powder by B.B. Frosch to her latex paint saved her from having to sand them. Once her first coat was done, she decided the color she’d chosen was a little too bright for her tastes and she added some black paint to it. She used two coats of paint on the lower cabinets. “One issue with chalk paint I read about is that you have to wax it once a year. I was not up for that,” she says. So instead she applied several coats of polyurethane to give the cabinets a tough, low-maintenance finish.
Upper cabinets. A fear of wood bleeding through white paint meant the upper cabinets needed some sort of treatment. In her research she found that many people recommended shellac as a base coat to seal the wood. She rubbed on two coats of Zinsser Bulls-Eye Clear Shellac with a lint-free cloth, then used three coats of white paint on the upper cabinets.
Lower cabinets: Opera Glasses (with black added), Behr; upper cabinets: Whisper White, Behr
Phase 3: September 2017
- Prepped and painted kitchen cabinets
- Added glass-front doors
- Added door knobs and pulls
- Installed LED strip lights
- Added hanging pot rack and knife rack
So she went online, looking to Houzz and other sites for the best advice. “I love a white kitchen, but the more I heard about handprints from little ones, dirt and grease on lower cabinets, the more it made me decide to go with a dark color there,” she says. Though she usually likes blacks and grays, she found herself adding beautiful kitchens with dark blue lower cabinets to her ideabook. She chose a deep blue hue and got to work.
Here you can see the kitchen as it looked last November after Michele completed her cabinet paint job. The painting process took several weeks. The couple also added a butcher block island and a stylish pantry door, and Ryan installed LED strip lights over and under the cabinets and along the sides of the cabinets with clear doors. Months later they got rid of the raised bar, replaced the countertops and added a new tile backsplash.
The Cabinet Paint Job
Prep. Michele first got an estimate from someone to paint the cabinets for her. It was $3,200. “There’s a lot of things I can’t do and am more than happy to pay someone else to do and do it right. But I can paint,” she says. She began by removing the cabinet doors, drawers and hardware. She cleaned and degreased the cabinets thoroughly, attacking them with a trisodium phosphate, or TSP, cleaning product. “When I saw how much dirt and grease that wood was hiding, I was thankful I had decided to go with a dark color instead of white,” she says.
Lower cabinets. Michele knew that getting paint to stick to wood would not be easy. In her research she’d learned that chalk paint sticks to wood cabinets well, so the meticulous cleaning job she did and adding a chalk paint powder by B.B. Frosch to her latex paint saved her from having to sand them. Once her first coat was done, she decided the color she’d chosen was a little too bright for her tastes and she added some black paint to it. She used two coats of paint on the lower cabinets. “One issue with chalk paint I read about is that you have to wax it once a year. I was not up for that,” she says. So instead she applied several coats of polyurethane to give the cabinets a tough, low-maintenance finish.
Upper cabinets. A fear of wood bleeding through white paint meant the upper cabinets needed some sort of treatment. In her research she found that many people recommended shellac as a base coat to seal the wood. She rubbed on two coats of Zinsser Bulls-Eye Clear Shellac with a lint-free cloth, then used three coats of white paint on the upper cabinets.
Lower cabinets: Opera Glasses (with black added), Behr; upper cabinets: Whisper White, Behr
That fall, the couple also added glazed cabinet fronts and LED strip lighting to open up the kitchen and display favorite pieces.
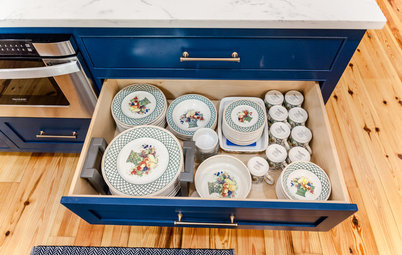
Glazed cabinet doors. Michele and Ryan replaced the wood inserts with Lexan polycarbonate sheets on a few of their original cabinet doors. Ryan is well-versed in electrical work in addition to being handy in general, and he added LED strip lights down the sides of these cabinets to illuminate the interiors. Michele carefully curates the items that are displayed in the clear-front cabinets. The glazing “opens up the kitchen, especially since there are no windows, and allows me to show off some of the older dishes I’ve collected. The white mugs were my grandma’s, and the green pitcher is jadeite Depression glass,” she says. She scored the new cabinet hardware from a private seller on Facebook.
With the new paint job, the Lexan inserts and the addition of new cabinet pulls and knobs, it’s hard to believe these are the same cabinets.
Phase 3 Budget
Painting supplies: $150
Cabinet Lighting: $100
Lexan sheets: $45
Drawer pulls and door handles: $40
Pot rack, extra pot hooks and extra chain: $78
Knife rack: $119
Total: $532
Lexan glass: Amazon
They installed a new pantry door that fall as well.
Phase 4: November 2017
Phase 4 Budget
Wooden pantry door with clear glass insert: $100
Stain and Polycrylic topcoat: $15
Frosted film: $20
Decal: $13
Black door lever: $78
Total: $226
Pantry door decal: Designs by Tenisha, Etsy
Phase 4: November 2017
- Installed new pantry door
- Stained pantry door
- Added film and decal to glass insert in pantry door
Phase 4 Budget
Wooden pantry door with clear glass insert: $100
Stain and Polycrylic topcoat: $15
Frosted film: $20
Decal: $13
Black door lever: $78
Total: $226
Pantry door decal: Designs by Tenisha, Etsy
The original kitchen with a view of the dining room above the peninsula bar top
Phase 5: June 2018
By the following spring, the couple knew they had to replace their countertops. “I didn’t love our countertops, but everyone who came over always admired them so I’d talked myself into living with them,” Michele says. They were originally laminate, but the previous homeowners had covered them in something that looked like concrete. They were more brown than the couple liked. However, right around the time they had decided to live with them, the counters started to fall apart, with large chunks chipping off the edges.
The couple also had wanted to get rid of the high bar on the peninsula and add a new backsplash, so the crumbling countertops gave them the green light to begin this next step in the cosmetic renovation. “The kids were always climbing up on the bar stools and standing on them just to see over that bar, and we wanted to open things up between the dining room and the kitchen,” Michele says. They wound up learning about three countertop choices while interviewing contractors and sourcing materials.
1. Concrete. The couple initially looked into concrete in grayer tones than their existing countertops because they liked the look and idea of it. But the contractors they interviewed didn’t seem up to the job, didn’t show up on time or didn’t call back after giving an estimate, or all of the above. So they started looking into other materials that a wider range of contractors could handle.
2. Quartz. With concrete scratched off the list, Michele and Ryan knew they liked the look of marble, but they wanted something that was more resistant to scratches, chips and stains. So Michele did her research and they turned to quartz, an engineered product that can look like natural stone, because they liked its look and durability. However, once they got to the stone yard to check out slabs, they learned that the quartz they liked came in smaller slabs than natural stone and they would need to buy a second slab to cover their countertops. This was a potential budget buster.
3. Quartzite. While at the stone yard receiving this news about quartz, they saw slabs of quartzite, a natural stone that is harder than marble. They found out that one slab would take care of the whole kitchen, and ding-ding-ding, they had a winner. “Although quartzite is more expensive than quartz, we didn’t have to buy a second slab so we saved money overall,” Michele says.
And once they’d given up on concrete, they interviewed other contractors, asking each of them if they had completed a bar removal like this before. One of them whipped out his phone and showed them a slew of before-and-after photos of similar jobs he’d completed. That’s when they knew they had their contractor, even though his estimate was not the lowest quote.
Tip: Often the lowest estimate is not the best value. You get what you pay for, so conduct thorough interviews and check out references and reviews when choosing a home improvement pro.
What’s the Difference Between Quartz and Quartzite?
Phase 5: June 2018
- Cut down high bar top between dining room and kitchen.
- Replaced existing countertops with quartzite
- Installed new backsplash
- Replaced sink and faucet
By the following spring, the couple knew they had to replace their countertops. “I didn’t love our countertops, but everyone who came over always admired them so I’d talked myself into living with them,” Michele says. They were originally laminate, but the previous homeowners had covered them in something that looked like concrete. They were more brown than the couple liked. However, right around the time they had decided to live with them, the counters started to fall apart, with large chunks chipping off the edges.
The couple also had wanted to get rid of the high bar on the peninsula and add a new backsplash, so the crumbling countertops gave them the green light to begin this next step in the cosmetic renovation. “The kids were always climbing up on the bar stools and standing on them just to see over that bar, and we wanted to open things up between the dining room and the kitchen,” Michele says. They wound up learning about three countertop choices while interviewing contractors and sourcing materials.
1. Concrete. The couple initially looked into concrete in grayer tones than their existing countertops because they liked the look and idea of it. But the contractors they interviewed didn’t seem up to the job, didn’t show up on time or didn’t call back after giving an estimate, or all of the above. So they started looking into other materials that a wider range of contractors could handle.
2. Quartz. With concrete scratched off the list, Michele and Ryan knew they liked the look of marble, but they wanted something that was more resistant to scratches, chips and stains. So Michele did her research and they turned to quartz, an engineered product that can look like natural stone, because they liked its look and durability. However, once they got to the stone yard to check out slabs, they learned that the quartz they liked came in smaller slabs than natural stone and they would need to buy a second slab to cover their countertops. This was a potential budget buster.
3. Quartzite. While at the stone yard receiving this news about quartz, they saw slabs of quartzite, a natural stone that is harder than marble. They found out that one slab would take care of the whole kitchen, and ding-ding-ding, they had a winner. “Although quartzite is more expensive than quartz, we didn’t have to buy a second slab so we saved money overall,” Michele says.
And once they’d given up on concrete, they interviewed other contractors, asking each of them if they had completed a bar removal like this before. One of them whipped out his phone and showed them a slew of before-and-after photos of similar jobs he’d completed. That’s when they knew they had their contractor, even though his estimate was not the lowest quote.
Tip: Often the lowest estimate is not the best value. You get what you pay for, so conduct thorough interviews and check out references and reviews when choosing a home improvement pro.
What’s the Difference Between Quartz and Quartzite?
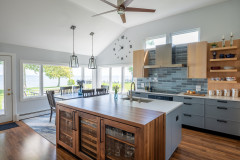
The kitchen today
The Bar Is Gone, and the Counters are Beautiful
In three days, the contractor demolished the raised bar between the kitchen and the dining room and installed the new countertops, backsplash and undermount stainless steel sink and faucet with contemporary style.
“I feel the quartzite could be modern or more traditional depending on the color palette of the kitchen,” Michele says. “It feels more modern now with the blue cabinets, but change the cabinets to all white or a beautiful gray and the countertops would still look fantastic but take on a more traditional vibe. And since I like to change things up every so often, it’s great to have so many options.”
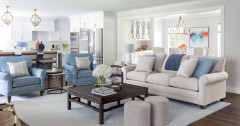
The original dining room and kitchen peninsula
Before. The bar cut off the view for the kids from this dining room to the kitchen. And the counter overhang wasn’t designed deep enough to accommodate diners.
Before. The bar cut off the view for the kids from this dining room to the kitchen. And the counter overhang wasn’t designed deep enough to accommodate diners.
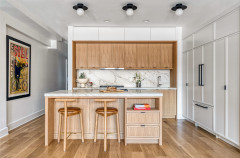
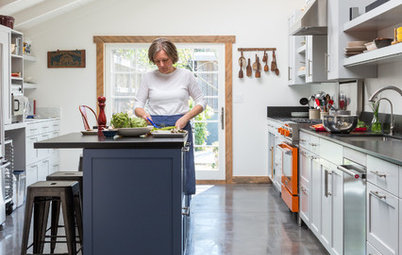
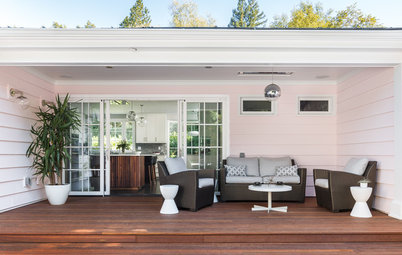
The kitchen and peninsula eating area today
After. Now the peninsula is a spot everyone in the family can use. The windowless kitchen now gets more light from the dining room. And they added 4 more inches of overhang to the counter on the dining room side to make it functional for eating.
“The bar being level with the counters is also one of my favorite things. It opens up the kitchen, gives us more usable space and, best of all, allows my kids access to the bar area without having to stand on the bar stools,” Michele says. “The very first thing my 4-year-old did after the countertops were in was hop up to sit on a stool and say, ‘Hey! We can eat here now!’”
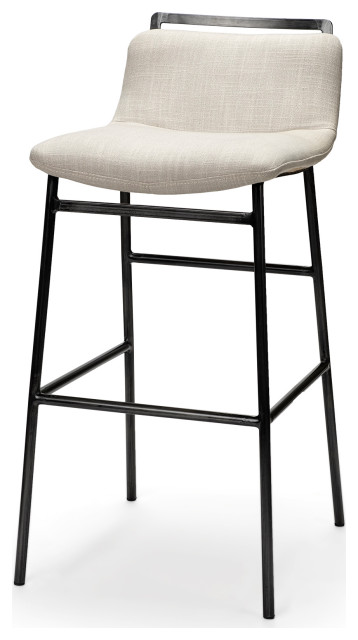
Browse bar stools
After. Now the peninsula is a spot everyone in the family can use. The windowless kitchen now gets more light from the dining room. And they added 4 more inches of overhang to the counter on the dining room side to make it functional for eating.
“The bar being level with the counters is also one of my favorite things. It opens up the kitchen, gives us more usable space and, best of all, allows my kids access to the bar area without having to stand on the bar stools,” Michele says. “The very first thing my 4-year-old did after the countertops were in was hop up to sit on a stool and say, ‘Hey! We can eat here now!’”
Browse bar stools
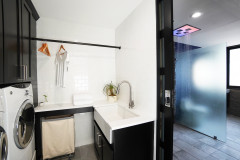
The new sink
What a Difference a New Sink and Faucet Can Make
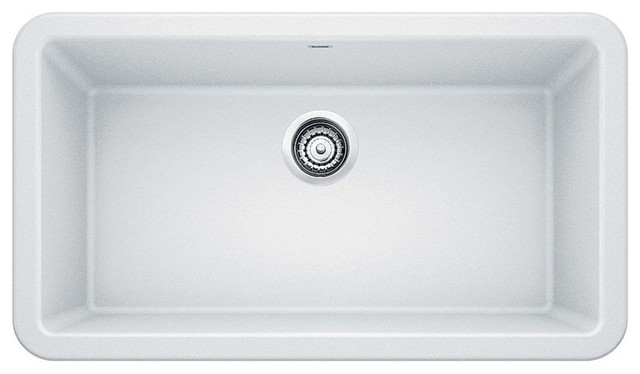
Here’s a closer look at the quartzite countertops and the new sink. “My new sink and faucet are probably my most favorite thing about the whole remodel. The old sink was about 8 inches deep and split halfway down the middle. The faucet was low and small, and the sprayer wouldn’t pull out. And if you did force it out, it wouldn’t go back in,” Michele says. “My new sink is one large bowl and it’s 12 inches deep. Every time I use it I ask my husband, ‘Have I mentioned that this sink is amazing?’”
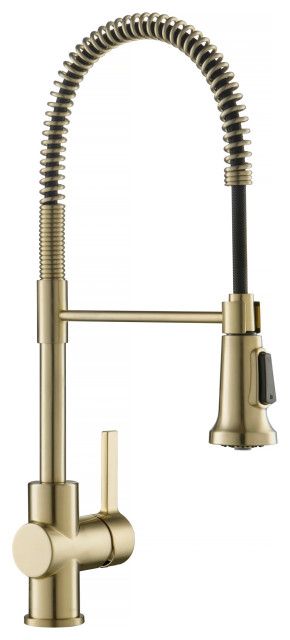
The Cannons knew they wanted an industrial-style faucet but worried about overspray now that the bar was one level. “We saw a commercial for Delta’s faucet with ShieldSpray and decided we had to have one,” Michele says, adding that the Foundry kitchen faucet with ShieldSpray is everything they hoped it would be.
What a Difference a New Sink and Faucet Can Make
Here’s a closer look at the quartzite countertops and the new sink. “My new sink and faucet are probably my most favorite thing about the whole remodel. The old sink was about 8 inches deep and split halfway down the middle. The faucet was low and small, and the sprayer wouldn’t pull out. And if you did force it out, it wouldn’t go back in,” Michele says. “My new sink is one large bowl and it’s 12 inches deep. Every time I use it I ask my husband, ‘Have I mentioned that this sink is amazing?’”
The Cannons knew they wanted an industrial-style faucet but worried about overspray now that the bar was one level. “We saw a commercial for Delta’s faucet with ShieldSpray and decided we had to have one,” Michele says, adding that the Foundry kitchen faucet with ShieldSpray is everything they hoped it would be.
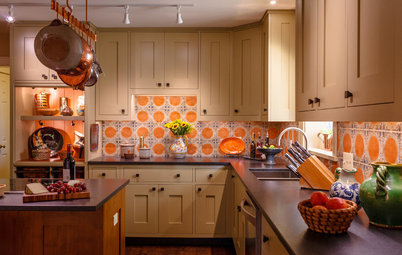
The Cannons replaced appliances, countertops and backsplash tile as part of their extended makeover.
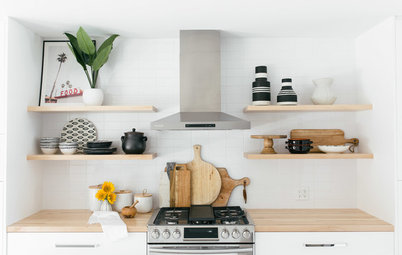
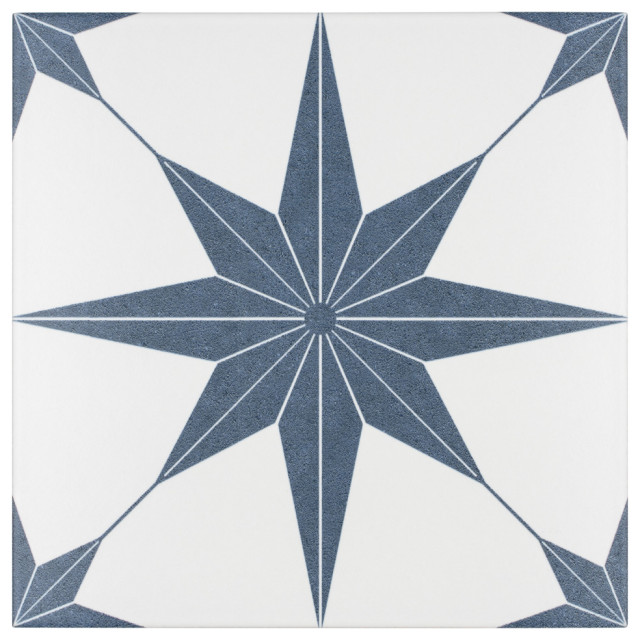
Backsplash. Michele had wanted flat subway tiles until she saw beveled subway tiles up close. The three-dimensional tiles add depth to the wall and freshen up the classic subway style. You can see how the undercabinet LED strip lights emphasize the 3D tile profiles here.
A more open feeling. Michele’s ideal kitchen would have had a vent hood and a microwave drawer, but this was one of those spots where she came up with a more practical and budget-friendly alternative: an over-the-range microwave with a built-in ventilating system. “I totally get the desire to not have a mounted microwave. They’re like ceiling fans — you’d rather not have to have them, but sometimes there’s no way around it. I would have loved to have installed a vent hood, but that would have meant getting rid of the microwave completely, which wasn’t an option,” she says. The glazed cabinet fronts were a way to make the cabinetry feel more open while still retaining the mounted microwave oven.
Phase 5 Budget
Quartzite slab, bar cutdown and countertop and backsplash installation: $3,650*
Backsplash tile: $80
Sink: $300
Faucet: $250
Stainless steel table: $100
Marble pastry slab: $130
Total: $4,510
*Includes labor
Knife rack: Wake the Tree, Etsy; find magnetic knife holders
Other New Additions
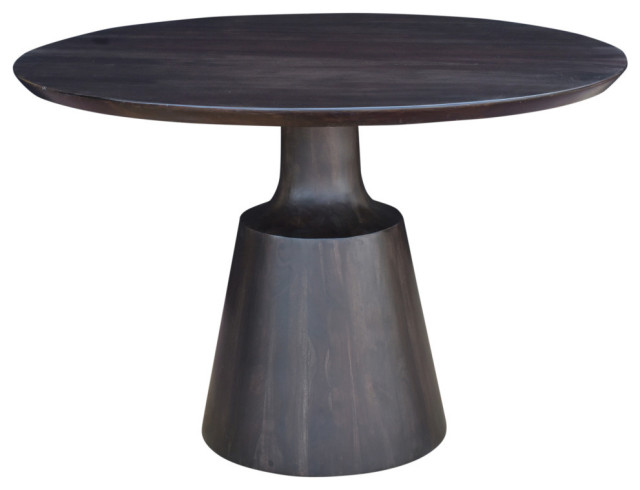
We skimmed over these moves within the phases but they deserve to be emphasized. Michele replaced her butcher block island with a stainless steel one ($100) to better suit the kitchen’s new look. She added a marble pastry slab ($130) to the top of it for function and to play off the marble look of the new countertops. A new streamlined pot rack ($78 including hooks and extra chain) creates some division between the kitchen and dining room and shows off the cookware she and Ryan have collected over time.
Wall color: Stonington Gray, Benjamin Moore; marble pastry slab: Williams-Sonoma; island: WebstaurantStore; browse kitchen islands
The refrigerator area before its update
The refrigerator area today, with the family’s custom sign
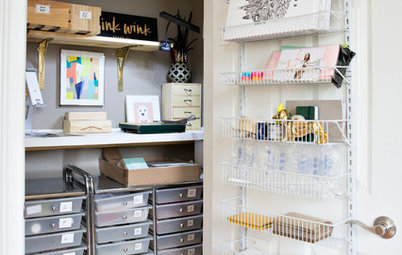
A Station for Baking
Michele is a professional cake decorator, and this area around the fridge is dedicated to baking ingredients and equipment, including the standing mixer. She and Ryan replaced the wood door inserts on the cabinet over the fridge with Lexan glass and he added his LED strip light magic to the top and bottom of the cabinets and inside the glazed-front cabinet. He wired all of the LED strip lights in the kitchen to one light switch. They also found a great deal on a gently used stainless steel refrigerator from a neighbor via Nextdoor.com.
She took full advantage of the space above the upper cabinets. “I love collecting old things, and the new lighting adds just the right touch to highlight fun pieces like my milk glass collection, the yellow sugar and flour tins that belonged to my grandma, the tin lunchbox that belonged to my dad and the tin plate that belonged to my dad’s granny,” she says. The lunchbox still has the original Thermos inside.
The blue candy dishes and white vase are milk glass and the blue-and-white mixing bowl belonged to Michele’s mother. She had the family sign made at an Etsy shop, The Lizton Sign Shop.
The style of the kitchen has the balance Michele had envisioned from the start. The crisp white contrasting with blue-black, the gleaming no-nonsense stainless steel and streamlined edges are modern elements. The natural stone countertops, the beveled backsplash and items with meaning, like the milk glass collection and other family pieces, soften the overall look into an inviting transitional style.
The style of the kitchen has the balance Michele had envisioned from the start. The crisp white contrasting with blue-black, the gleaming no-nonsense stainless steel and streamlined edges are modern elements. The natural stone countertops, the beveled backsplash and items with meaning, like the milk glass collection and other family pieces, soften the overall look into an inviting transitional style.
The Completed Kitchen
It took four years and a lot of sweat equity, but the Cannon family’s kitchen makeover is finally complete. And they completed the bulk of it within six months. The total for the entire remodel was $8,047. The marble pastry slab ($130) was a gift from Michele’s mother, so the couple spent less than $8,000 on the kitchen.
“It definitely has been a drawn-out process,” Michele says. “It helped that I always had an idea of what I wanted to do with it so we could work on bits and pieces as we were able. And it kept us from having to take out a loan and going into debt to do it.”
Takeaways
More
Homeowner’s Workbook: How to Remodel Your Kitchen
5 Trade-Offs to Consider When Remodeling Your Kitchen
See other kitchen makeovers
Other Resources on Houzz
Find a kitchen contractor near you
Ask the community about your kitchen
Browse kitchen products
It took four years and a lot of sweat equity, but the Cannon family’s kitchen makeover is finally complete. And they completed the bulk of it within six months. The total for the entire remodel was $8,047. The marble pastry slab ($130) was a gift from Michele’s mother, so the couple spent less than $8,000 on the kitchen.
“It definitely has been a drawn-out process,” Michele says. “It helped that I always had an idea of what I wanted to do with it so we could work on bits and pieces as we were able. And it kept us from having to take out a loan and going into debt to do it.”
Takeaways
- Don’t feel bad if your renovation takes an extended period of time. It’s a good way to stay within a budget you can handle. Because they waited until they had the money, the Cannons never had to borrow for the renovation.
- Do your research before embarking on DIY adventures. It will save you from having to do a task more than once. For example, Michele found that the techniques she read about, like using chalk paint powder and shellac, were successful ways to avoid sanding the cabinets.
- Make sure your cabinets are in good shape before investing the time and effort in painting them.
- A dark paint color on lower cabinets can hide a multitude of sins.
- Lighted glazed-front cabinets can help mitigate the lack of natural light in a kitchen.
- When you are interviewing home improvement pros, ask about their experiences with similar jobs, and check out their portfolios, references and online reviews. The estimate is not the only factor to consider when assessing value.
More
Homeowner’s Workbook: How to Remodel Your Kitchen
5 Trade-Offs to Consider When Remodeling Your Kitchen
See other kitchen makeovers
Other Resources on Houzz
Find a kitchen contractor near you
Ask the community about your kitchen
Browse kitchen products


Kitchen at a Glance
Who uses it: Houzz reader Michele Cannon; her husband, Ryan Cannon; their two kids, ages 4 and 8; a cat and two dogs
Location: Dallas
Size: About 144 square feet (13 square meters)
Before. “When I look at the ‘before’ photos of our house I can’t believe we bought it,” says homeowner Michele Cannon. “I like more black and white and grays, and it needed a lot of work.” She, husband Ryan and their young kids (4 months old and 4 years old when the sale closed) were embarking on a new adventure in homeownership. The couple got busy after work and on weekends, painting every wall and replacing all the carpeting and the tile floor in the kitchen with hardwood flooring before they moved in.
“Luckily, we are both good at working with our hands. But by the time we moved in we were simply exhausted, so we put the kitchen makeover off,” she says. It wasn’t until four years later that they completed the job. During those years they replaced the existing appliances with stainless steel models whenever they found a good bargain, and Michele did thorough research, including using Houzz to get inspiration and tips.
Last October, 3½ years after they moved in, Michele was ready to attack the laborious cabinet paint job that was the most important element of the kitchen’s cosmetic makeover. She’d done thorough research and given herself a deadline — completion before guests arrived for Thanksgiving. It was six more months after that before they completed the makeover. The kitchen now has a clean transitional style that mixes modern lines and finishes with personal vintage-style elements.
We’ll go through all of the phases and budgets for each phase. Labor was paid for with the couple’s sweat equity unless otherwise noted.