


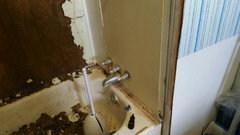
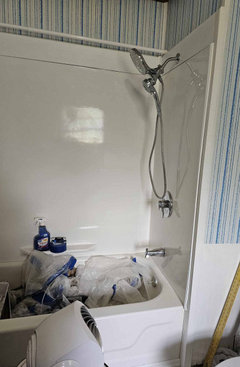
Ensuite #2 for bedroom #3 renovation (work-in-progress)
We purchased this home in the mid 1980s but it was built in the 40s or earlier. It came with 3 bedrooms and 2 ensuite bathrooms (with tub/shower combos) and one guest bath that is only large enough for children. The two ensuites both had carpet. It was beige carpet that was already stained and we didn't have the time or $ to rectify that for many years. We spent nearly 10 years overseas (during which time we had tenants from hell who did over $70k worth of damage and haven't paid one cent for it-- our lawyer said they would burn the house down and kill our livestock/pets if we tried to sue them). Because the plumbing was messed up by the tenants, the sewage kept backing up and, unbeknownst to us, broke the wax seals on the toilets so they were leaking into the subfloor.
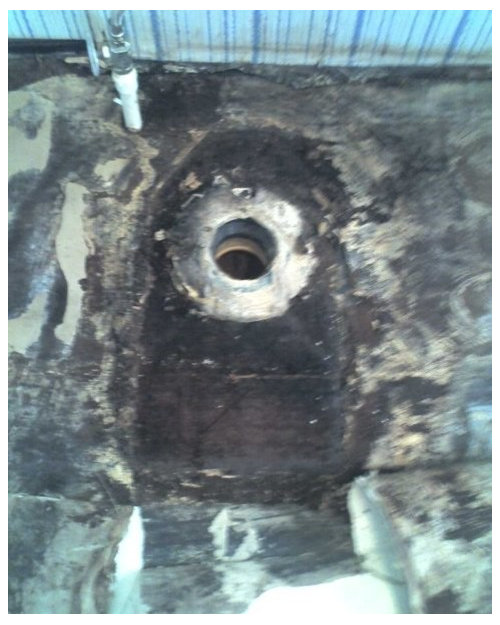
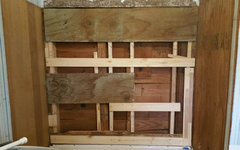
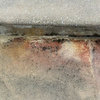
When the linoleum in Ensuite #2 started bubbling up and the floor got softer, I realized we had a problem. We took the toilet off and found that there was carpet underneath it. The wood subfloor was the consistency of mud and was absolutely disgusting. There is also carpet underneath the vanity and it became saturated with sewage. I was unable to remove it without breaking the plumbing for the lavatory so I put a face panel underneath the toekick and sealed it up.
My father was the handy one with more building experience and knowledge. He was helping me but he passed away suddenly and unexpectedly in March 2009. I did manage to chisel out the ruined floor panel but the project got put on hold for a few years but I decided that I need to finish it and began working on it again.
Sadly, I did not get any photos of the carpet, old toilet, or even the linoleum before it was messed up.
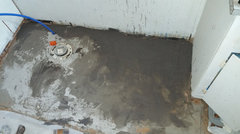
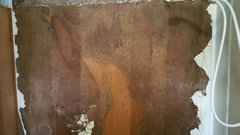
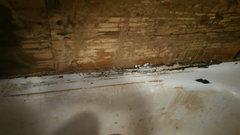
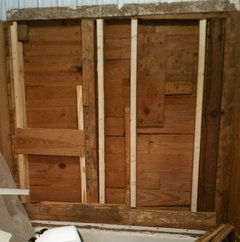
Photo #1 shows the carpet under where the toilet sat. The torn linoleum is visible.
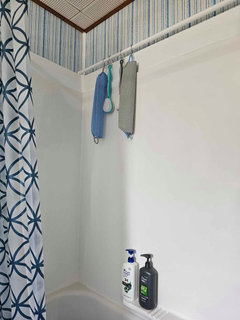
#2 shows the carpet pad after the carpet was removed. The linoleum was pried up and you can see that some of it stuck to the wood.
#3 shows when I removed the carpet pad. The wood underneath was like mud.
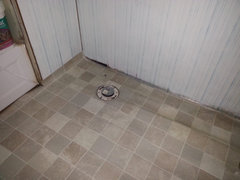
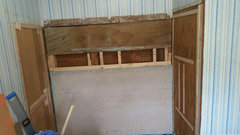
#4 shows after I shoveled out the mud-like wood.
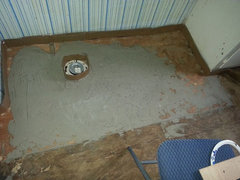
After taking out the board, I bought a cheap tube of lipstick (I don't own any makeup) and spread it on the toilet flange (after cleaning the old wax ring off). I then took an old cardboard packing box and (after cutting a few notches to allow it to slide to the wall) pressed it down to transfer the mark for a template. I also marked where the water supply line was and cut a hole for that.
Then I took some luan and taped the template to it. I took it outside and used a jigsaw (I know, wrong saw for the job-- circular saw would have worked better but the one I had was too heavy for me to hold with one hand) to cut the luan. I drilled and then cut the hole for the flange slightly larger to allow for expansion and contraction. It fit like a glove. I secured it with decking screws every few inches along the perimeter.
(continued in next post)


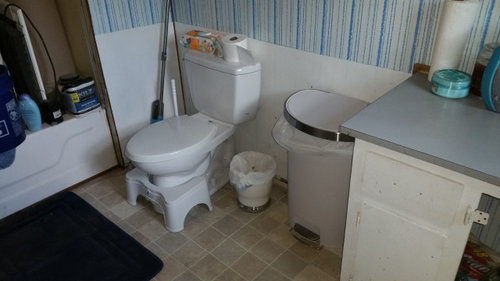
Editing here in case people do not want to scroll down. It has been a rollercoaster of going through hurricanes, illness, injuries, etc. Since these last photos we had 3 attempts at leveling the floor. Third time's the charm. It is as smooth as I could get it. Used a leveling mix that does not self level but didn't require primer. A winter storm ruptured all of the pipes so they were replaced with PEX. I installed the vinyl sheet by myself (so it has some spots where it got messed up but they are hard to see). Friend hooked up the plumbing and installed the toilet for me. I cleaned and organized. Tub was being used for storage so I cleared it out.
Last leveling mix:

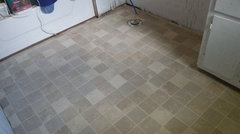
Vinyl sheet & toilet installed:
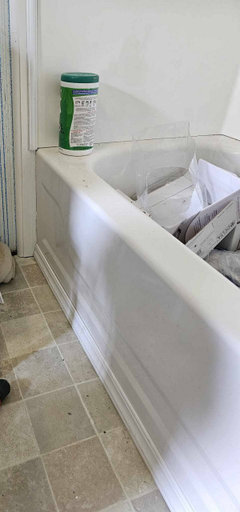
Tub cleared out:

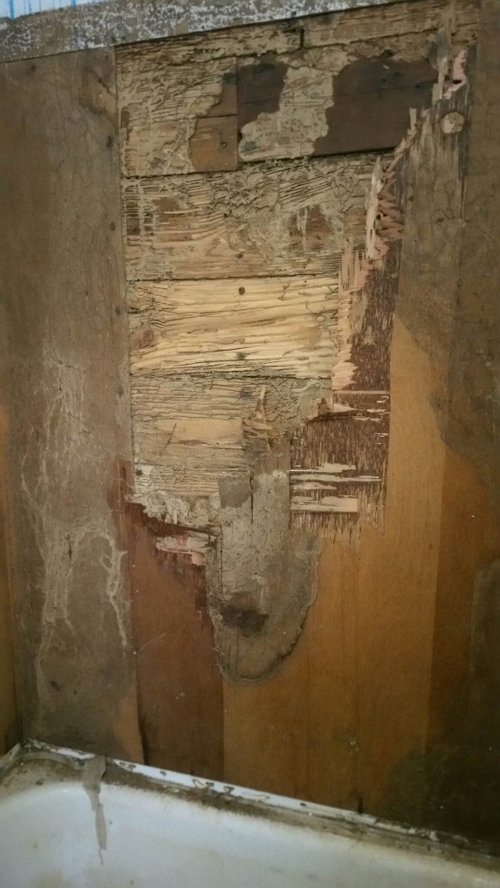
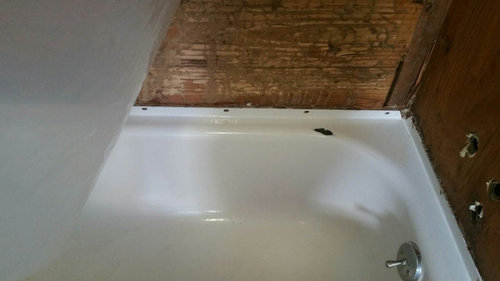
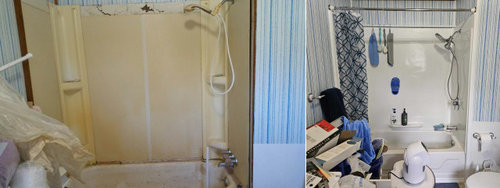
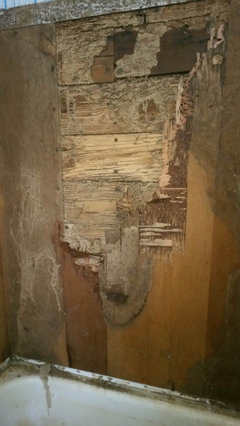
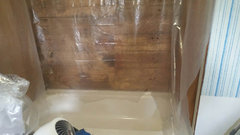
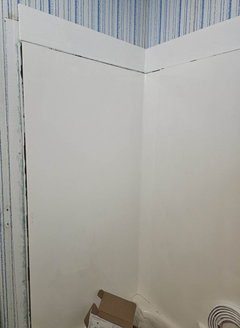
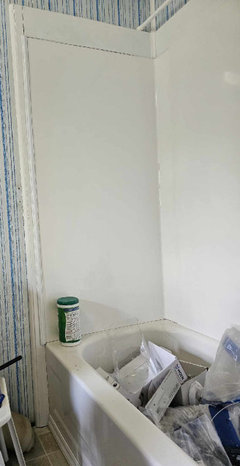
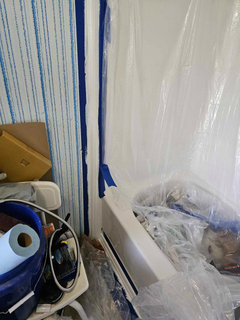
Walls were crumbling behind the surround so I tore it out:

Plywood was badly damaged so I tore it out & discovered termite eaten tongue & groove boards:
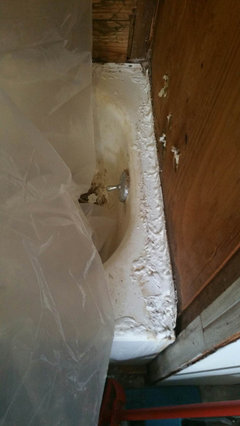
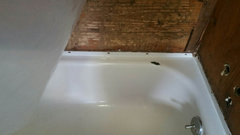
Tub was filthy:

I cleaned it up-- took a damn chisel to get old adhesive & caulk off:
Had to remove the termite damaged boards, reinforce with 2x4s and add furring strips. This is how it is now (except I cleaned the tub again & vacuumed out the crud):

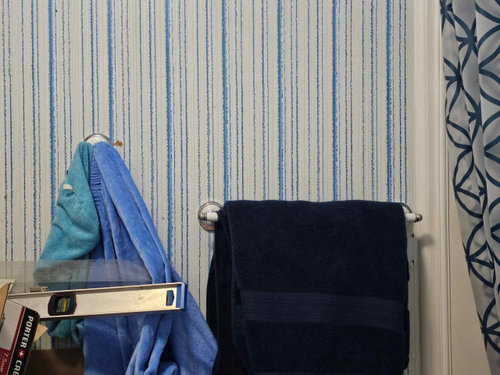
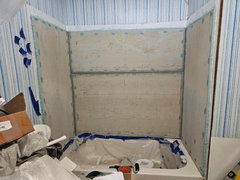
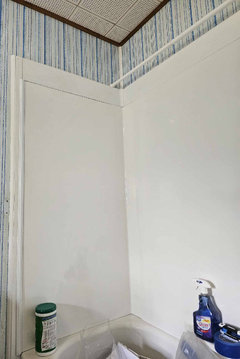
Editing again for those who don't want to scroll to comments. Cement board went up, got it "mudded", wall panels went up. Caulked, prepped, primed, painted, put up curtain rods, towel bar, & tp holder.

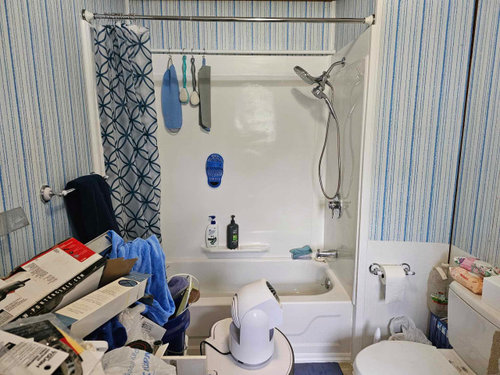
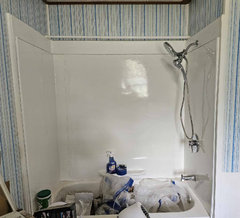
I obviously still need to clear out the clutter, but the shower functions and it feels great!
Comments (117)

zannej
Original Author6 years agolindsey, part of the agreement with the tenants was that in exchange for having extremely low rent payments, the tenants were supposed to care for the livestock. The head tenant was best friends with the chief of police and we wrongly thought we could trust him. Unfortunately, we couldn't. We were told they sold most of our livestock & those they didn't sell were neglected & died. There were rumors that their nephew came over and shot all of our cats. When we got back, only 2 of our animals were still alive (one horse and one cow). We only expected to be gone a short time but the government wouldn't let us return home due to an oversight we were kept overseas longer than was supposed to be legally allowed. I think they liked to ride the horse and the cow kept giving birth and they sold her calves for $.
If we could do it over again, we never would have left our livestock with them.
It seems someone in the area still harbors a grudge because another one of our dogs was poisoned.
Meanwhile, I'm recovering from another accident-- fell down some stairs outside the post office & twisted both ankles. I sprained the left one (which I'd previously broken years ago) and tore a tendon in the right one. I'm able to walk already but not for long periods of time and I can't jump, kick, skip, or run. On the upsdide, I knew where the compression bandages were in the store and helped a less fortunate lady to find ones for her ankle and knee. I took better care of my ankles this time & got some good instructions from my doctor.zannej
Original Author6 years agoJust lost my oldest cat. I'd taken him to the vet but he was so afraid of going to the vet that he had a panic attack and a seizure. They were afraid to take blood or run tests in case it caused him to panic & die. He took a turn for the worse on the weekend when the vet was closed. I did my best to take care of him & in the end had to just be there for him and try to comfort him when he passed. He died in my arms. I wish I could have done more for him, but he wasn't alone and he's no longer suffering.
I still need to bury him.
On a side note, I've had an idea about installing a vanity light in my bathroom. Initially I wanted to have a plug that would go in to the GFCI outlet, but after studying wiring more, I realized that if I open up the walls, I could use the GFCI outlet as a junction. I currently have a single gang box. I want to replace it with a 2-gang and add a rocker switch for the light. I've examined wiring diagrams on how to do it. If it is not already a junction for the adjacent room, it should be fairly simple.
I got the materials to make a mirror with bullseye plinths, so I might take the mirror that I was gong to put in my bathroom and put it in the guest bathroom instead and build one for mine, but then use it as the door to a medicine cabinet that I plan to make. It won't be very deep, but I'll have to see how far it sticks out so I can decide if I need to bump the vanity light out more-- although, if I set the vanity light higher, it might not be a problem. I'm going to need to redo the top molding-- maybe put in some real crown molding instead of the raw wood strips that are up. And the ceiling tiles are really ugly. I'm seriously thinking of covering my ceiling with luan & gluing vinyl floor tiles to it. Either that or I can put some beadboard on the ceiling.
Related Discussions
How do I turn a standard bathroom into a masterbath en-suite
Q
Comments (18)@Pennydesign- yes, suzyq53 is correct; the furniture went in mostly through the deck steps. Little things came up the spiral staircase. @Lindsey, yes the privacy issues from the staircase is an issue. That's yet another detail we have been considering. We'll keep a door on the room. I have worked today on two new plans. Let me know your thoughts/vote! Thank you for your thoughts and time. Comments are welcomed. Please note, I am not a designer. The sketches will eventually be reviewed by my contractor. Another question: If you have the time, tell me how long you think each of these planned renovations should take. I want to compare your thoughts with my estimate. This is my first renovation and I want to make sure I understand the process. Sorry the pics are a bit light. However, picture one has a rectangular walk in closet with 1.5 ft expansion on the bathroom, while picture #2 has an incomplete diagonal privacy wall with 1.5 ft expansion on the bathroom. Please note we have an eastern king bed and side dressers for lighting & our personal items. That means we need about 11 ft for the bed and dressers to go against. Thanks for being interested....See MoreEn-suite bedroom door positioning - seeking solutions!
Q
Comments (35)Thanks Mark. We have a nice portrait on the wall as you walk up the stairs as a focal point, but your solution is probably the best. You could do outswing, but have it rest 180* against the wall shared with the stairs. I didn't think of that at first (I thought, "Outswing it, so you see the open door when you come up the stairs,"), but since you have something nice planned at the top of the stairs, I wouldn't want to block something pretty....See MoreShould I build ensuite for every bedroom VS guest bathroom?
Q
Comments (25)So ensuite or en suite is very clearly a British term (with French origin) and used in NA more commonly in Canada. It doesn't mean that Americans don't know what it means but the only reason I do is because of the Canadian origin on much of HGTV. Well - ok - maybe from travel to Europe before that. Where I live it hasn't become a common term. The fact is that pools are more common in warmer climates. Doesn't mean they don't exist of course in Canada but was trying to make an educated guess - house has pool using a British/French term - I would go with Bahamas or Aus. And - are we calling Southern Idaho warm? Back to the original question - the 4th bedroom will never have a toilet? I am confused because in one line you say ensuite means all 3 parts but then you say just vanity and shower is on the table. In the US, it would be a little unusual which is generally not good for resale value. Many people get up in the middle of the night to use the toilet. Having to go into a public area to do that (the hall) is not ideal if they are modest. But if that is already done, then it would still be helpful to have the shower in the suite but it would add a little to the "unusual" nature. So from a resale point of view, I would keep things as normal as they can be. Now - are in you in AUS or are you Australian? Clarity is helpful. Because resale in AUS - no idea. There are probably parts of the US that unusual is no big deal. In my area, it is a big deal....See MoreHelp! Only downstairs bathroom as en-suite?
Q
Comments (13)We’re in the process of reconfiguring the layout to add this extra bedroom, so I don’t have anything to share right now. I would say we are a young married couple who won’t have kids. We will use the space as a “snug” so we don’t mind the door in either place. I want to know mostly about what most people prefer, as it won’t be a forever home. I want to try to make the best decision for the next family. Adding a power is not an option....See More
apple_pie_order
6 years agoSorry about your oldest cat and the loss of your other pets.
Do you have any current photos?
Some people find it useful to make a good long list of what needs doing room by room, then mark items as easy, medium, hard, "needs help", and "needs pro". Just making a list is an accomplishment when you are under the weather.
apple_pie_order
6 years agoAnother comment on postponing work on the house while recovering: sometimes all we can do is to keep up with cooking and cleaning. When there's extra time and energy, sorting out our tools (or just the junk drawer) and decluttering the house and yard can make things look and feel a lot better. YMWV.
zannej
Original Author6 years agolast modified: 6 years agoRight now I can't get good photos because the place is a mess and I need to do a lot of cleaning.
apple_pie_order
6 years ago@zannej: when you are ready, you may want to start a new post in "Design Dilemma" instead of "Before and After". Posts in Design Dilemma are seen by more people and often get more responses.
zannej thanked apple_pie_orderzannej
Original Author5 years agoGood idea. Although, I think for the most part I know what I want to do. One of the cabinet doors I put on has fallen off, so I have to figure out what is wrong with the screws or if there was a problem with the holes. I'm thinking of changing the white hinges out for chrome because chrome looks better, but then chrome might be harder to clean. I'll have to see. I wish I could figure out what model my vent-a-lite is. I think it is Broan brand but it is very old and the fan motor and heater have gone out in it.
I've noticed that in the older parts of my house, there is shiplap on the ceiling. I'm wondering if there is shiplap under the fugly ceiling tiles in my bathroom. I'd rather look at painted shiplap than those ugly tiles.
zannej
Original Author4 years agolast modified: 4 years agoI made a little progress working on the floor leveling but still have more work to do. I've been procrastinating a lot & taking care of other issues that came up-- plumbing repairs & such in other areas of the house. I still need to finish leveling the floor & getting it smooth enough to lay the floor in. The bottom of the wall panels peeled off when I removed the painter's tape so I'm going to use beadboard, chair molding, and base molding (which I've already purchased). I have corner blocks so I don't have to miter cut.
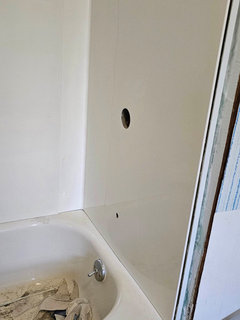
I've decided to replace the crappy glue-up wall stuff that is falling down around my tub with a Delta surround that should fit over the tub. I will also get a Delta Lahara valve & trim for the controls & a Moen handheld showerhead. I need to figure out where I put my shower curtain hooks so I can modify them to stay on. I will probably need a new shower curtain because I think my old one got ripped. I'm seriously thinking of refinishing the tub but I think that would be a lot of work & it takes about 3 days for the finish to cure. I may just patch the scraped part on the tub & leave it at that.
I need to stop with the procrastinating and get this done.
 MOEN Attract 6-Spray Hand Shower and Shower Head Combo Kit with Magnetix in Chro · More Info
 Delta Faucet Lahara 17 Series Dual-Function Shower Trim Kit with 5-Spray Touch-C · More Info
zannej
Original Author3 years agoI have the valve but still need the trim for it. I will be using PEX. I also have the copper & sharkbites for a tub spout. I still need to get around to finishing the floor but life has been absolutely crazy & I've been helping my friend fix up his house. I sanded, stained, & poly'd all of his cabinets, helped him install new flooring, helped him install his countertops, helped him install his sink, helped him install a new tub & toilet. I found many of the fixtures for him so he now has a decent kitchen & bathroom. I've got a truck with good gas mileage so I've hauled a lot of stuff for him.
I'm debating whether or not to replace my tub. I will absolutely need to change the drain as it turns out the morons cut all the way through the floor joist underneath it. I will need to make a box to reinforce the joist (well, my friend will have to bc I've put on weight due to hypothyroid & can't fit under there anymore). May have to see if the plumber can do some of the work though.
I will try to remove a couple wall panels in my room carefully. If they get messed up I can patch them & paint them. I need to take a look at what I believe is a vent in the wall. Plumbing has to be gutted & I will need to add vents to the fixtures (as none of them are properly vented). I'm thinking I can vent the lavatory out the side wall. It will look ugly on the outside, but I don't care- the house already looks bad there anyway.
If possible, I might link the lav drain in to the plumbing already in the wall & have it run up through the roof (if the pipe isn't just cut off inside the wall). I need to remember to post diagrams of the plumbing later.
zannej
Original Author3 years agolast modified: 3 years agoI'm still having health issues. We got hit with two consecutive hurricanes and had no power for quite awhile after each one. My thyroid doesn't want to cooperate so I've had low energy. Had a Covid scare but turns out it's a sinus infection. My body doesn't want to cooperate. The friend that had been helping me had a stroke so I'd been taking him to doctor appointments and helping him out instead of working on my own stuff. Still trying to get the energy and get my body to cooperate enough to at least finish the floor. Some of the baseboard trim and stuff I bought got broken. A lot of my tools are over at my friend's house.
I decided to go with the Moen Engage showerhead instead because it has higher gpm. Already purchased it.
Got a ToiletMaster Lift jack that makes removing and installing toilets much easier. Once you remove the bolts, it slides under the old toilet, you jack it up, roll it out of the way, set it down on something, repair/change seal, raise it back up and put it back in place (you can leave it lifted if it won't be for an extended period of time). If you're replacing the toilet you roll the old one out & set it down, jack up the new one and roll it in place. It comes with guide sticks to help line it up while lowering.
Once I get over this sinus infection I'm hoping to get more done.
 Moen MAGNETIX 26013 COMBO 2.5-GPM CHROME 6-Spray Rain Handheld Shower - - Amazon · More Info
zannej
Original Author2 years agoGot hit with a winter storm and now need to run brand new waterlines but there's a rattlesnake under the house that told us to go away when we tried to run it. Plumbers are all booked up. Only one that will come out has a very sweet man as an assistant who does all the dirty work and I couldn't send him under there with a rattlesnake in good conscience.
Somehow managed to injure my right deltoid and rotator cuff. Haven't been able to work on fixing the floor as a result (since I lean on my shoulder to get up and down and need to extend my arm to spread the stuff).
zannej
Original Authorlast yearMy shoulder has mostly healed but I've had some bad reactions to medicine and other things going on. We did get the PEX lines run but nothing is hooked up-- its all terminating in shutoffs to the shower, toilet, and sink. Friend got hot and cold reversed so we need to fix that. Still have no energy. But I know I need to get it together and finish the floor. Will need some soft pads to sit/kneel on (I have some somewhere). I'm re-evaluating the power supply for the light. Instead of having a switch over at the vanity, I could rig the toggle switch to control two lights (vanity and overhead).
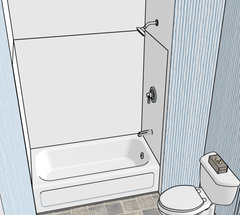
I have started a sketch of the bathroom in Sketchup but need to take measurements again to get things right.
I wish I had more people around who were handy and who could help but I can't even get people to come out for $.
zannej
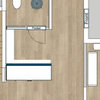
Original Authorlast yearI added a very rough sketch of the layout of the bathroom. I did not draw in towel bars, tp holder, shower walls, tub spout, etc. I guesstimated the placement of the door, window, and toilet.
 ZanneJ's Ensuite · More Info
I also have some pictures of the botched leveling job and the 2nd layer to try to fix it. Still needs a 3rd and maybe 4th pass to smooth it over.
1st layer that was botched
 ZanneJ's Ensuite · More Info
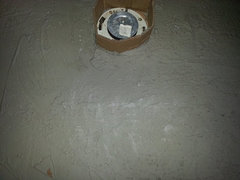 ZanneJ's Ensuite · More Info
2nd layer after using angle grinder to smooth down bumps
 ZanneJ's Ensuite · More Info
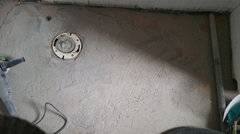 ZanneJ's Ensuite · More Info
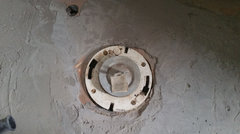 ZanneJ's Ensuite · More Info
With sheet vinyl roughly in place
 ZanneJ's Ensuite · More Info
That lump got smoothed out but I have to adjust it over a bit and use some quarter round next to the vanity and tub. I'll be putting wainscoting on the walls I tried to paint white.
zannej
Original Authorlast yearlast modified: last yearUPDATES! I have a semi-functioning bathroom now! So, I finally got the right dose of thyroid meds to not be completely exhausted constantly. I've had more energy, but my back, arms, wrists, knees, and ankles don't always want to cooperate. In the past few weeks I did a 3rd coat of leveling mix-- this time I sifted the powder to keep lumps out and I used additive because the additive makes it stronger.
Photo taken while it was still wet. It's not completely level but it is smoother and I got rid of some of the craters.
 ZanneJ's Ensuite · More Info
After it dried: ZanneJ's Ensuite · More Info
Floor loosely laid over it: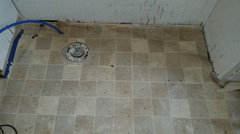 ZanneJ's Ensuite · More Info
Flooring trimmed, smoothed down, and perimeter taped (although it was more of a rubbery glue with paper backing):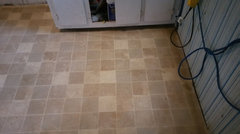 ZanneJ's Ensuite · More Info
 ZanneJ's Ensuite · More Info
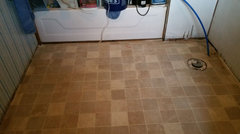 ZanneJ's Ensuite · More Info
 ZanneJ's Ensuite · More Info
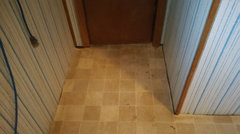 ZanneJ's Ensuite · More Info
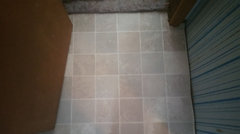 ZanneJ's Ensuite · More Info
Last photo was from after I scrubbed the floor. I had to use a kneeling mat and scrub every single square. My arms/wrists hate me.This is what it looked like after cleaning:
 ZanneJ's Ensuite · More Info
Then I got my friend to help me get the toilet in. I moved it into the room on some thick paper to protect the floor and got the bolts aligned, marked where the pex had to be trimmed, put straws over the bolts to help line the toilet up for a test fit. Then I put the waxless seal on (no pic of that) and my friend got the toilet on and put the tank on top. Toilet seat has a broken part that I ordered and I'm waiting for it to arrive. They don't sell that seat anymore and its really comfortable so I wanted to fix it. My friend even put the metal/porcelain lever on for me. I'd had it on an old tank that broke. The lever that came with this toilet has a plastic part that wears down and eventually breaks. We've had 2 break over the years. This lever is all metal (except for the porcelain part. It flushes great. ZanneJ's Ensuite · More Info
Got a new trash bin on clearance that matches nicely. ZanneJ's Ensuite · More Info
That painted wall and some of the other walls will get some wainscoting because those striped panels keep having strips tear off from the bottom.I got a Better Homes and Gardens hamper thingy. It looked like it would be smaller in the store and I didn't realize it had crappy plastic clips that don't want to stay in place. I had to use packing tape to hold them on and it doesn't quite line up like it should. It would have taken maybe 10min to assemble if the clips had stayed on but it took 2 hours because they kept popping off, shifting, etc. But I finally got it together and I might just move it to the laundry room (if it doesn't fall apart on the way). It might be useful for short term. Shower seat will not be staying in this room. And the drawers I initially had next to the toilet will go across from the toilet.
 ZanneJ's Ensuite · More Info
The next step is to get the vanity cleaned off, stuff put away, stuff I no loner need donated, broken/junked stuff thrown out, etc. More vacuuming and cleaning. Toilet seat installed properly once it is fixed, bidet sprayer hooked up once I get the plumbing done better (have to cut open the wall where it is painted white. Door put back on vanity, sanding, more painting, replace the faucet, & fix the plumbing properly. Wainscoting, baseboards, quarter-round etc will follow. Also probably need to replace shower walls as they are falling off. Need to get the new showerhead and the valve for the shower as well as trim/controls installed as well. But for now at least the toilet can be used.apple_pie_order
last yearThat's a lot of work completed. Good to have the second bathroom well underway. Will this bathroom be primarily yours or shared with family most of the time?
zannej thanked apple_pie_orderzannej
Original Authorlast year@apple_pie_order It will be primarily mine because it is farther away from my Doofusaurus' room than the other bathroom. But if the other one is occupied he will use mine. I'm not happy about it because he doesn't clean up after himself, leaves doors and drawers open, doesn't close the wet wipe container, uses a ton of toilet paper, etc. I have boxes stacked up that he has to navigate so it is harder for him to get through to my door (I joked that it was on purpose to discourage use of my bathroom).
We're also renovating the bathroom for him & house guests as its the only non-ensuite. His bedroom and the guest bathroom & kitchen were the original parts of the house. It got expanded over the years. They added two bedrooms, a living room, and years later tacked on a great room. Living room was originally the porch. The original bathroom was not built even remotely to code. The toilet is in a tiny alcove that does not meet code requirements in size. Doofusaurus can't even fit his shoulders in there to sit on the toilet. The shower has no P-trap and goes directly to the sewer. I have another thread on that here: https://www.houzz.com/discussions/536570/need-help-with-awkward-laundry-room-bathroom-floor-plan
I have it pretty much planned out already but need to make a few changes. I know where I want everything to go but I need to plan the plumbing and make sure it won't conflict with any joists..
I'm trying to keep in mind what I need to do on this one now:- Declutter/clean up stuff in tub and on vanity
- Repair / Replace DWV (plumbing stuff) under the house
- Get proper DWV plumbing vents installed
- Install new faucet and drain for it
- Make and install new vanity mirror
- Install vanity light over mirror
- Replace electrical switch & tie light in to vanity light
- Install new shower walls, showerhead, and tub spout
- Connect new shower stuff to PEX lines
- Replace/repair heat/vent/light
- Install wainscoting, baseboards, & quarter-round/shoe molding trim
- Repair scrape on tub
- Add tank topper/space saver cabinet above toilet
- Figure out more storage solution (if room permits some sort of storage bench might be good)
zannej
Original Authorlast yearThus far I have cleaned up the vanity. Sink had horrible rust stains but I managed to get most of them out. Baking Soda and White Vinegar helped. Resorted to pumice stone for the worst of it. I will post photos later. Still need to get the tub cleared out and the door put back on the vanity. The bathroom currently smells like pickles from all the vinegar. LOL.
zannej
Original Authorlast yearAs promised, pictures of the sink before and after
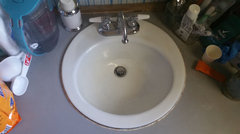 ZanneJ's Ensuite · More Info
 ZanneJ's Ensuite · More Info
I've had a rotator cuff injury on my right arm, back injury, and now currently an electrocution injury to my left bicep and deltoid. PSA: If an induction cooktop cracks, don't use it. It can conduct electricity through the pan.
I obviously cleared off the counter (in this picture the Henry's box was on the floor to flatten out a crease in the vinyl sheet. It worked. ZanneJ's Ensuite · More Info
I added a smaller waste bin next to the larger one
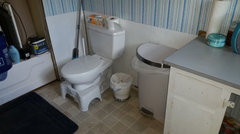 ZanneJ's Ensuite · More Info
The laundry cart got filled up
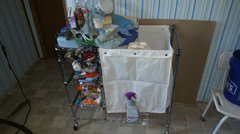 ZanneJ's Ensuite · More Info
The tub previously looked like this
 ZanneJ's Ensuite · More Info
I cleared out the stuff so it looked like this
 ZanneJ's Ensuite · More Info
The tub and wall surround were stained and filthy
 ZanneJ's Ensuite · More Info
The wall panel behind the glue up crap was peeling off ZanneJ's Ensuite · More Info
I removed the glue up crap and the panel it was adhered to but I wasn't able to get the side with the controls because the tub spout would not come off
 ZanneJ's Ensuite · More Info
I removed the handles from the diverter, hot & cold controls
 ZanneJ's Ensuite · More Info
I saw that the plywood on the back wall was water damaged
 ZanneJ's Ensuite · More Info
So I started tearing it off. I thought I would find bare studs but I was wrong. It was wedged behind the tub so later on it had to be removed with an oscillating blade. But I discovered horizontal boards with old termite damage
 ZanneJ's Ensuite · More Info
My friend came over and got the rest of it off and got the tub spout off for me. He then put up plastic sheathing. I have difficulty reaching above my head with my left arm while it heals
 ZanneJ's Ensuite · More Info
The flange on the tub and the rim adjacent to it were crudded up with old caulk & adhesive that were stained with hard water (iron). I made a cleaning paste out of white vinegar and baking soda. I slathered it all over and let it soak overnight.
 ZanneJ's Ensuite · More Info
I started cleaning it off and you can see how disgusting the tub looked
 ZanneJ's Ensuite · More Info
I had to use a chisel to get the adhesive off. It took hours of going inch by inch to get the crud off
 ZanneJ's Ensuite · More Info
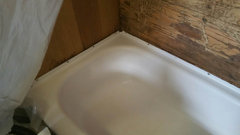 ZanneJ's Ensuite · More Info
I also trimmed the plastic so its not in the way as much. It will get taped to the flange later. Cement boards will be put over that.
 ZanneJ's Ensuite · More Info
 ZanneJ's Ensuite · More Info
The old wall panel used to have a mural of swans swimming and had little blue swans along the bottom
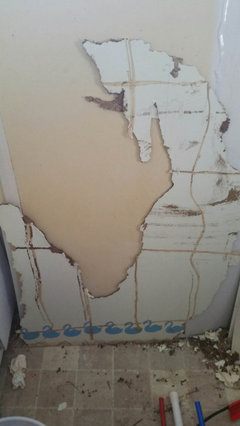 ZanneJ's Ensuite · More Info
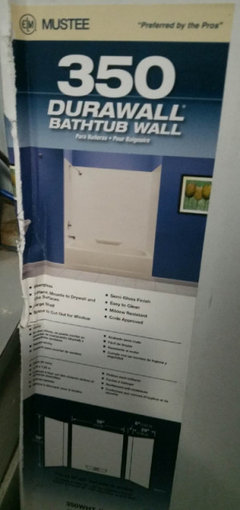
The next time my friend is available we will cut and dry fit cement board. I will coat the edges with aquadefense (2 coats). After that is dry enough we will install the cementboards, drill holes for plumbing, put up L-bead trim, and apply thinset.Once that is dried it will get sanded. Once everything is dried, sanded, etc, the Mustee Durawall 350 wallset will be glued up.
 ZanneJ's Ensuite · More Info
After that I will put up PVC boards around the perimeter.
I have a rough sketch of the shower (not including trim) but the showerhead and controls are too high.
 ZanneJ's Ensuite · More Info
zannej
Original Authorlast yearI didn't like how squishy the tongue and groove boards were in some places. They had been eaten through and some had holes. I was advised to tear them out so I did. That was a bear. Some of the wood was very strong & it's about 3/4" thick, maybe even more. I discovered that some of the studs did not go all the way up. Others were pieced together in sections, and one was chewed by some kind of bugs. I had to bypass that one and we added new 2x4s, furring strips, etc. Still need more to get the wall more level, but progress has been made. I have cleaned up since the picture was taken-- cleaned out the old wood and vacuumed. I also measured and made some marks.
 ZanneJ's Ensuite · More Info
I will be getting the boards soon and will update with pictures once that is done. The dirt line goes up to 60". The new surround only goes up to 58" but it will be sitting in front of the tub flange with a 1/4" gap from the bottom of the cementboard to the tub rim. The tub slopes down to the right so adjustments will be made. Additionally, the left wall bows away from the tub in the corner so more shimming will be needed on that side. I will use PVC boards to cover the ugly above the cementboard.
apple_pie_order
last yearThe bathtub is an epic tale, indeed. Is the sink hooked up and usable already? That'd be a great leap forward.
zannej thanked apple_pie_orderzannej
Original Authorlast year@apple_pie_order Yes. After the pipes ruptured and we ran all new PEX, my friend was able to put on new supply lines and get the sink working. The vanity is cluttered up with cleaning supplies right now but once the shower is fixed up then I can clean it off again-- and fix the door that fell off the vanity.
My friend needs some drywall painted over at his house soon so that might come before the shower gets finished. I'm ok with that bc I shower over at their house. In a bit of off-topic but good news- My friend FINALLY dumped his abusive cheating gf who was draining the life from him and is now dating a mutual friend whom we all adore. We are all very happy. I'm going to do the primer and when she picks a color, I will paint the color she wants. She actually likes talking to me about home improvement stuff and design ideas and I'm getting to see her a lot more often than in the past. She also doesn't constantly call my friend demanding to know what he's doing and when he's getting home when he works on a project over here.
I'm going to get some lumber tomorrow to frame out the back wall a bit more.zannej
Original Author11 months agoWhile my friend was unavailable to help me I temporarily placed the bottom back wall cement board. The walls were all out of whack-- with the back left corner having a large gap between the tub and the plywood. So I used paint stirring sticks and craft sticks to pad it out and try to make it more even.
 ZanneJ's Ensuite · More Info
I then did a dry fit of the side cement boads and tacked it in with a couple of screws. I did a dry fit of the surround sides and marked where to cut the sides of the cement board. I couldn't get the top cement board up by myself so I had to wait until my friend was available again.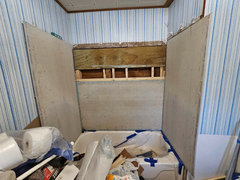 ZanneJ's Ensuite · More Info
Those things only weigh 35lbs but with an injured arm it was harder to lift than they look. Still, I got them in place. I had to remove them in order to get the top back cement board up. It was a tight fit. I had taken the time to shim everything to be level and that helped. Because the lower board was perfectly level it made insalling the top board easier. We had to pull them all off for my friend to put up the vapor barrier. I suck at using tape so all I did was hold the plastic up while he taped. I couldn't have taped by myself as my left arm still can't reach that high above my head without being pulled up by an external force. ZanneJ's Ensuite · More Info
The wallset fit differently with everything in place so the side boards had to be cut again-- found an oscillating attachment works better than the scoring tool. Used Gorilla waterproof tape at the top. Ran out and couldn't find my 3rd roll to secure the bottom. I'll secure it with Aquadefense later. As you can see, the plastic protection inside the tub was removed (well, some of it was bc it detached on its own but we needed it out of the way).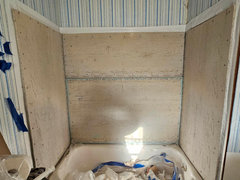 ZanneJ's Ensuite · More Info
We did a dry fit of the surround-- which is very forgiving of the still slightly wonky walls after all the boards were secured thoroughly. 2-1/4" screws were used on the upper panel and in the corners that needed to go deeper. Shorter ones were used on the sides as the walls are thinner. My shopvac is havin an issue with the filter not working so it blows dust in the air when I vacuum. Need to resolve that. I did vacuum but I got a face full of dust. Need to vacuum again but also need a new filter for the vac but none are in stock.
This is what it looks like with the surround up: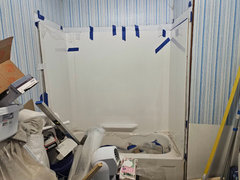 ZanneJ's Ensuite · More Info
And I added some L-bead trim (dry fit) to see how it would look on the right edge. Covers that ugly cementboard nicely.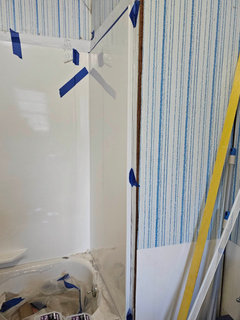 ZanneJ's Ensuite · More Info
Next step is aquadefense over edges and holes. I was going to do it with the boards down but didn't want to mess with trying to get them back up. In order to get the top board in place we had to use spacers but they wouldn't stay and the board kept slipping so I put in some screws that held it at the right height and pushed the bottom against the wall. No pics of that.
I'll post more pics as I progress. Need a stepladder to be able to reach the tops of the cement boards.zannej
Original Author11 months agoThanks, @suzanne_m !
Today I did some cleanup. I had to take the wallset down to seal the edges and screw holes with aquadefense. It's not just for water protection. I found that it reinforces things. There were some hairline cracks on two of the cementboards so I spread aquadefense over them. I will apply tape and thinset over as well. I'm waiting for the first coat to dry and then will apply a 2nd coat. Hopefully the 2nd coat will go on more easily as the edges were rather crumbly. I actually had to fill some holes on the edges where chunks of cementboard came out. Only about pea-sized chunks but I put hot glue in and waited for it to dry. I also put some low expansion foam into the cavity on the back of the center surround part where the shelf is. I don't like hollow shelves, although this one was rather sturdy and thick. I'll add more photos later.
apple_pie_order
11 months agoThis kind of progress is nice because you can actually see it coming together well.
zannej thanked apple_pie_orderzannej
Original Author11 months ago@apple_pie_order Exactly! It feels so good to see the progress. I still need to upload photos. Since the last post I got the 2nd coat of aquadefesnse up, the mesh tape on, L-bead trim cut to size, & 2 sides of L-bead secured. Unfortunately, the left panel shifted so I need to remove the left L-bead (thankfully I used staples) and adjust it. Good thing they made the wall panels so sturdy because I dropped the center panel several times and it kept falling when I was trying to get it to stay in place. Once I get all the trim up and I feel like my coordination is good enough, I will apply thinset. I've never done it before so I will have to tape plastic all over the damn place. LOL.
zannej
Original Author11 months agoMy mother has had some hypoglycemic events that have me distracted. Been having to make sure her sugars don't get low and have to check on her constantly. Trying to get her to go to the doctor but she canceled the appointment I set up with her. Arm is still slightly sore from moving around wallsets and trying to organize the bathroom a bit better. I'm going to get a framing square and then try to get thinset done beofre Sunday. That's when my friend should be available to come help.
zannej
Original Author11 months agoI got Aquadefense and the mesh tape applied. Stapled up the L-bead trim. Then secured it all with mortar. 1st batch of mortar set up too fast-- it was too warm and water was too warm. I used icewater the 2nd time and made a smaller batch. Still sloppy as hell but I will live with it. Next step is installing the surround.
 ZanneJ's Ensuite · More Info
 ZanneJ's Ensuite · More Info
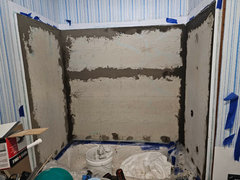 ZanneJ's Ensuite · More Info
- zannej thanked apple_pie_order
zannej
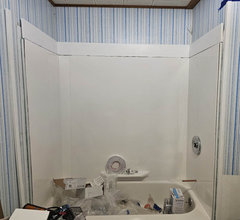
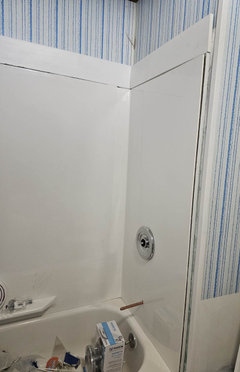
Original Author10 months ago@applie_pie_order, Yes, I have the shower arm, the shower head, the tub spout, the valve, the controls, the bath mat, the curtain rod, the curtain, the curtain rings, etc. My friend was delayed on being able to come over and help because his daughter needed surgery (appendectomy). But we got the surround up! Two setbacks: One is that the corner has just enough of a curve that my corner grab bar shelf will not fit. 2nd is that during the dry fit the wallset never stuck as flush to the back wall as they did on final glue-up so the trim that was mudded on is sticking too far on the ends. I need at least 3/4" to cover the gap on one side, but I found some trim to cover that. I also will have to notch some trim to go on the side. But that is OK. I will cover anything else up with caulk. I'm going to see if I can brace the wall and dril pilot holes from the other side. I'm paranoid that any drilling from the other side migh pop it loose if its not held in place. Alternatively, I suppose I could have my brother push on the wall from the shower side while I drill from the other.
On the upside, the trim did help to get the wall panels lined up a bit more and it covers what would be exposed cement board.
 ZanneJ's Ensuite · More Info
I'm in the home stretch. I need to prime and paint some trim, cut stuff to size, and get it installed and get the plumbing in (after holes are drilled). I'm glad I didn't pre-drill the surround because my holes would have ended up way off.. I got some L-trim for the outside corner of he wall to cover up the gap where the blue striped wall panels don't meet up. I also found some PVC baseboard for the bottom of the tub to cover the wood chunk underneath it. I ended up buying smaller trim that is the same thickness as the wider trim so I will have less cutting to do.
zannej
Original Author10 months agoPictures later, but we got the horizontal trim up and the plumbing somewhat roughed in. Friend got nauseous from the adhesive smell and was exhausted from work so we had to cut the work short.
apple_pie_order
10 months agoMore progress, I hope your friend is better. About 6 or 8 hours more work to get the shower flowing, complete with shower curtain?
i recall an extra exhaust fan in a box in the other (blue) bathroom. Will that be going in here?zannej thanked apple_pie_orderzannej
Original Author10 months agoThanks, @apple_pie_order
My friend is feeling better. I bought food for him & his family before dropping him off at home. It was after 8pm & he was too exhausted to make dinner. I always try to feed him when he helps me. It took about 3hrs to do the work we got done-- and that is including the time to unbox a miter saw stand, put it together, stop and move out of Mom's way as she passed through the setup area, unbox the miter saw & put it on the stand, get it set up, measure, measure again, cut trim, shim, put adhesive up on and put trim up, secure it, take a break to get air outside, move stuff out of the closet to get it out of the way to access plumbing, find something I forgot to put in there (I put the plumbing stuff in there ahead of time so it would be ready), go outside to shut off the water, flip the breaker for water pump, purge the lines before hooking them to the valve, and trying to get the valve connected to the trim-- but we need to drill some more holes. Need the adhesive to cure (takes 48hrs) before we can drill for the showerhead.
This bathroom already has a vent/light/heat fan and the other one doesn't have the right size duct opening to replace it. The extra fan is slated for the guest bathroom. We are flipping the laundry room and guest bathroom because the guest bathroom is so tiny it is useless. The toilet is in an alcove so small my brother can't fit his shoulders in it. The laundry area is super awkward and narrow and also hard to get to around a corner. Flipping them will allow us to maximize space. We can fit a tub in the old laundry room (which is just about an inch over 5' wide). I recently purchased 20Amp triple rocker switches for each bathroom to control the heat/light/vent fans.
Back to this reno, we still have to use brad nails to secure the trim better (my brad nailer is in a closet blocked by a box with my new portable table saw & the air compressor for it is on a high shelf where I can't easily get it down by myself due to my borked left arm). I'm hoping we can find the brad nailer. That tool closet is a jumbled mess so it will take some digging.I got some shims up between the tub and the corner trim so that when I put the vertical trim up it will be even. I've decided to take a cutoff from one of the trim pieces that I've already cut to the correct height and use it to fill in the 1/2" gap between the vertical trim and the tub.I was able to use wood glue for that part but I will need the nails to reinforce and I will need to use construction adhesive on the shims for the top of the vertical boards. Anything visible from the side can be covered in caulk. Once we get the hole drilled for the showerhead (involves pilot hole from closet side and then drilling through from the shower side with a larger bit) and get the drop ell in place we can get everything properly aligned and drill holes for the bolts to secure the trim to the valve, cut the copper stub-out for the tub spout to size, get the tub spout on, get shower arm and showerhead on, put up some trim to cover gaps, caulk, etc. Waiting for caulk/adhesive to cure will take the most time. If need be I can do some touch-up paint on things, but hopefully I'll be able to use this shower before next week.
Left side top trim
 ZanneJ's Ensuite · More Info
Whole view (the board to the left is the piece that will go vertically once everything is fixed up)
 ZanneJ's Ensuite · More Info
Right side top trim plus shower control escutcheon & tub spout stub-in
 ZanneJ's Ensuite · More Info
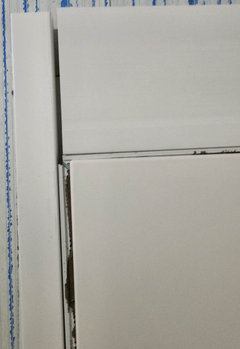
I am pleased with how well the corner trim covered the ugly ends/gap of the plywood panels. The wall bowed a bit so we had to use tape to hold the trim flush to the wall. Good thing PVC has some flex.
 ZanneJ's Ensuite · More Info
Unfortunately, my friend left too much of a gap but I can use a piece that was cut off of the end of another board (about 1/8") to scab on to it and reduce the gap. Rest can be filled in with caulk. I have some flexible trim that will cover the gap between the shower surround and the vertical edge trim.
 ZanneJ's Ensuite · More Info
I'm probably going to need a lot of caulk, but I'm ok with that. I never expected this to be perfect. I might even paint some of the exposed stuff to see how it looks. I wish I'd gotten the "mud" off of it but I couldn't see it until it had cured and we removed the tear away strips. I may even be able to use tear-away strip pieces to cover some gaps. LOL.
The back wall trim piece sits farther back than I'd expected but that leaves room to add another shower curtain rod that I can add hooks to and hang back scrubbers and stuff from.
apple_pie_order
10 months agoThanks for the update. It's really enormous progress. Real bathrooms are the opposite of the magazine ads for the miraculous "bath in a day!". The plan to switch laundry area and tiny bathroom sounds practical. Finish one thing, start another.
Looking ahead, an inside workbench area that's customized to your convenience would be really nice. Pegboard, drawers, shelves, lighting, stool, and so on. His & Hers Workbench · More Info
 Pegboard Cabinet Doors Designed to Fold and Lock - Wall Control Pegboard · More Infozannej thanked apple_pie_order
zannej
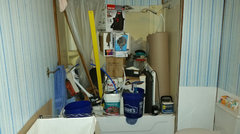
Original Author9 months ago@ apple_pie_order I actually have a full workshop down in the barnyard, but it needs repairs. Roof is leaking, electrical is on the fritz, one exterior side has holes, trees are growing uncontrolled around it, etc. It really needs to be fixed up but that is something I can't do myself. Will have to hire someone to cut the trees down and to get the roof and exterior walls fixed. It has the pegboard work benches, etc. But its a disorganized mess. I have the exterior door for the back (future laundry area) on a work bench because I painted it there and need to put it back on its frame.
I also have a work area in a car port but the electrical to it is no longer working (I suspect a severed line) and a tree fell on part of it so it is a mess.
I've got another post somewhere on the laundry & bathroom swap reno.
My friend's thumb dislocation and waiting on parts pushed things back, but Sunday we put in 5hrs of work (including assembling my portable tablesaw).
What we accomplished on Sunday (aside from assembly)- Hole in plywood for shower arm widened enough to fit drop ell more snugly to give more length to arm
- Drop ell secured & plumbed (I got a sharkbite slip on to make it easier)
- Valve & controls secured
- Tub spout rough-in secured & adjusted (needed angle changed slightly)
- Tub spout installed
- Shower head secured
- Measuring & cutting of PVC trim
- Straight PVC trim put on top of pvc boards to cover gaps between them & walls
- PVC trim attached on both sides of surround to frame it out & cover gorilla tape
- PVC quarter round next to left side trim to cover gap behind it & wall
- PVC wide flat trim to cover gap on right side
- Flexible PVC trim glued up to cover gap between surround and side trim
- PVC baseboard installed
- Rear shower curtain rod installed (for hanging loofahs & back scrubbers)
- Leak test done on plumbing in closet
- Friend hit in the nuts by hose from air compressor when he went to remove it
- Food and groceries purchased for friend to make up for it
It all sounds cut and dry but some of the stuff took longer. Initially, the shower arm wasn't sticking out far enough so I got an extension piece, but it required making the hole on the plywood side (inside the linen closet) larger. But then it was too long and the extension piece had burs on the threads so we had to remove it. Friend put shower arm in backwards at one point so had to take it off and flip it around. Had to remove a board that the old drop ell had been attached to in order to get clear access. Getting the holes for the screws on the controls to line up was a bit of a pain and took awhile with both of us having to go back and forth from the bathroom to the closet. Then I mentioned the tub spout was at an angle-- pointing down. Friend had to use a screw as a shim to tip the vertical part of the pipe back a bit to make it come out straight. Tub spout wouldn't sit flush to its escutcheon until then. Shower trim escutcheon still doesn't fit flush on side without screws but caulk will cover that.
At least the brad nailer worked well and I had all of my tools ready this time. I even had time to change the HVAC filter while my friend was connecting the plumbing. Leak test was all good.
Now all that remains is cleaning, caulking, perhaps some touch-up paint (not crucial), buffing of repair on tub, more cleaning, caulk drying, & main shower curtain rod & curtain put up. Then shower will be functional. Eventually I need to install the tp holder and towel bar, but I can use the shower without doing those things. Also need to go get my shampoo & body wash from friend's house. Will probably need some sort of shower caddy in there to hold stuff.
I very much appreciate the encouragement and feedback.
Pictures of the progress from Sunday to follow.Left side showing the side trim, some of the cove moulding, & flexible gap trim. You can see I scabbed on some pvc to the edge of the side trim to cover the gap between it and the tub. That was three slices of a 5-1/2" pvc board stacked on top of one another, glued toghether, stapled to the side of the trim,a nd then additional slices stapled on the side because the tub slopes a bit. Then I used the tear awa strip from L-bead trim to cover it, primed, & painted. 3/4" quarter round is visible on the left side.
 ZanneJ's Ensuite · More Info
Lower down view to show the Frankensteined section. The baseboard is also visible-- you may be able to spot a repair/patch of the sheet vinyl where a mouse chewed it.
 ZanneJ's Ensuite · More Info
Higher view with the cove moulding. Covers the uneven merging of the wall panels in the corner as well as uneven joining of PVC boards. Eventually I'm going to and and paint the rough wood trim on the ceiling.
 ZanneJ's Ensuite · More Info
View of back wall so you can see the trim & moulding on both sides. The top trim covering gaps between the boards & wall are not really visible, but they keep things from falling down behind the boards. Moen showerhead (fixed + handheld), Delta Lahara dual controls (heat & pressure), and Moen Monticello tub spout. You can see the rear curtain rod for the loofahs and stuff too.
 ZanneJ's Ensuite · More Info
View of the baseboard in front of the tub. If you recall, before it had a gap with exposed wood board there before. I love this baseboard. Not only is it waterproof, it just looks really nice. You can also see where we had to put a 3/4" strip next to the tub below the overhang.
 ZanneJ's Ensuite · More Info
I mentioned that because I had to shim to get the side trim even with the surround, I had to cover the gap on the right side with flat trim
 ZanneJ's Ensuite · More Info
And last picture showing lower down on the right side.
 ZanneJ's Ensuite · More Info
apple_pie_order
9 months agoThat looks transformed. You are on the home stretch. Another few hours in two batches (caulk drying) to declare the shower is finished?
Installing the TP holder and towel bar will make the bathroom feel normal. A shower caddy is a nice convenience to enjoy every day.apple_pie_order
9 months agoThe two workshop and carport work areas you have allow you a lot of flexibility, though it'd be hard to keep track of which tool is where. I hope you can get the roof and electrical fixed after the trees have been cleared away.
Do you still have livestock on the farm?zannej thanked apple_pie_orderzannej
Original Author9 months ago@apple_pie_order I typed this message before but it got deleted from an error. I've been busy with stuff so I haven't posted. The caulk said to wait 48hrs to let it cure. Primer said it would dry in an hour but I live in a humid climate so I let it go a few hours. I let the paint dry for a full day.
Prepping for paint pics:
 ZanneJ's Ensuite · More Info
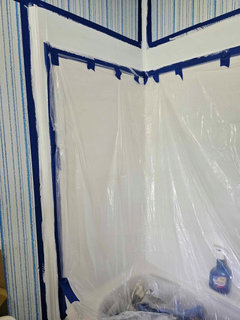 ZanneJ's Ensuite · More Info
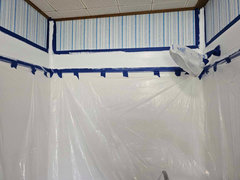 ZanneJ's Ensuite · More Info
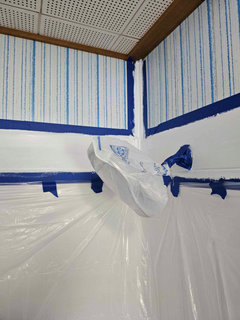 ZanneJ's Ensuite · More Info
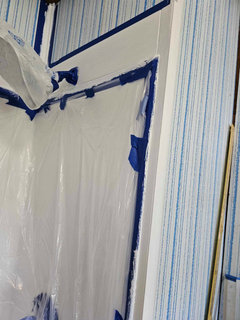 ZanneJ's Ensuite · More Info
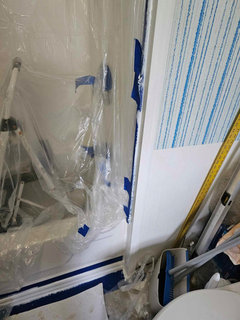 ZanneJ's Ensuite · More Info
After painting:
 ZanneJ's Ensuite · More Info
 ZanneJ's Ensuite · More Info
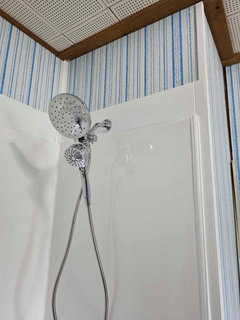 ZanneJ's Ensuite · More Info
 ZanneJ's Ensuite · More Info
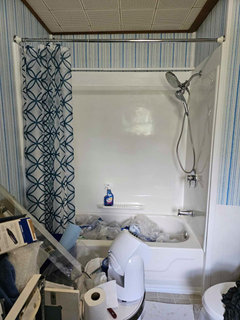 ZanneJ's Ensuite · More Info
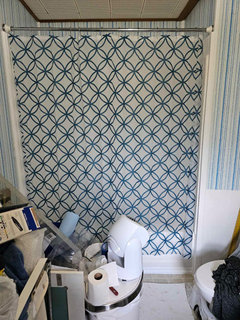 ZanneJ's Ensuite · More Info
 ZanneJ's Ensuite · More Info
 ZanneJ's Ensuite · More Info
The little plastic thing on the right that is holding bath gloves covers the ugly spot where I repaired the scrape
 ZanneJ's Ensuite · More Info
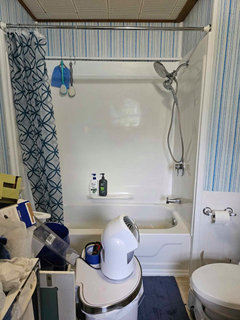 ZanneJ's Ensuite · More Info
My back scrubber stuff is blue. Gray is for my brother. Shampoo & body wash are mine. He still needs to bring his home from our friend's house.
 ZanneJ's Ensuite · More Info
I have cleaned up the mess under the tp holder since this.
 ZanneJ's Ensuite · More Info
 ZanneJ's Ensuite · More Info
 ZanneJ's Ensuite · More Info
Now I need to clean out all the junk, clean the floor up, get some wainscoting, get baseboards, etc.
I plan to put up a robe hook near the shower so I can put something on after getting out of the shower. It's more of a wrap than a robe so it doesn't need to be too high. I have a spot to hang longer stuff just inside the door. Will need to do more painting, replace the faucet, work on the plumbing more, etc, but I've been able to shower and it is glorious. My friend did put the cartridge in upside down so the hot and cold are reversed, but I don't mind. I can remember which way is hot and which is cold.
This is the robe hook I'm going to put up:
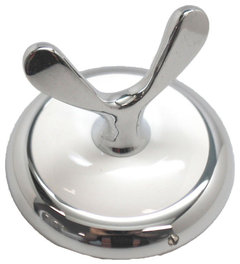 A photo clipped from Houzz Bookmarklet · More Info
It isn't a perfect match, but its close enough. I can hang the body wrap and maybe a head wrap on it.
Those set screws are a real bear though. A pox upon whoever decided to have a flathead screw for it.
TL: DR? After over a decade, I finally have a working shower!
apple_pie_order
9 months agoIt looks great! Your own shower! The remaining things are small potatoes compared to what you've accomplished.
I hope your brother and your mother are able to use the blue bathroom you posted about a while back. Since you are willing to share your own bathroom with your brother, it'd probably be good to add a separate set of towel bar(s) and maybe a storage shelf for his use so he doesn't encroach on your space. Grab bars near the toilet and in/near the tub could be useful.
For kicks, you could stage the bathroom like you were selling the house, then take your own photos.zannej thanked apple_pie_orderzannej
Original Author9 months ago@apple_pie_order We will likely do the laundry room/guest bathroom renovation before we do the blue bathroom for my mother. That way, when we do start working on Mom's bathroom, there will be one she can use. I need to clean up my room. It's got too much junk in the way for her to easily get to the bathroom.
My brother using my bathroom is short-term, but I eventually want to add some shelves, possibly cabinets, etc for more storage. I want to have storage for toilet paper, wet wipes, tissues, etc.
It's so nice to be able to take a shower whenever I want instead of having to drive over to my friend's house and hope no one is doing laundry or having people wanting to come in to use the bathroom while I'm showering (friend only has the one bathroom).
I made a To Do list for the bathroom (in no particular order)
- Remove tools & junk-- find storage for them
- Clean up floor & counter
- Install robe hook
- Move or trim peg on board with pegs that interfere with door
- Fix cut joist under the tub
- Cut access panel under tub from closet
- Change out overflow & drain for tub
- Replace faucet & lavatory drain
- Replace S-trap with either in-wall vent stack or AAV
- Open up wall behind toilet to examine any pipes (possibly merge tub vent)
- Sand & paint vanity
- Install new hinges & pulls on vanity + magnets to help doors stay shut
- Sand & paint dresser
- Install new knobs on dresser
- Sand & paint door
- Put mirror on door
- Sand & paint rough wood trim all around room (door, window, ceiling, etc)
- Replace trim on vanity with pvc cove moulding
- Install beadboard, chair rail, and baseboards
- Replace triple toggle switch with new 20Amp triple rocker switch
- Replace old GFCI with new
- Add light switch next to GFCI for vanity light
- Install vanity light
- Install light over shower
- Install bracket to hold mop and broom
- Build new mirror frame & install new mirror above vanity
- Figure out some storage for bath slippers
It seems like a long list, but hopefully it won't be so bad. I'm thinking shelves or cabinets over the laundry cart will help. I might make cabinets though. It can start as shelves and I can add wood to make them in to cabinets.
I was going to raise the toilet up with a platform, but it seems to be ok for now. I might add a small grab bar later on to help me get up if I start to have problems.apple_pie_order
9 months agoThanks for prompt response. That's a long punch list. How about doing the put-away and clean up, fixing the hinges on the missing vanity door, add a robe hook, then calling it done for now? In a few hours, it'd be done. You've got a mirror already, the sink and faucets look pretty good since you shined them up a few months ago.
Good luck with the bathroom/laundry switchover. Maybe start a new post for that when you are ready?zannej thanked apple_pie_orderzannej
Original Author9 months ago@apple_pie_order The existing mirror is damaged-- the stuff tha tmake sit refllective peeled off at the bottom and it looks ugly. The porcelain on the hot water handle on the faucet keeps coming loose and I already have a new faucet that looks nicer and is taller.
The plumbing is done wrong so the water gets siphoned out of the P-trap and can allow sewer gases to come up-- which is a health hazard. Fixing the plumbing can also help with making things drain better.
The joist under the tub needs to be addressed/fixed so we don't' have sagging or collapsing floor.
The wainscoting & baseboards and such are purely cosmetic, but I'd like to get to them eventually.
The electrical needs updating since I sometimes get a little zap from the light switch and the vent fan isn't working-- which I suspect is from electrical issue. The switch is from the 70s or older so it is time to replace it. I already have a replacement switch.
I have a thread on the laundry room/guest bathroom thing. I think I started it before this thread. https://www.houzz.com/discussions/536570/need-help-with-awkward-laundry-room-bathroom-floor-plan
I probably have one on the other bathroom- https://www.houzz.com/discussions/6211158/color-fixture-choices-for-master-bathroom-upgrade
Ran into another snag-- ceiling is dripping so I think there may be a roof leak. I no longer have the dexterity to climb on the roof-- my ankles give me trouble since I tore tendons in both of them years ago. Going to need to send someone up on the roof to inspect as well as have someone check the attic.
I really need to start on the cleanup.apple_pie_order
9 months agolast modified: 9 months agoThanks for info. Definitely a good to-do list! Safety first.
zannej thanked apple_pie_orderzannej
Original Author6 months agoBeen hit with fatigue again and have sick family members I've been looking after. Also was procrastinating. Haven't cleared stuff out yet but am hoping to this weekend. I've been working on a new computer build because my current one is not able to handle all of the graphics and games I play with. Just waiting on the power supply unit and need to build a shelf for the new case so I can keep it out of reach of kitties.
Anyway, I finally put up the robe hook I got from Ebay. It actually looks nicer than I expected. From afar it looks like it matches the towel bar.
I had some trouble with the supplied screws. Metal was too soft and they were only meant to go into drywall anchors. Even though I pre-drilled, they would not go all the way in and they stripped out. I wasn't able to get them all the way in & then they got stuck. In my efforts to remove them I slightly bent the mounting bracket and scraped the wall panel. I will have to do some mild touch-up to disguise the scrape. I'm thinking a little white primer spread thinly over the area might help.
I had to resort to getting the mouth of the drill around the screw heads to pull them out and then replaced them with star head decking screws. Those went in easily. Bracket was not bent in a spot that would interfere with how the post attached to it. I used a magnetic torpedo level to make sure the bracket went on level. It may look crooked in the photo, but its the wall panel that is crooked.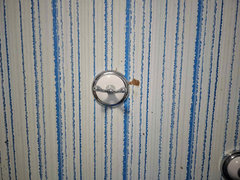 ZanneJ's Ensuite · More Info
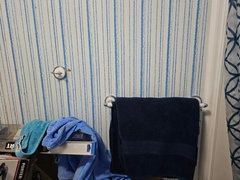 ZanneJ's Ensuite · More Info
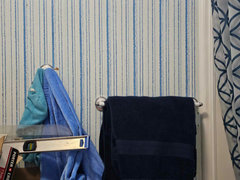 ZanneJ's Ensuite · More Info
Obviously it still needs cleanup, but I think it looks nice. I had to use a tiny precision screwdriver to get the set screw tightened down. I also used tt to tighten down the posts on the tp holder. They were moving apart because they could slide a bit as I didn't have the correct size screwdriver to tighten them down. Just happened to find a precision set on my mother's desk recently.
Next step is cleanup and installing the hook for my slippers. I'm debating where to put the hook. I want to put it wehre I can easily reach my slippers but not have it look too ugly or get in the way of the towels or other stuff. It attaches via doublesided tape and the base is rather ugly so I might find a way to cover it up a bit.apple_pie_order
6 months agoProgress on your to-do list is nice. Good luck with the clean up this weekend.
zannej thanked apple_pie_order


suzanne_m