


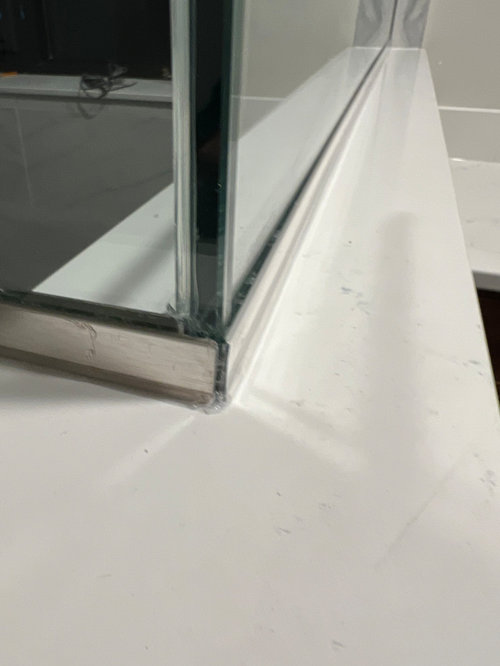
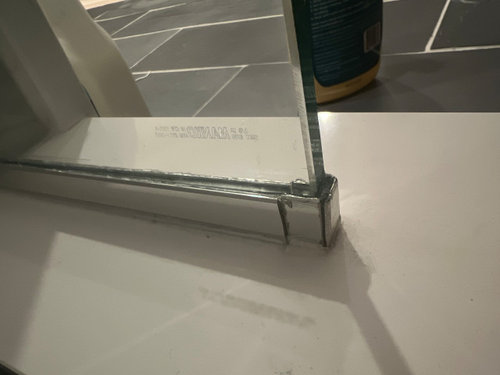
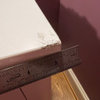
Shower U Channel Install Issue
nuttmeg
last year
Featured Answer
Sort by:Oldest
Comments (7)
 PRO
PROJoseph Corlett, LLC
last yearRelated Discussions
water inside u channel under shower door
Comments (3)I sent the shower door company the photo and they said it could be air bubbles in the silicone but they will come out and take a look....See More*least* obtrusive shower screen channel?
Comments (1)followup: I found a 3/8" tall U-channel at eshowerdoor...now to convince my local folks to find it or let me supply it... Anyone have any feedback on the "dryset" channel below? It's a step beyond, doesn't need silicone, don't know if it's better or worse... Here is a link that might be useful: a different approach, also only 3/8...See MoreANYONE with a black u-channel used for their frameless shower?
Comments (3)you asked about soap scum though. The matte really doesn't show anything. no I don't have glass in mine. But for yours I would just be diligent about cleaning the channel area once a week to avoid any gunk buildup. I don't think it matters what color you have there....See MoreMAAX uTile Product Quality and Installation
Comments (0)We recently added a MAAX uTile shower system to an existing basement 1/2 bathroom. Below is a detailed review of our experience. We are pretty experienced DIY’ers, have previously completed remodeled a bathroom down to studs including 80% new plumbing and electrical, and have many other framing, plumbing, electrical, and cabinetry projects within our experience. For this project, we were looking to “go fast and limit cost” in adding the new shower. uTile seemed a good solution to us: the system has only three main components to install: a shower base/pan; the uTile walls; and, a shower door. a minimum number of pieces should equal a fast installation consistency of manufacture should ensure relatively good quality the product was available at basically “all” the major big-box home improvement stores, lending it some credibility MAAX is generally recognized as a mid-tier quality company, so pretty safe to deploy. Our only hesitation: reviews of the product were mixed. Still, there was not a lot of fear-mongering about the product. Frankly, there was generally less information on the internet than we expected to find, except for MAAX’s own promotion. The team at Menards (where we purchased) was positive about the product line, so we proceeded with our plan. Before you continue to read, here’s the punchline: The project turned out to be NOT fast, NOT easy, and NOT particularly low cost, though we probably did complete at about 25% lower product cost than a traditional tile shower installation. There was no savings on time - we likely spent more time than on a traditional shower install. We would NOT recommend this product except in very specific circumstances. Our experience with a MAAX UTile installation was quite frustrating, though we eventually completed the project and all seems watertight for now, but we are not confident in long-term performance of the system. Now, our story and the gory details: DELIVERY AND QUALITY Product delivery was difficult. We ordered through Menards, with a 6 week delivery promise. The order was delayed by an additional 6 weeks (to 12 weeks). The Menards team helped, providing an in-stock, same model shower base ahead of the delivery, to keep our overall basement renovation job moving. When the order did arrive, a wall was missing (a MAAX delivery error). Menards worked diligently to expedite the missing piece. When the last wall arrived (an additional 2+ weeks delay) and we brought the boxes home, we discovered one wall had a surface crack and each wall had some cosmetic defect. MAAX tech support offered good support in this moment: they collected our damage report and quickly shipped a replacement for the cracked wall (we decided to work around the other cosmetic issues). Quickly = add another week of delay. Total delivery time: 15 weeks. Unfortunately, quality was challenging beyond the walls. The base, an Olympia model base, is built by gluing a molded plastic floor to a styrofoam, formed under-layer. The system as-manufactured SQUEAKED when stepped on. We had to evaluate if this was caused by a non-level floor issue (no), related to movement before the system was permanently secured (no), or something else. We determined the problem was between the surface and styrofoam layers, where the two surfaces rubbed together. This may be because the layers were not glued together well, or may just be a bad design: weight on the base’s surface creates friction between the layers which creates squeaking. With some research and good advice from the internet, we resolved this by pouring real talcum powder in the poorly-glued gap between the layers, completely around the base edge - no more squeaking! We hope this will be a lasting fix. A note: you need real talcum powder, not baby powder - talc is bad for babies and ladies, and thus is no longer used in baby powder, but it was needed for this part of this project. Baby powder is now a corn-sugar-based product, this has many potential problems. INSTALLATION MAAX indicates that the uTile system should be installed within an effectively perfect space - level and plumb in all (specific) dimensions except floor-to-ceiling height. Two “buts”: the instructions are not perfectly clear on how the pieces must install relative to the space, and the actual product quality does not match the demand for space construction quality. This created a cascade of problems for us. Shower base location - We placed the shower base prior to the walls arriving, including setting the drain pipe location. We followed the very specific instructions for a uTile installation (which are different to the shower base’s standard instructions). These say, absolutely, “Install the base pushing it completely against the studs” (page 7, step 2). Um, NOT true, as we only found out later, after the plumbing was set. Setting the back of the shower base completely against the studs creates a later problem with alignment of the uTile shower walls with the front edge of the shower base. We were completely screwed on this one, I’m afraid, since we installed before testing fitting everything (due to delivery delays). We ended up with about a 1/4” overhang of wall beyond the edge of the shower pan. It doesn’t look terrible, but it is not right. You WILL need to shim the shower pan off the back wall by about 1/4” to get perfect alignment on the front edges. This is a significant error in the install instructions. Installing the walls - As we placed the walls, in our nearly-but-probably-not-perfect opening, we encountered what seemed to be odd panel alignment issues. We noted different-sized gaps on the back wall between the top and bottom of both the right and left sides of the wall; in testing fitting all the wall panels, this created an exaggerated gap in both corners where the wall panels met, and seemed to pull the front edge of the side walls away from the studs. We checked our level and plumb on all walls, they were good (we only expected minor shimming). A bit of evaluation revealed that the back wall was slightly warped in the middle, by about 1/4”, from the center to the bottom of the wall. With no way to attach the center and bottom of the wall to the studs behind, we resolved this, as best we could, by attaching the back wall to the side studs about 6” from the bottom of the studs on both sides of the panel - an action definitely not in the instructions, which do not call for any screws-to-studs on the sides of the back wall. This resolved the warping problem enough that the corner gaps mostly closed up, and the side walls mostly squared up and touching their framing studs. We proceeding to “permanently” install the walls, per installation instructions, and sealed up the corners. Installing the corner shelves - This task seemed so simple, but was in fact a challenge. The walls must be completely square for the shelves to fit relative to the shelf mounting template. We used the template. I expected there would be some allowance for adjustment in the alignment of the shelves. I was wrong - no play here at all. With slightly imperfect wall square, the screw openings to attach the shelves to the shelf mounts were off by 1/16” and could not be adjusted, so would not install. The mounts were already in, so I had to make the shelves work! I dealt with this by cutting off the bottom of one of the two screw sleeve fittings for each shelf, and tossed the related screw liners, creating the play we needed to fit the shelves. They are secure, no worries there. My best guess is this was ultimately related to the slight lack of square caused by the warped back panel; I don’t think it is an error in the template, but really there should be more tolerance in the shelf’s design. With the base, walls, and shelves installed - and if everything had arrived on time, without defects, warp, etc - I might say that UP TO THIS POINT, a uTile install was relatively easier than a traditional tile shower install. After this point in the installation, however, I would NOT be able to say this. Why? The instructions are silent on how adjacent surfaces should attach/align to the “edges” of the shower - which becomes a time consuming, ridiculous “finishing” challenge with the product. In our case, uTile wall installation left about a 3” gap between the (low) ceiling and the top of the uTile panel, and wall finishing was needed along the front edges of the uTile panels. The panels themselves have a 1/8” thick, 1” wide “lip” that is used for securing the panel to studs. The finished panel surface is raised a little more than 1/2” (maybe 9/16”?) above this surface. Moisture-resistant drywall or some other water-resistant material needs to be wrapped over the lip, and you must decide how much reveal of the (finished) side edge of the raised panel you want to see. (Note: the finished side edge does NOT look like tile, it is simply color-matched to the tile as a flat surface.) To create a level-with or parallel surface to the wall panel face, you must install the material by first shimming behind the material to deal with the thickness of the panel’s lip, and then attaching the material to the nearby wall structure in a way that leaves a clean finishing line with the wall panel, and then deal with (in our case, due to the lack of proper base installation instructions) the overlap issue at the panel edge / shower base edge. Simply put, this work is a total pain in the $%#. In our case, with a 48x32 shower, the total amount of drywall to install was probably less than 4 square feet, but was spread along 24 linear feet, and had 48+ linear feet of related edge-finishing bead, outside corner bead, inside corner bead, etc. The drywall work, to make this all look good, took 2 additional days, including drying time for mud. THIS TOTALLY WIPED OUT ANY INSTALLATION TIME VALUE FOR UTILE. Relatively, the shower door went up quickly, but even this was a bit difficult with the uTile panels. Typically, you would drill through your tile into a backing stud for mounting the shower door framing (ours was a sliding door with side framing). In the case of uTile, you must attach the shower door framing to the uTile panels using screws and plastic expansion plugs, because there is an air gap between the back of the uTile panel and the studs behind. You cannot just use a longer screw to get to the stud and torque it down, or you risk cracking or breaking the uTile panel. We drilled the holes for the plugs to the MAAX spec, but these turned out to be too large to keep the MAAX-supplied plugs from turning in the relatively thin panels as screws were installed. So, we visited Menards one more time to find plugs that would work better and hold firmly in the MAAX-specified holes. This is, again, an issue with the uTile design - more thickness at these locations on the panel would prevent this kind of issue and allow for a proper attachment through to the studs. THE WRAP UP Now that it is all finished, it looks “ok”, but I wish we had simply installed a traditional tiled shower without all the hassles associated with uTile as a system, and of course without the quality and delivery issues. We have limited reasons to expect the system will perform poorly as a shower, but do have concerns about the system’s rather complete reliance on the integrity of the large number of silicone seals at every panel edge for water protection. We will update this post if our experience turns negative as the system is used over time. So: Kudos to Menards for helping us solve delivery problems. Kudos to MAAX tech support for owning their (worst) quality problems as reported by us Negatives for product quality, installation instruction accuracy, and lack of product tolerance for real world conditions. Negatives for promise v. reality of installation effort, time, and cost. Overall, I cannot recommend this system to a DIY’er who could just as easily install a traditional tile shower system. I am happy to address any questions about our experience, if it will help you with your own!...See More
ci_lantro
last year PRO
PROHALLETT & Co.
last yearnuttmeg
last year
Mrs. Beasley
last year- PRO
Patricia Colwell Consulting
last year

Related Stories

BATHROOM DESIGNShould You Install a Urinal at Home?
Wall-mounted pit stops are handy in more than just man caves — and they can look better than you might think
Full Story
BATHROOM DESIGNHow to Install a Toilet in an Hour
Putting a new commode in a bathroom or powder room yourself saves plumber fees, and it's less scary than you might expect
Full Story
GARDENING GUIDESGreat Home Project: Install a Rain Garden
These beautiful and environmentally friendly landscape additions have a place in wet and dry climates
Full Story
BATHROOM DESIGNHow to Match Tile Heights for a Perfect Installation
Irregular tile heights can mar the look of your bathroom. Here's how to counter the differences
Full Story
DOORS5 Questions to Ask Before Installing a Barn Door
Find out whether that barn door you love is the right solution for your space
Full Story
BATHROOM DESIGNHow to Build a Better Shower Curb
Work with your contractors and installers to ensure a safe, stylish curb that keeps the water where it belongs
Full Story
INSIDE HOUZZWhat Homeowners Want in Master Bathroom Showers and Tubs in 2019
Homeowners are split on tubs, while the majority upgrade showers, according to the 2019 U.S. Houzz Bathroom Trends Study
Full Story
INSIDE HOUZZHomeowners Focus on the Shower in Master Bathroom Remodels
Showers are getting bigger even as most rooms stay the same size, the 2020 U.S. Houzz Bathroom Trends Study shows
Full Story
REMODELING GUIDESTop 10 Tips for Choosing Shower Tile
Slip resistance, curves and even the mineral content of your water all affect which tile is best for your shower
Full Story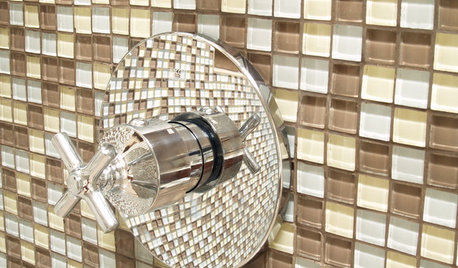
BATHROOM DESIGNConvert Your Tub Space to a Shower — the Fixtures-Shopping Phase
Step 2 in swapping your tub for a sleek new shower: Determine your mechanical needs and buy quality fixtures
Full StorySponsored
Professional Remodelers in Franklin County Specializing Kitchen & Bath


millworkman