Here to share my journey (and massive learning curve) to refinish 17 vintage, two-panel doors…using a variety of strippers, elbow grease, etc…and give anyone who has experienced the same as an amateur or professional the chance to offer advice, trips, tricks, etc.
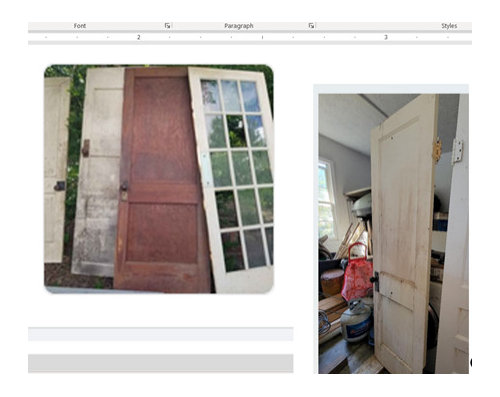
First, we are “owner building” a house— of course it needs doors. First, I thought, Gee, look at all these deals on social media platforms…$25 for a solid wood door? I’m in! We’ve been buying up blocs ever since…Our first set of 6 came in at only $100 for 6 vintage doors…pictured here, taken from a house. built in the early 1900’s.
Stripped, they look like some sort of curly pine.
Our second set came from a newer house, probably built in the 40s or 50s, and have a fine veneer on the rails, but overall have a mahogany tone. The next 6 were pricier at $40 bucks a piece, but well worth it. Don’t know what I will find underneath.
Either way, they most likely have lead paint or even lead-tainted varnish. Yup, old timers added a version of lead to speed up drying times in varnishes and paint. SO my first step, was learning about protecting myself from lead poisoning.
PROTECTION: I wear chemical gloves to my elbows and a 3M Respirator Mask rated higher than lead paint removal, and goggles, no matter what. I do not let anyone come near my site without a mask. Plus, I remove my shoes and clothes and hairscarf after I finish for the day and before entering the house. I work outside and shower when I am finished. Unfortunately, I will admit…my first door, I forgot a drop cloth.
STRIPPERS:
I’ve used Smart Strip, Smartstrip Pro, Citrustrip in a spray can, Citrustrip paste, KwikStrip…I even bought the practice box of Dumond products just to test. What I won’t use are the strippers that can ruin the wood, like the PeelAway. I plan to wax these gorgeous, wood doors into something beautiful and nostalgic, so I don’t want to ruin the wood.
SMARTSTRIP: I loved the idea of spreading on a product, laying on some paper, and yanking off paint like a gal waxing her legs! And guess what, my first door? It did just that. Man, was I excited. Look here:
But then, Smartstrip did not work quite like that on every door. Some doors had more layers, some had different types of paint and primers and varnishes. In fact, my last four doors (coming from the “newer” house,) the paint has refused to stick to the paper…no matter how thinly or thickly I left it, no matter how long or short I waited…SO the type of paints and how they are layered matters.
Some latex bubbles right up and sticks to the paper. Other latex turns into a stringy mess, like hot chewing gum and will not adhere to the stripping paper. And lead paint? Yes, many layers will come off at once, but it will leave a muddy, chalky smear behind. BUT this is still better than dry flakes flying all over the place, poisoning the air.
SMARTSTRIP PRO: Yup, worked about as well as the regular product, but it did leave what looked like a few black water spots on one door, so I did not use it again.
CITRUSTRIP in a Spraycan versus Paste: I found this product in both versions works faster than Smartstrip on LATEX, but not as well on tougher, older paints. And though I have no idea why, the stuff in the spray can works the fastest of the three. But spraying that much area is hell on my old thumbs. I am going to try the liquid version…maybe it works as well as the canned stuff.
KWIPSTRIP: yup, it worked faster than Smartstrip, but you have to neutralize it, and it can also make restaining impossible or blotchy. Plus, it turned the paint into a goopy, baby poop like texture that seemed impossible to scrape up; it just spread the color all over the place and deep into the grain. After I tested it, I only use it when I absolutely have to.
TYPES OF PAINT
Though most of my doors came from three separate houses so far, the types of paints I’ve encountered have been a hodgepodge of tastes. I’ve hit weird latexes, milk paint, oil lead-based, enamels, even old fashioned orange shellac. And I swear there might have been wallpaper in there under some of the paint, too. I’ve encountered mints, yellows, pinks, and a few shades of purples, and what looks like dark blue primer. No door, and I mean NO DOOR has had the same exact range of colors and types of paint. It sure would have been nice if each door had peeled off the way Smart Strip is supposed to work, like the first one did…but no…
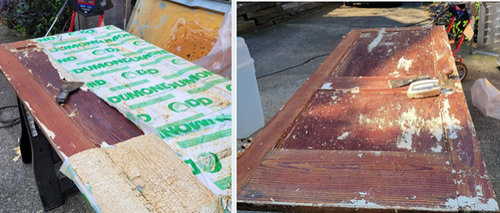
This door here is the worst one yet:
That picture is AFTER THREE PASSES. The first pass only raised a layer of latex. The second pass I felt like I was scraping off linoleum; it was thick, and leathery and STUCK, but I got it off to find a whole new layer of what looked like blue primer…and under that was this lavender left over. I applied one last coat of Smartstrip and paper to sit over night…again, and finally reached varnish. Hopefully, none of the other doors had whatever this devilish combination was…
TECHNIQUES, TIPS and ADViCE
1. The longer a product stays on the better it works. BUT do not let it dry out. Even if you use the Dumond paper, you must keep it from drying out, or you are right back to square one. I cover all that with giant plastic sheeting while it ferments. (Old shower curtains, etc.)
2. Instead of Dumond Paper, I have also tried good old plastic wrap. You lay down your stripper, then cover it. The paint won’t stick to it like it does to the paper, but since the paper only works about a third of the time, try plastic. I bought the wide, industrial roll from my big box store. Easier for plastic-wrap challenged people like me. (I can NEVER get it off the roll without twisting and sticking to itself…so I prefer the paper—but the paper is comparatively $$ and it dries out if you don’t protect it. The plastic does not.
3. A five-in-one to scrape has been the best of the tools I’ve tried. So is my 2 edge scraping brush. Yes, everyone says use plastic scrapers, so you don’t damage the wood. But I’m not Hulk. I need a tougher tool, and it sure does the job once the paint is softened. And its pointy edge gets in the nooks.
4. Once the paint is soft enough in the crevices, I use a cheapo toothbrush dipped in Denatured Alcohol to work it out. Yes, a wire brush will also do the job, but it often damages the wood. I keep a bunch from the dollar store; they can pick up the goop and be tossed, if necessary. It will make a smeary mess, but then I use steel wool dipped in DA to gather it and then a wet microfiber rag to wipe that up.
5. Barbecue skewers, carved popsicle sticks, and pointy Q-tips can also help in those crevices. But again, the paint must be soft enough.
6. Denatured Alcohol is your friend. (And so is high proof Grain Alcohol…cheaper, stronger...and more tasty. Just kidding: NEVER EVER drink Denatured Alcohol; it will kill you. Grain only does that if you imbibe too much...but it will clean up paint.)
6B. Update---Hand Sanitizer works even better than denatured alcohol, especially at removing milk paint and varnish, probably because it doesn't evaporate as quickly.
7. Once I get down to the last WET layer, where the paint is mostly gone and only WET smeary residue (and perhaps varnish) is left, I work in small shifts. I stress the word WET, because once any left over bit dries, this step is harder. I keep the last wet layer wet, with Dumond paper or plastic wrap, and I work in 2 foot chunks. I scraped off the last of the paint with my 5-in-1. I dip my toothbrush in DA and work those last crevice bits into a muddy lather, I use my steel wool (even Chore Boy brillo) to scrub the flat surfaces, and then I scrape the mush into a pile and wipe it with paper towels and the damp rag to wash it off. Repeat as necessary. I’ve learned if I scrape that last layer off the whole door instead of doing a smaller scrape, scrub and wash, the smeary residue has dried and is harder to take off.
8. Once I’m down to that washed layer, it is usually ready for sanding and I wet sand first (because, as I said, old varnishes can have lead too that has leached into the wood.) If it still has too much color from the varnish, I do another round of denatured alcohol and hardy steel wool, wash with wet rags and then start my sanding.
9. Sanding. I use a flat sander that has a vacuum and Hepa attachment AND I keep a shop vac with a hep bag, running nearby as I sand. The less lead dust I put into the air, the better.
10. I wipe down with TSP wipes, then I wipe down with Mineral Spirits before final light sand. TSP is controversial. Do some research.
11. All that goop I have scraped off goes directly into a heavy duty bag per our state regulations…
Anyway…I’m still trudging through, now on door 9, side number 17. Each door is different, and not even the same wood inside one house. It will take some creativity to get them a uniform color and look in the new house, but I’m excited to have something this pretty with this much history…And I am sure I will learn even more tricks along the way.


Verbo
Jilly
Related Discussions
strip / refinish 1950s table?
Q
Should I strip/refinish or replace banister?
Q
Strip and refinish help please
Q
To paint or strip and refinish
Q
Keen BOriginal Author
Keen BOriginal Author