


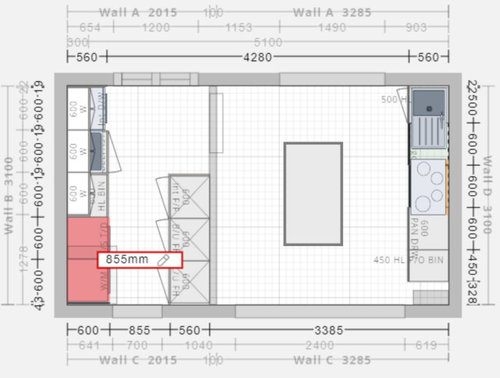
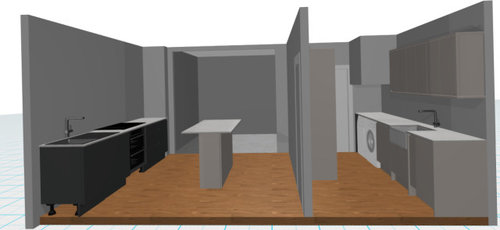
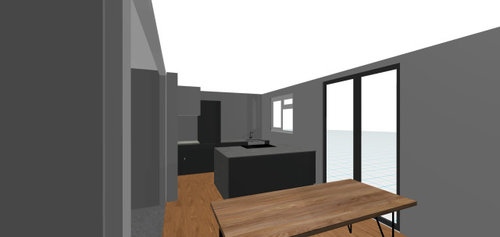
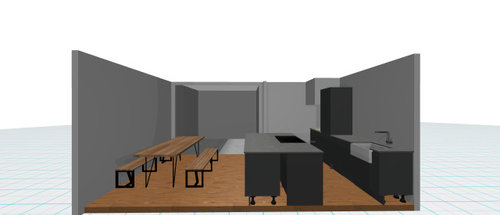
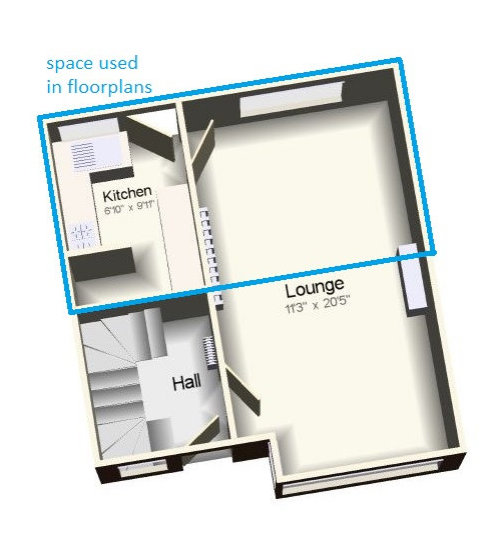
Kitchen reno: open-plan or kitchenette with utility
Evie
2 years ago
last modified: 2 years ago


Featured Answer
Sort by:Oldest
Comments (8)

herbflavor
2 years ago
Evie
2 years agoRelated Discussions
More photos/elevations/plans of Stacey's kitchen reno..pic heavy
Comments (8)Thanks guys! So you think the column should maybe look like the one I drew on the mudroom elevation? That is a square post (below). There are no existing columns in the house right now. The exterior is currently "brick" (masonry block) and white vinyl siding with colonial-style lighting and shutters. Our plan is to remove the shutters and vinyl, paint the "brick" to match new natural-light-grey-stained cedar shingles, with varnished wood doors... I guess that's Cottage style. The interior of the house seems like it will be happy with that aesthetic (don't want to force it to be something it's not) so the simple square column seems to fit, no? With just plain trim around the top and where it meets the counter or whatever? By the fireplace, I want all the storage that counter-height and 24" deep cabinets would provide, but I'm worried that it should be more delicate so as not to seem to much a part of the kitchen itself. Unfounded worry??...See MoreMOVING kitchen instead of reno in place plans
Comments (6)Computerklutz--Thanks! A bigger and more-functioning kitchen is worth trading something. Brickeyee--I have to admit that I had to google DWV lines! DH, who is not a plumber, thought this was doable. I'll consult a plumber (haven't settled on the ONE yet) to make sure. The house is 40 years old and this is the first remodel. Huge crawl space under the house. There isn't any plumbing in the back of the house though, except for exterior garden hose lines. The expense may be worth it, depending on what it is. Chisue--This drawing represents just over half of the house. The other half is bedrooms. Here's a crude drawing of what it looks like. We are adding a real master bath on the other end of the house. This also enlarges bed 3 a bit. I live near Seattle. Basements aren't common in my area. This is our forever house. We are in our early 40's--not just starting out. We searched for over a year to find this house. We've heavily considered moving over the last couple of years during our remodel ponderings, but ruled in out. We just finished 11 years of hard work on the gardens. We have a great lot, but it needed a ton of work. Our garden was featured on last year's county Master Gardener's tour. Our neighborhood is centrally located in a great school district with a private lake, security, and many neighborhood children's activities. Plus, we only have one income now and can't afford a big house with more room like we'd like. Plus, I can almost guarantee that the kitchen in a new house wouldn't fit our habits so we'd have to remodel it anyway. We need to make this space work for us, with tradeoffs that are acceptable. Oh, and we had planned for years to add a second story onto the house, but found out we can't. Our foundation is unfilled cinderblock. It won't support a second floor. I mentioned above that we planned a bumpout of the kitchen to accomodate a bigger kitchen so there is the potential of slightly more room there, but I'm not sure how we could use that potential space it if we move the rooms around. I posted this drawing of my "mudroom" idea over on the this thread in the kitchen forum. I think this would help a lot!!...See Moreplease help review my kitchen reno...feedback on plans please!
Comments (15)Here's an idea: All perimeter counters and cabinets are 3" deeper than standard: -- Counters are 28.5" deep. This gives you more workspace as well as more room behind the sink for a faucet and to clean behind -- Base cabinets are 27"D. If your cabinetmaker does not offer deeper base cabinets, then pull standard 24" base cabinets out from the wall -- Upper cabinets are 15"D. This should not be a problem - most cabinetmakers today offer 15"D upper cabinets. All zones are nicely separated, which allows multiple people to work in the Kitchen at one time - preparing a meal/snack, cooking, and/or cleaning up. There are four defined Prep Zones, with potential for others throughout the Kitchen. There are 3 Prep Zones on the island - two of which are adjacent to the prep sink. The third is around the corner and while it is not directly adjacent to a sink, it's close to both sinks. There is a 2-bin trash pullout next to the prep sink. The Cooking Zone is on the wall for ease of venting. It is surrounded by ample work/landing space. There are two cabinets on the left for tray storage and pot & pan storage on the right. Additional pots & pans can be stored in the island. The Cleanup Zone is on the perimeter where dirty dishes are hidden from direct view from the Dining Room and Family Room. Both DWs flank the cleanup sink. There is also a 2-bin trash pullout b/w the cleanup sink and the range for easy access from both the Cooking Zone and the Cleanup Zone. Dish storage is located in several locations near the DWs and all to the left of the cleanup sink. This is so your dishes are located near their point of use - the Dining Room. Dishes are also stored near the DWs for ease of unloading. Finally, dish storage is located where someone can set the table or load/unload the DW without getting in the way of those preparing & cooking. Since you have a large family, you probably have more dishes than most (I grew up in a large family - six children as well - and we had more dishes than most.) Dish storage is located: -- A 24" Dish Hutch is to the left of the sink/DW. It has a 15" deep upper cabinet that goes to the counter above a 27" deep base cabinet. I recommend the first 6" to 9" of the upper cabinet be either a drawer or two or separate doors from above so you can open the doors above even when there are items on the counter. A nice thing about this arrangement is that if you are short or while your children are, dish storage is lower than in standard upper cabinets. Instead of starting 18" above the counter, storage starts 9" or so above the counter. [Note, I originally made it 36" wide, but then I remembered that you have a Utility Shaft at the end!] -- There is a 42" dish drawer in the island for additional dishes. The drawer faces the sink/DW side. With an aisle 51" wide, you should be able to have both the DW and the drawer open at the same time - nice and easy for putting dishes away! -- Finally, assuming the Utility Shaft is not as deep as the counter, I propose putting a tall dish cabinet in front of it for additional dish &^ glass storage. The refrigerator and freezer are on the periphery so both those working in the Kitchen and those just looking for a snack or putting away groceries can access it without getting in each other's way. They are also located so non-Kitchen workers do not have to cross through the working part of the Kitchen to get to them. The MW drawer is located on end of the island - near the refrigerator/freezer and a water source. Most MW'd food comes from the refrigerator or freezer and many need water added to them when MWing. As with the refrigerator, the MW is located such that both Kitchen workers and non-workers can access it without getting in each other's way. The Pantry is located just outside the main Kitchen work area. A walk-in/step-in/reach-in pantry is a much better use of space for pantry storage - it's more flexible, it costs much less, and storage is more efficient. The island has seating for eight. Two seats have 18" of knee/leg space for tall family members or visitors. The other six seats have the minimum recommended 15" overhang. This will be find for short to average height folks. There is a 12"w x 27" tall Utility pullout for broom, dustpan, swifter, etc. If you prefer, it could also be turned 90 degrees so it's a 27"W x 12"D cabinet. To the left of the pantry is a Tea/Coffee/Beverage Center. It's located outside the Kitchen proper to allow anyone to make tea/coffee, etc., without encroaching on the Kitchen's main work area. If you'd like, you could add a bar sink and, possibly, a refrigerator drawer or under-counter beverage refrigerator. Note that a bar sink is smaller than a prep sink, so it will not take up as much room. A bar sink is usually small b/c the most use it gets is to fill glasses for water or to fill a coffee maker, etc. Prep sinks, on the other hand, get a lot more use and more space is needed so they are generally larger. . . Zone Map:...See MorePlanning Kitchen Reno--Need help with new arrangement!!!
Comments (3)Wow thank you so much for your thoughtful work, comments and ideas, mama goose!! I knew there were plenty of other options I hadn't considered, so I really appreciate your thoughts. The gray wall where the fridge and range currently are is load-bearing--we have talked to a GC about removing it and adding a beam in its place. It will need to be engineered but we are willing to see that through. The yellow cut out wall does have air return going to it. Not sure exactly what would need to be done to reroute that. Maybe keeping partial of that wall would be nice to give that bathroom separation. I really like that idea, herbflavor! I wouldn't mind getting rid of the small dining nook. We wouldn't have another dining area, but it really isn't big enough to be comfortable anyway. We are casual enough to go with the island seating I think! I'll have to run that idea by my SO. I also really like the sink on the island to make the back wall more functional. Corner pantry would be great! I do agree changing the slider out for a single door would be super nice to extend the counter space....The slider is only a few years old so not sure my SO will go for it but I definitely want to look into that! That would make such a difference....See MoreSuki Mom
2 years agoEvie
2 years agoKendrah
2 years agoEvie
2 years agoEvie
2 years ago


Related Stories
BEFORE AND AFTERSKitchen of the Week: Saving What Works in a Wide-Open Floor Plan
A superstar room shows what a difference a few key changes can make
Full Story
WHITE KITCHENSCool Scandinavian Style in an Open-Plan Kitchen
A London family replicates the elegance of its previous kitchen in a larger space, adding lots of concealed storage
Full Story
BEFORE AND AFTERSReader Kitchen: An Open-Plan Space in St. Louis for $44,000
A couple tear down a wall and create an airy cooking, dining and living space filled with light
Full Story
KITCHEN MAKEOVERSAn Open-Plan Kitchen in a Converted Scottish Barn
Modern appliances and a rustic backdrop come together in this farmhouse kitchen for a chef and his family
Full Story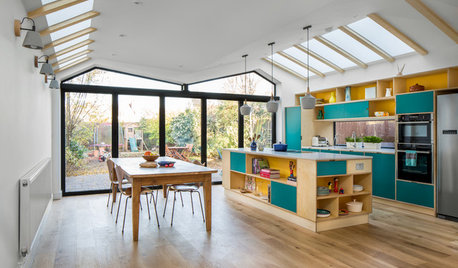
KITCHEN MAKEOVERSOpen-Plan Kitchen Gains Light and a Connection to Nature
A bright and colorful London addition replaces a ‘falling apart’ sunroom, a kitchen and a living room
Full Story
KITCHEN DESIGNKitchen of the Week: Creamy White, Wood and Brass in an Open Plan
A design-build firm helps a Minnesota couple create a roomy L-shaped kitchen with off-white cabinets and a walnut island
Full Story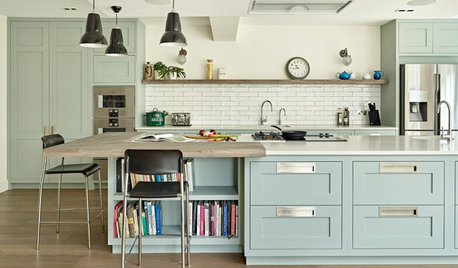
KITCHEN DESIGNKitchen of the Week: Open-Plan Room Perfect for Entertaining
Soft matte finishes and a practical design were key to creating this bright and functional open-plan kitchen
Full Story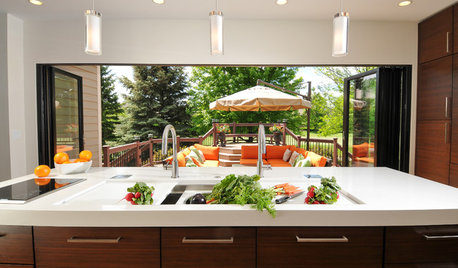
KITCHEN DESIGNKitchen of the Week: Traditional Kitchen Opens Up for a Fresh Look
A glass wall system, a multifunctional island and contemporary finishes update a family’s Illinois kitchen
Full Story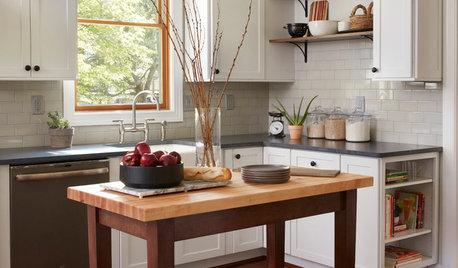
KITCHEN DESIGNKitchen of the Week: A Cottage Kitchen Opens Up
A Maryland remodel balances modern needs and architectural integrity in a kitchen designed for gatherings
Full Story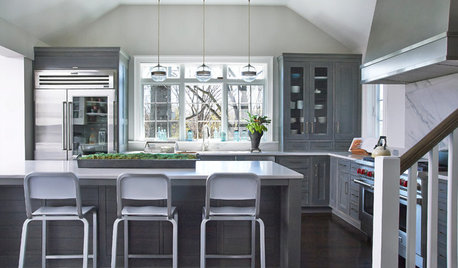
KITCHEN OF THE WEEKKitchen of the Week: Colonial Kitchen Opens Up to Scenic Views
A lack of counters and a small sink window motivate a New York couple to update their kitchen to add space for their busy family
Full StoryMore Discussions
thinkdesignlive