


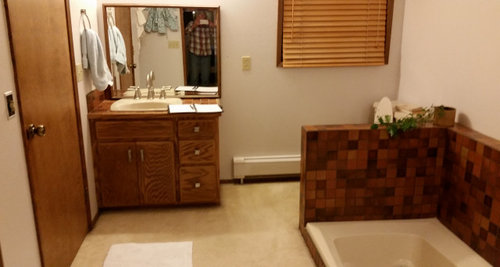
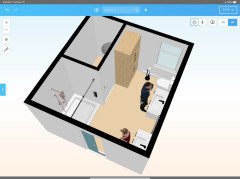
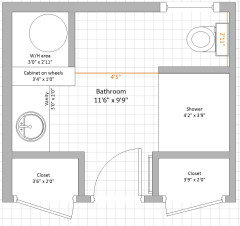
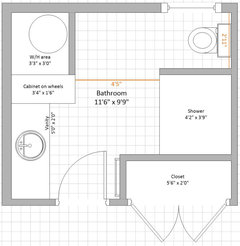
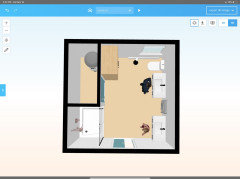
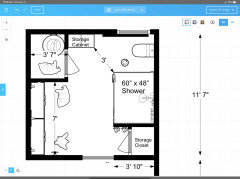
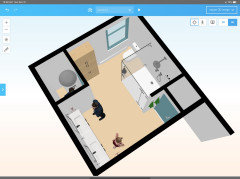
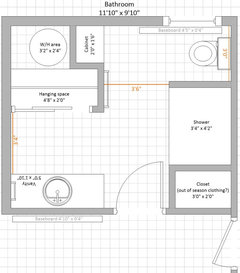
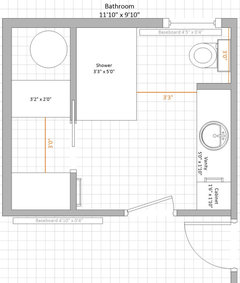
Layout for remodeling master bathroom
Laura Grosmaire
3 years ago
last modified: 3 years ago

Featured Answer
Comments (19)

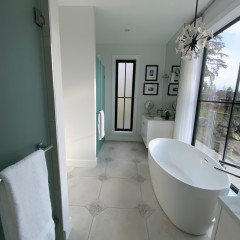
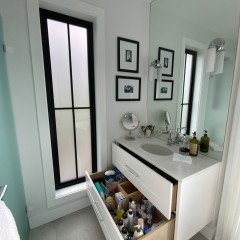
Laura Grosmaire
3 years agoRelated Discussions
Bathroom Reveal, Thanks to the Bathroom and Remodel Forums! (pic
Comments (56)This old thread got revisited. @dani_m08 to answer the question about extra probe, I believe I ordered an extra one when I bought the set up. The probe wire is just setting in the junction box I think but honestly I cant remember. When I laid out the underfloor heating and the probe, I just ran another probe near the first probe, and it was then sealed into the floor self leveling compound as per instructions. then the end was just threaded into the wall like the one that would be live, and not connected, but just laying there in the box. Regarding the tile layout. I just decided to run it this way, after getting instructions on the 90Degree way, IIRC. The herringbone that I love is from my childhood and the side walks in my neighborhood that all ran at 45Degree. so that to me is herringbone. I know you posted on @sochi thread about her amazing bathroom and a wall mounted faucet. I would totally do it if I had the right sink for it. In my case I had made my sink out of soapstone and an integrated backsplash. The pictures of this bathroom reveal are no longer available because of the use of photo bucket, when it was Gardenweb. I did not keep my account with photo bucket. I'll add some of the reveal pictures so you can see the sink and floor. Regarding the sink there is no ledge for water to drip from my hands when using the faucet. The water drips right into the sink. In my other bathroom with a deck mounted faucet I am always wiping up drips and it is a nuisance. I much prefer the setup for this sink. Below: I love the flush finish from the faucet to the bottom of the sink. nothing drips on a counter or edge of a sink. Below: looking in from the doorway. Below: Here I am finishing up the sink. the backsplash was epoxied on as a separate piece. The whole soapstone install in the room took next to nothing to buy as they were all small pieces that I epoxied together with a 3 part stone epoxy. Below: this is the counter at the tub, and is in 2 long pieces but I was able to epoxy them together at there edges to make a wide slab for the top. All the soapstone was finished with a 60 grit sandpaper to be rough and this lovely soft tone of blue/green/gray/white. I did not oil it so this color tone would remain light. Below: If I recall correctly @sochi helped me decide on this Hubberton Forge Mirror. I have 3 different metals in this room, but they are all a cool silver to black color. Below: the center of this tower shares space with the kitchen on the other side of the wall. there is also some extra space that houses some electrical wiring. this is an old simple house. this bathroom was an add on when it got move to the farm in the 30s IIRC. The plumbing was all rearrange and some of the details that were orignially there I kept but updated it, such as this tower feature. The old one went and the carpenter did a wonderful job with this one. Below: This feature was another thing I kept from the old bathroom but flipped it from the other end and had the carpenter put drawers in it. Before it was a hell hole. things got lost and the build was soooo old and creapy I didn't like using it for storage. Now it is perfect for storage....See MoreBathroom layout idea with 2 small bathrooms - including measurements
Comments (19)The "regular" bath layout that jensbride posted first is very similar to what our DD & DS shared for years and worked very well. The door, however, was a pocket style and placed directly across from the toilet. This allowed the vanity to be scooted around the corner to take up the whole wall. It leaves the toilet close to the tub, but with lots of elbow room. Our kids just learned to keep the door partially closed when the bath wasn't in use due to the "view"....See MoreMaster Bathroom Remodel
Comments (11)If plumbing costs are not an issue and you do not want a bathtub, you could remove the tub, extend the shower towards the current tub and have the toilet where the tub is..that way, the toilet is not in your face and it's slightly hidden. You can have the double vanity where you have the vanity now. Where you have the toilet now, you could add a linen closet or shelves for the towels and other bath related items. You could also leave the toilet where it is and have shelving to the left of your vanity, where your bathtub is now.. You could also have a bathtub/shower combo...See MorePlease Help - back to back bathroom layout / remodel
Comments (19)You want to stare in an open door and see a TOILET first? The door will always be closed? No........it wont : ) Yes, sorry. So simple! Cut the linen width to 18. Cut the vanity to 66 inches, and shower to 30 inches width. You will freak when I say that, but. When you shower in a TUB shower, you are standing in a width of about 21 inches! So the 30 is actually quite decent. Otherwise? Eliminate the linen next to vanity, and put a low storage beneath the window, left of entry door 30 wide and 18 deep.. That would keep the vanity size at 72, and shower width as well. That's the best, actually. The master door entry needs to move in any scenario....See More PRO
PROSharon Brindley Designs
3 years ago- PRO
Sharon Brindley Designs
3 years ago 
suzanne_m
3 years agoLaura Grosmaire
3 years agosuzanne_m
3 years agolast modified: 3 years agosuzanne_m
3 years agolast modified: 3 years ago
Karenseb
3 years ago- PRO
Sharon Brindley Designs
3 years ago 
decoenthusiaste
3 years agolast modified: 3 years agosuzanne_m
3 years agolast modified: 3 years agoLaura Grosmaire
3 years agolast modified: 3 years ago- PRO
Sharon Brindley Designs
3 years ago suzanne_m
3 years agolast modified: 3 years ago- PRO
Sharon Brindley Designs
3 years ago suzanne_m
3 years agolast modified: 3 years agoLaura Grosmaire
3 years agolast modified: 3 years ago


Related Stories
INSIDE HOUZZWhy Homeowners Are Remodeling Their Master Bathrooms in 2018
Priorities are style, lighting, resale value and ease of cleaning, according to the U.S. Houzz Bathroom Trends Study
Full Story
INSIDE HOUZZWhy Homeowners Are Remodeling Their Master Bathrooms in 2019
Find out what inspires action and which types of pros are hired, according to the 2019 U.S. Houzz Bathroom Trends Study
Full Story
INSIDE HOUZZHomeowners Focus on the Shower in Master Bathroom Remodels
Showers are getting bigger even as most rooms stay the same size, the 2020 U.S. Houzz Bathroom Trends Study shows
Full Story
BATHROOM DESIGN10 Things to Consider Before Remodeling Your Bathroom
A designer shares her tips for your bathroom renovation
Full Story
BATHROOM DESIGN14 Design Tips to Know Before Remodeling Your Bathroom
Learn a few tried and true design tricks to prevent headaches during your next bathroom project
Full Story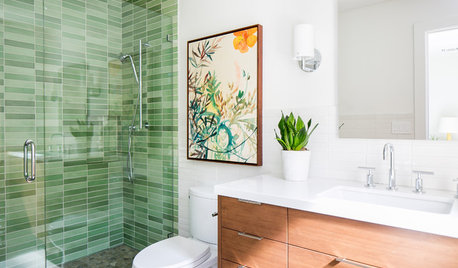
BATHROOM DESIGNTry These Bathroom Remodeling Ideas to Make Cleaning Easier
These fixtures, features and materials will save you time when it comes to keeping your bathroom sparkling
Full Story
BATHROOM COLOR8 Ways to Spruce Up an Older Bathroom (Without Remodeling)
Mint tiles got you feeling blue? Don’t demolish — distract the eye by updating small details
Full Story
4 Easy Ways to Renew Your Bathroom Without Remodeling
Take your bathroom from drab to fab without getting out the sledgehammer or racking up lots of charges
Full Story
REMODELING GUIDESBathroom Workbook: How Much Does a Bathroom Remodel Cost?
Learn what features to expect for $3,000 to $100,000-plus, to help you plan your bathroom remodel
Full Story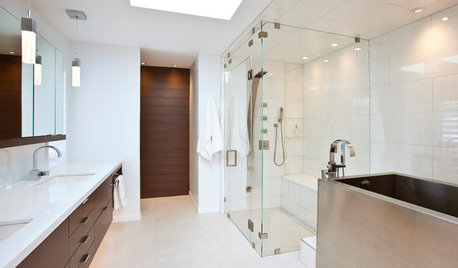
BATHROOM DESIGNRoom of the Day: New Layout, More Light Let Master Bathroom Breathe
A clever rearrangement, a new skylight and some borrowed space make all the difference in this room
Full Story

suzanne_m