


Can we talk sour dough starter?
lindac92
3 years ago
Featured Answer
Comments (21)

plllog
3 years ago
lindac92
3 years agoRelated Discussions
Sour dough vs metal - grrrr.
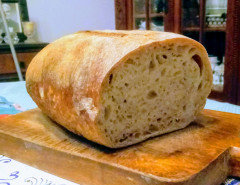
Comments (13)I've been "fermenting" for awhile now - but in other forms (i.e. sauerkraut, pickles, etc.) and thought I'd had my homework pretty well sorted out. I also like stainless steel for other acid cooking as well. Perhaps, it isn't a noticed thing with some - but I definitely detect the bitter acrid taste of metal coming in contact with acids - fruits, tomatoes, but not noticed it especially cooking with milk (yogurts, etc.). My baking pan was probably aluminum. The greenish hue was not all through the bread, and so removed it. One other thought, however, is that I also tried tweaking the recipe with some bran. It "drank" up quite a bit of fluid (I recently read grainlady's notes) and made my bread quite heavy. It didn't rise as well as I'd like - and perhaps that entered into the final picture as well. See - I told you I'm a newcomber. Truly enjoy these notes on artisan breads, and maybe some day ------- Bejay...See MoreMaking Artisan bread with sour dough sponge?
Comments (11)Here is a recipe I found on a blog site (link is below). She has experimented using sourdough starter in addition to the master recipe. Recipes using sourdough starter may be in the next book that Zoe and Jeff are working on. Another site suggested adding 1 c of starter to the basic recipe. Hope this helps. Shelley The Master Recipe: Artisan Free Form Loaf. From Artisan Bread in Five Minutes a Day: The Discovery that Revolutionizes Home Baking by Jeff Hertzberg and Zoe Francois (Thomas Dunne Books, 2007). Copyright 2007 by Jeff Hertzberg and Zoe Francois. Makes four 1 pound loaves. Note: This recipe must be prepared in advance. 3 cups (720g) lukewarm water 1-1/2 tablespoons (4 1/2 teaspoon) granulated yeast (about 1-1/2 packets) 1-1/2 teaspoons kosher salt (or 3 teaspoons table salt) 6-1/2 cups (940g) unbleached flour, plus extra for dusting dough optional 200g of well fed sourdough starter Cornmeal for the peel (or leave on baking paper) In a large plastic resealable container, mix yeast and salt into 3 cups lukewarm (about 100 degrees) water.(make sure you follow this step. When I skipped it I found a ribbon of undisolved yeast). Using a large spoon, stir in flour, mixing until mixture is uniformly moist with no dry patches. Do not knead. Dough will be wet and loose enough to conform to shape of plastic container. Cover, but not with an airtight lid. (I mix mine in a bowl and then put in a lightly oiled 4.75l decor brand container). Let dough rise at room temperature, until dough begins to flatten on top or collapse, at least 2 hours (takes an hour in Darwin) and up to 5 hours. (At this point, dough can be refrigerated up to 2 weeks; refrigerated dough is easier to work with than room-temperature dough, so the authors recommend that first-time bakers refrigerate dough overnight or at least 3 hours.) When ready to bake, sprinkle cornmeal on a pizza peel. Place a broiler pan on bottom rack of oven. Place baking stone on middle rack and repeat oven to 450 degrees, preheating baking stone for at least 20 minutes. Sprinkle a little flour on dough and on your hands. Pull dough up and, using a serrated knife, cut off a grapefruit-size piece (about 1 pound). Working for 30 to 60 seconds (and adding flour as needed to prevent dough from sticking to hands; most dusting flour will fall off, its not intended to be incorporated into dough), turn dough in hands, gently stretching surface of dough, rotating ball a quarter-turn as you go, creating a rounded top and a bunched bottom. Place shaped dough on prepared pizza peel and let rest, uncovered, for 40 minutes. Repeat with remaining dough or refrigerate it in lidded container. (Even one dayÂs storage improves flavor and texture of bread. Dough can also be frozen in 1-pound portions in airtight containers and defrosted overnight in refrigerator prior to baking day.) Dust dough with flour. Using a serrated knife, slash top of dough in three parallel, ¼-inch deep cuts (or in a tic-tac-toe pattern). Slide dough onto preheated baking stone. Pour 1 cup hot tap water into broiler pan and quickly close oven door to trap steam. Bake until crust is well-browned and firm to the touch, about 30 minutes. Remove from oven to a wire rack and cool completely. http://andreainthekitchen.wordpress.com/2008/05/20/artisan-bread-in-five-minutes-a-day-master-recipe/...See MoreSour Dough Starter Question
Comments (20)If you use a "modern" version of a starter that uses baker's yeast in the recipe, it will eventually die out due to the acidic environment, and if there has been sufficient inoculation of natural yeast from the flour, the baker's yeast will eventually be replaced with natural (aka wild) yeast. This method isn't right or wrong, just one of the endless choices for starter recipes. When it comes to developing a starter with a strong colony of yeast, choose wholegrain flour for the first 2-3 feedings and then you can use whatever type of flour you wish. The outside of all whole grains are covered with yeast so that is your best source for yeast, more so than the air. If you want to mill small quantities of wholegrain flour yourself you can use a coffee/spice mill. Rye flour ferments faster than wheat or spelt (and rye starter also smells pretty bad but works like a charm). Spelt flour has more carbohydrates and is a good choice. All flour, including bleached/unbleached flour, will work. You can even make gluten-free starter with rice flour. There are recipes that use grapes in the mixture in the mixture as an additional source for yeast, and the gray sheen on grapes is naturally occuring yeast and the grape juice adds more sugars for the yeast to feed on (although there are more than enough "sugars" (carbohydrates) in flour for the yeast to feed on. Other sources for yeast in starter recipes can be found on cabbage leaves (the gray dusty sheen on the leaves is yeast; and I have recipes that use peach leaves in the starter as a source of yeast). Starter is a study of contradictions. All you need to do is do a search on the "care and feeding of sourdough starters" to quickly see the contradictions. My best suggestion is to try a number of methods until you find one that works best for you. When one starter dies, there are plenty more recipes to choose from. I use a starter called "Everlasting Yeast" that was popular just over 100 years ago and is just a little different from traditional starter. Helpful hints: -If your starter doesn't double in bulk when fed, it probably won't double your bread dough. -Until you know how your starter acts/reacts when resting in the refrigerator, you may want to place it on a deep-dish pie tin/dish. It's not completely unheard of for a starter to occasionally escape the confines of the jar/container while in the refrigerator. It's a lot easier to clean the pie dish than the entire refrigerator. I cover my pint jar with a small Quick Cover (looks like a tiny shower cap) with some holes poked in the cover for the fermenting gasses to escape. -If you don't have all day to make sourdough bread and you need to speed things up a bit, add 1/8 t. of SAF-Instant Yeast to your dough. -When I don't want to make bread and hate to waste 1-cup of starter to feed it, I make 8-crumpets per King Arthur Flour Recipe entitled "Sourdough Crumpets or How to Resurrect a Neglected Starter". For each 1 cup of sourdough starter, sprinkle over the surface: 1 t. sugar 1/2 t. salt 1/2 t. baking soda [Grainlady note: I use a 4-cup measuring cup because this mixture foams-up quite a bit and it's easier to pour the batter from the measuring cup.] Whisk these ingredients in thoroughly. Preheat your griddle and grease your crumpet rings. Place rings on the pre-heated griddle and add 1/4-inch of batter to the ring. Cook over low/medium heat until the tops are set and full of holes (the batter also looses its glossy sheen). Remove the rings (twist back and forth with a pair of tongs to loosen the crumpet and then lift the ring) and flip the crumpets over for a minute or two. [Grainlady note: if you only have 4 crumpet rings like I do, I flip the rings so the side that didn't have the baked crumpets on is now on the bottom. Now you don't have to clean and grease your rings for the second batch.] To serve crumpets you pop them in the toaster to brown and crisp. Top with butter and your favorite jam/marmalade/jelly.... I like to add flavorings to the crumpet batter, such as orange/coconut or King Arthur's Fiori di Sicilia. I sometimes add some herbs and finely chopped ham or sausage crumbles for something a little heartier for a brunch crumpet and toast them flat in the toaster oven. Crumpets freeze well. Cool separately on a cooling rack, then quick freeze while laying flat. Separate the frozen crumpets with a square of parchment paper, stack and place in a freezer bag. Don't stack crumpets like you would pancakes off the griddle because they tend to stick together. -Grainlady Here is a link that might be useful: Sourdough Primer - King Arthur Flour...See MoreSour Dough recipe for Moni and whoever
Comments (5)I've been using this recipe for years. DH does the pancake duty! lol Alaska's Treehouse Bed and Breakfast Seward, Alaska Specialty Recipe Treehouse Signature Sourdough Pancakes The Sourdough Starter: Our sourdough starter is over 90 years old and was handed down from an Alaskan pioneer woman to our good friends, who then shared it with us over twenty years ago. We frequently send a small amount off with guests so they can nurture their own sourdough pot and make these special pancakes... a traditional Alaskan pioneer breakfast. So the same starter now has traveled all over the States and beyond. Sourdough Starter: 1 Tablespoon dry yeast 2-1/2 cups warm water 2 teaspoons sugar or honey 2-1/2 cups flour Mix together ingredients and let ferment 5 days at room temperature, stirring daily. Then place in refrigerator. Starter should be used/replenished every seven to ten days. Sourdough Pancakes: 2-1/2 cups flour 2 cups warm water 1 cup sourdough starter 1/4 cup powdered skim milk 1 egg 2 Tablespoons sugar 1 teaspoon salt 1 teaspoon baking soda The night before, mix flour with the warm water and add starter. Stir well and cover with a damp cloth. In the morning, take out 1 cup of starter and pour back into crock with original starter. Add powdered milk and egg to remaining batter, beating well. Combine sugar, salt, and baking soda; sprinkle evenly over batter, then fold in gently. Let batter rest a few minutes. Cook on a hot, oiled griddle. Serves: 4...See Moreplllog
3 years agolindac92
3 years ago
l pinkmountain
3 years agoplllog
3 years agol pinkmountain
3 years agol pinkmountain
3 years agoplllog
3 years agol pinkmountain
3 years agolast modified: 3 years agolindac92
3 years ago
teeda
3 years agoplllog
3 years agolindac92
3 years agoplllog
3 years agotuesday_2008
3 years agol pinkmountain
3 years agolast modified: 3 years agolindac92
3 years ago
Cloud Swift
3 years agol pinkmountain
3 years ago
Related Stories
KITCHEN CABINETS9 Ways to Save Money on Kitchen Cabinets
Hold on to more dough without sacrificing style with these cost-saving tips
Full Story
GREEN BUILDINGThe Big Freeze: Inventors Break New Ground to Keep Things Cool
Old-fashioned fridges can be energy guzzlers, but there are more eco-friendly ways of keeping food fresh, as these global innovations show
Full Story
HOUZZ TV FAVORITESHouzz TV: Life, Love and Purpose Down on the Farm
A Missouri native proves that you can go home again — and discover something entirely unexpected
Full Story
KITCHEN DESIGN5 Mistakes We Make That Drive Kids Out of the Kitchen
To foster family time and culinary competence, here’s what we can do instead
Full Story
FARM YOUR YARDRemake Your Backyard Into a Mini Farm
You can get a taste of country life by line-drying your laundry, growing some produce or going whole hog with the critters
Full Story
FEEL-GOOD HOME12 Very Useful Things I've Learned From Designers
These simple ideas can make life at home more efficient and enjoyable
Full Story
MOVING5 Risks in Buying a Short-Sale Home — and How to Handle Them
Don’t let the lure of a great deal blind you to the hidden costs and issues in snagging a short-sale property
Full Story
KITCHEN DESIGN5 Home Cooks Share Their Favorite Family Recipes
Peek inside the kitchens of these Houzz users and learn how to cook their time-tested, passed-down dishes
Full Story
INSIDE HOUZZA New Houzz Survey Reveals What You Really Want in Your Kitchen
Discover what Houzzers are planning for their new kitchens and which features are falling off the design radar
Full Story
MOST POPULAR5 Ways to Pare Down Your Stuff — Before It Gets in the Door
Want to free up some room around the house? Rethink gift giving, give yourself a shopping mantra and just say, ‘No, thank you’ to freebies
Full StorySponsored

l pinkmountain