


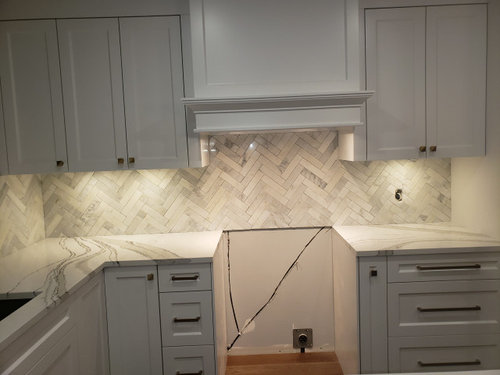
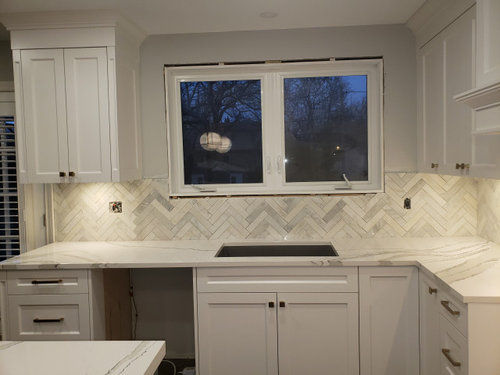
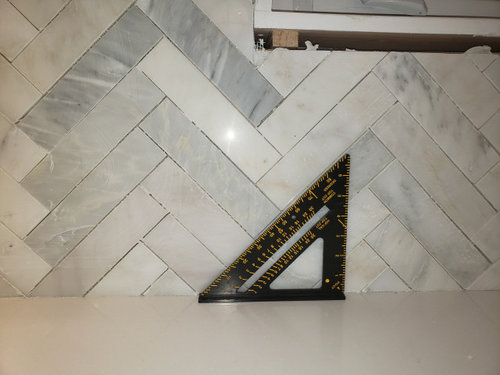
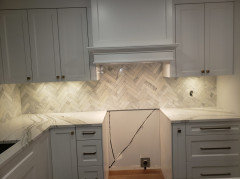
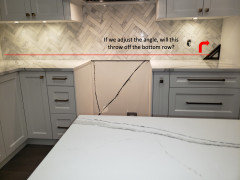
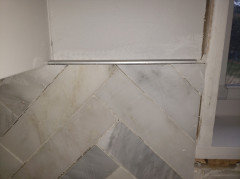
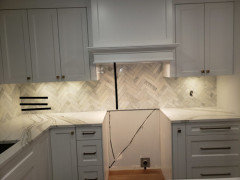
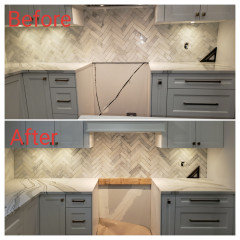
Crooked Marble Herringbone Backsplash Install. Acceptable?
Kristine
4 years ago

Featured Answer
Sort by:Oldest
Comments (49)

Jennifer Svensson
4 years agoRelated Discussions
backsplash install help! is this acceptable?
Comments (21)Please believe me, I'm not trying to excuse your tile guy, but is it possible that the sheets themselves had defects? Even so, like others above, I agree that the tile guy should have noticed and brought it up at the time. The longer they "cure" the harder they're going to be to remove and/or adjust. When is he coming back? Has he offered any other solution, other than it won't be visible when it's grouted? I hope he resolves this. These tiles are too gorgeous for you not to be happy with the finished product....See MoreWhere to center/start herringbone marble backsplash on prominent wall
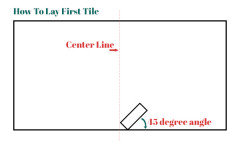
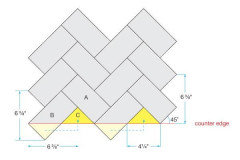
Comments (10)I think the installers questions/concerns are valid. The two most prominent focal points in the kitchen are that edge which tapers in a pencil, pictured below, and the center of the range. As you walk into the kitchen, both those spots are most visible. Centering on the window wall meant that the edge (circled) may have had tiny pieces, and this would look bad. So we started at that edge. Truly centering at the window doesn’t make sense for another reason- the center line has only about 6” of tileable space. It’s right over the faucet and barely visible. So starting in that edge area then meant that we couldn’t also continue the wraparound at that far corner (arrow) without compromising another prominent area- the area over the range. So there is going to have to be a compromise given the space. I don’t think it is as simple as start in one spot and wrap around. Had we started at the center line over the range and wrapped around to the adjacent wall, we would run the risk of having an awful edge by the pencil....See MoreCrooked herringbone kitchen backsplash
Comments (2)It doesn't look bad, I think it is something you have to decide if it would bother you. I thought I would show these photos to my husband and his response. "I could not deal with that. The tile would have to go or be redone." He is very picky, doesn't like clutter and movement. Now when I look at Houzz photos counter and backsplash corners, I note they don't always match. I think you have to decide what you like, the tile work looks well done. But I am not an expert. and sometimes they do...See Morecrooked cabinets on 100 year old home/ backsplash issue
Comments (8)Yes I had a nightmare experience with the contractor who installed that window 5 years ago. Not experienced - so it may be actually the window was installed crooked. Or home depot who slapped these cabinets in did a crooked job, after reading the responses here I think I may lay it in thirds, to eliminate the seam at least that goes straight up the middle from a 50/50 pattern. That was what I originally had told them to do but they did this. So the seam falls right up the middle which looks dumb to me. Then I guess grout and put a vase in front of it. Thanks for your observations ❤️ will post a photo when done....See Morejpp221
4 years agoKristine
4 years ago PRO
PROBeth H. :
4 years agolast modified: 4 years agoKristine
4 years agolast modified: 4 years agoKristine
4 years ago
territheresa
4 years agoKristine
4 years ago PRO
PROJoseph Corlett, LLC
4 years ago- PRO
Beth H. :
4 years agolast modified: 4 years ago howistyle
4 years agoKristine
4 years agoKristine
4 years ago- PRO
Beth H. :
4 years agolast modified: 4 years ago Kristine
4 years agoKristine
4 years agolast modified: 4 years ago
CEM TOSA
4 years ago PRO
PROSabrina Alfin Interiors
4 years agoKristine
4 years agolast modified: 4 years agoreno97
4 years ago- PRO
Beth H. :
4 years agolast modified: 4 years ago 
Toni Hamlett
4 years agoKristine
4 years ago- PRO
Beth H. :
4 years agolast modified: 4 years ago btydrvn
4 years ago- PRO
Joseph Corlett, LLC
4 years ago 
eam44
4 years agolast modified: 4 years ago- PRO
Joseph Corlett, LLC
4 years ago skunst2017
4 years agoKristine
4 years agovtlady52
4 years agoUser
4 years ago PRO
PROHome Reborn
4 years agolast modified: 4 years ago- PRO
Home Reborn
4 years ago Lizzie Bennett
4 years ago- PRO
GannonCo
4 years ago  PRO
PROJeffrey R. Grenz, General Contractor
4 years ago- PRO
Joseph Corlett, LLC
4 years ago - PRO
Joseph Corlett, LLC
4 years ago 
Briana Murry
3 years agojbtanyderi
3 years agoKristine
3 years ago- PRO
Beth H. :
3 years agolast modified: 3 years ago CEM TOSA
3 years agoToni Hamlett
3 years agobtydrvn
3 years agoMelinda Brown
3 years ago


Related Stories
GREAT HOME PROJECTSHow to Install a New Tile Floor
Is it time to replace your tile floor? Here’s how to get it done, which pros to call and what it will cost
Full Story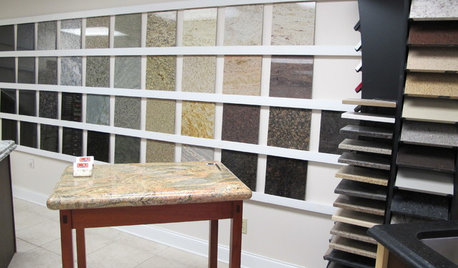
KITCHEN COUNTERTOPSWalk Through a Granite Countertop Installation — Showroom to Finish
Learn exactly what to expect during a granite installation and how to maximize your investment
Full Story
CONTRACTOR TIPSContractor Tips: Countertop Installation from Start to Finish
From counter templates to ongoing care, a professional contractor shares what you need to know
Full Story
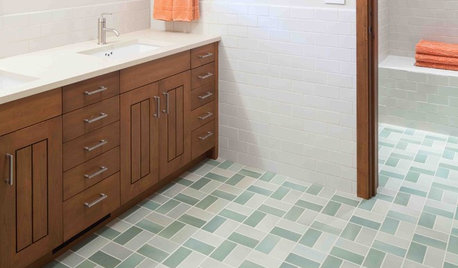
BATHROOM DESIGNHow to Match Tile Heights for a Perfect Installation
Irregular tile heights can mar the look of your bathroom. Here's how to counter the differences
Full Story
KITCHEN DESIGNHow to Add a Kitchen Backsplash
Great project: Install glass, tile or another decorative material for a gorgeous and protective backsplash
Full Story
MATERIALS10 Modern Marble Looks
Marble has broken free of the standard kitchen countertop slab and is showing up on bathtub backsplashes, modern dining tables and more
Full Story
KITCHEN BACKSPLASHESNew This Week: 6 Stylish Kitchen Backsplash Ideas
Marble slab, pink ceramic tile, blue-green glass tile and other materials make bold statements
Full Story
MOST POPULARBattle of the Backsplashes: Glass Mosaics vs. Natural Stone
Read about the pros and cons — and see great examples — of these two popular kitchen backsplash materials
Full Story
KITCHEN DESIGN7 Magnificent Oversize Backsplashes
They go up to the ceiling and don’t fall short on making a major impact. Are you ready to hop on the big-backsplash bandwagon?
Full Story
KITCHEN DESIGNHouzz Quiz: Which Kitchen Backsplash Material Is Right for You?
With so many options available, see if we can help you narrow down the selection
Full Story


flopsycat1