


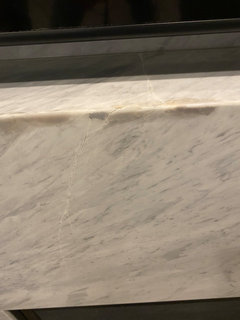
Help! Marble fireplace cracked!
T
4 years ago

Featured Answer
Comments (26)
 PRO
PROBeth H. :
4 years agolast modified: 4 years ago PRO
PROUser
4 years agoRelated Discussions
Best way to clean/rehab cracked marble?
Comments (2)You could also use a matching hardwood transition strip. I've never liked the brass look for floor transition strips, myself, and they also tend to dent and don't age well. Although there may be some that age better than others. -Roger...See Morehelp with repairing a cracked marble
Comments (1)Not gonna be a DIY repair. IF it can be repaired, it will take a pro with tinted 2 part epoxy and a lot of color matching skill and patience and a lot of your $$. In the end, it's probably cheaper to replace the marble or live with it as is. Vintage charm and all....See MoreNeed Help with cracked epoxy in marble seam!!!
Comments (1)Try emailing Kevin of AZ Stone Consulting via his GardenWeb Member Page. He's one of our resident professional stone experts. You could also try StoneGirl or Paulines, but I haven't seen them around in quite a while. Here is a link that might be useful: Kevin's GardenWeb Member Page...See MoreHairline Crack in 3x6 Marble Subway Tile
Comments (29)Part 5: So, after this whole saga, I have some advice for anyone dealing with a similar situation. Of course, always try to hire a real pro in the first place, not a hack like we did. Look up and read, or buy, relevant industry information that relates to the type of project you are dealing with, such as local codes, ASNI, TCNA, etc. Also read the manufacturer’s instructions for the products your contractor is using. Take BEFORE pictures. It’s fun to look back on the ugly before pictures and see how you improved your home. Take DURING pictures every single day. It’s fun to look back on the in-progress photos. I’ve been taking in-progress pictures of all our project for 30 years. If you work from home like I do, it’s easy. Take pics when the workers leave for lunch and in the evening after they leave for the day. Don’t interfere in the work space, or take pictures while they’re working. Take pictures of every part of the project from different angles including all the buckets of products they have left in the space and all the tools and such that are sitting around. If you don’t work from home, take pictures when you get home at night. If you are traveling and have decided to let the contractor work while you’re gone, ask a friend or neighbor to come over and take pictures for you each evening (give them a really nice thank you gift). Note: Last year the sibs and I helped my Dad remodel his whole vacation home which is 1000 miles away. I was able to go up once and sibs were able to go up twice. We all took tons of in-progress photos. When I was up there, tiling was about to begin. I looked up the installation instructions for the wall-board material they were using for the showers. There were no rolls of fiberglass tape amongst all their supplies and products, but it was called for in the instructions. I emailed the GC and expressed concern that the tile pro might not be planning to tape and seal the boards. The GC took care of it and the project proceeded. The GC was very professional and responsive, and it all worked out, but what if I hadn’t taken pictures, read the manufacturer’s instructions for myself, and brought up this issue? If an issue comes up during the project, email or meet with the GC and it will probably get resolved. Confirm the resolution by email to ensure everyone is on the same page. If your project goes seriously south like ours did when the GC quit, or if your project is really messed up and you are upset with the botched job, still try to have a meeting with the GC and ask them to provide a plan for moving forward to complete the project. Confirm all the communications by email so that there is a record of the communications. Confirm the understanding of any verbal agreements by email. If you and GC are not in agreement, or they quit, then you really have to pause and think about what to do. -- If the GC quits out-right like in our case: Ask for a refund by email or send a demand letter certified return receipt. Then embark on the process of finding a new contractor to re-do your project. After GC says no to the refund request, you can let it go like we did, or decide to sue them in justice court (small claims) or district court. -- If GC sues you, like our quit-GC did, you need to respond and go through the process. You’ll need to download and read your state’s civil procedure laws and construction laws. It is a real PITA, but you have to go through the process. -- No matter who is suing whom, you have to decide whether or not to hire a lawyer. In our case it was just a bathroom, not a whole house, so we decided to represent ourselves. If something like this had happened on a whole house build or remodel worth hundreds of thousands of dollars, well, then I think we’d be hiring a lawyer because the stakes would be so much higher. If the GC still wants to fix things: Ask them to write up their plan and send it to you by email, and then make your home available for them to attempt the fix. Take pictures the same as explained above. If the fix really does fix things, that’s great. If/after the fix fails, you are allowed (under most states’ construction laws – you need to read the law in your state) to fire them. We don’t have any experience with firing a contractor, we’ve never done that. But in our research, we learned that you have to give the contractor a chance to fix things before firing them. You can’t just get mad and fire someone because you have a concern, or even if they really did legit screw something up. You have to give them one crack at fixing it. Reflecting on the trial – why I think we won: We had a bench trial which means you are just talking to the judge and witnesses, no jury. DH conducted the case and called 4 witnesses: the quit-GC, the foreman, me, and the new contractor. We were well organized and prepared, but it was still surprisingly nerve-wracking; I was sweating and felt like I was going to throw up all day. Do the “superman” pose; it really helps. Do it at home, in the elevator, in the bathroom; seriously, it helps. Neither one of us had ever even talked to a judge before. Here are the important things we did that I think made the difference for us. DH prepared and organized all the important documents. He wrote out his opening statement so he could read it instead of talking off the cuff. He had all the exhibits prepared to hand to the judge, and copies to give to the plaintiff. He had extra exhibits on hand that he thought he might need in case the judge asked certain types of questions. All the emails and text messages were put together in one exhibit in chronological order. DH organized his statement and exhibits into 2 “chapters.” The purpose of the first chapter was to prove to the judge that we gave the GC a chance to remedy the situation, and that the GC had quit, not been fired. The purpose of the second chapter was to show why the amount of money we were seeking was justified. For that we used the new contractor’s report and the photographs of the bad work to show that it was necessary for the new contractor to demo all the way back and start over, and that new materials had to be purchased. And the financial analysis showed how we got to the number. The new contractor’s report and photos cross-referenced each problem to city plumbing codes, TCNA, and ANSI, and he walked the judge through the whole report and photos, explaining how things were done incorrectly. I wish this kind of situation would never happen to anyone, but sadly, it will. When projects start, you never think they are going to go south like this. But just in case it does: - Have a contract. - Take before and during photos. - Use email and text for all communications instead of relying on verbal communications and agreements. - Assume that your communications will, one day, end up in the public record, and make sure you always use professional language....See MoreT
4 years ago PRO
PROVirgil Carter Fine Art
4 years ago- PRO
User
4 years ago T
4 years agoT
4 years ago PRO
PROJoseph Corlett, LLC
4 years ago
jmm1837
4 years agolast modified: 4 years agokudzu9
4 years ago- PRO
User
4 years agolast modified: 4 years ago - PRO
Joseph Corlett, LLC
4 years ago T
4 years ago
live_wire_oak
4 years agoA Fox
4 years ago- PRO
Beth H. :
4 years ago  PRO
PROThe Kitchen Abode Ltd.
4 years agolast modified: 4 years ago- PRO
Joseph Corlett, LLC
4 years ago T
4 years ago PRO
PROHALLETT & Co.
4 years agoT
4 years agokudzu9
4 years ago
Dawn Hood
3 years ago- PRO
Joseph Corlett, LLC
3 years ago 
Nick Teefy
7 months ago

Related Stories

LIVING ROOMS8 Reasons to Nix Your Fireplace (Yes, for Real)
Dare you consider trading that 'coveted' design feature for something you'll actually use? This logic can help
Full Story
DECORATING PROJECTSFireplace Makeover Ideas for a Cozier Winter
From a new log basket to an entirely new look, these changes will help you snuggle up by the hearth
Full Story
FIREPLACESDesign Dilemma: Difficult Corner Fireplace
Where to Put the TV? Help a Houzz Reader Set Up His New Living Room
Full Story
HOUSEKEEPINGHow to Clean Your Fireplace Surround
Stone, bricks, marble and wood are among the most popular surfaces for fireplace surrounds. Here’s how to clean them
Full Story
CONCRETEWhy Concrete Wants to Crack
We look at the reasons concrete has a tendency to crack — and what you can do to help control it
Full Story
KITCHEN DESIGNGray Cabinets and a Wood-Wrapped Fireplace Update a Downtown Loft
The kitchen peninsula is jazzed up with custom wallpaper made using a photo from the homeowners’ Amsterdam honeymoon
Full Story
DECORATING GUIDESGot a Problem? 5 Design Trends That Could Help
These popular looks can help you hide your TV, find a fresh tile style and more
Full Story

MOST POPULAR7 Ways to Rock a TV and Fireplace Combo
Win the battle of the dueling focal points with a thoughtful fireplace arrangement that puts attention right where you want it
Full Story
GREAT HOME PROJECTSHow to Remodel Your Fireplace
Bring your fireplace design up to snuff with this makeover lowdown
Full Story


strategery