


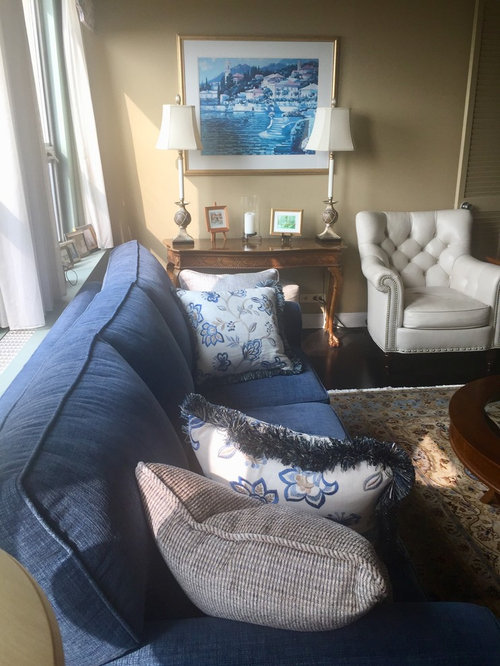
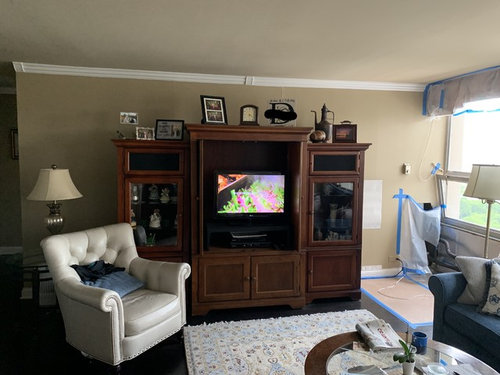
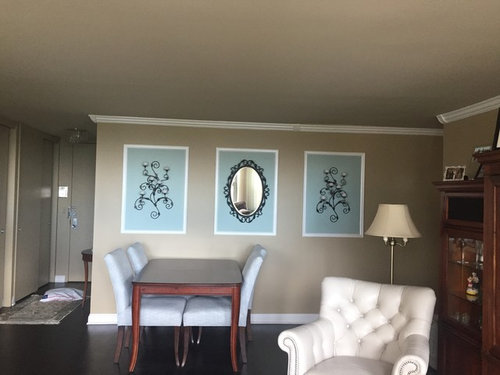
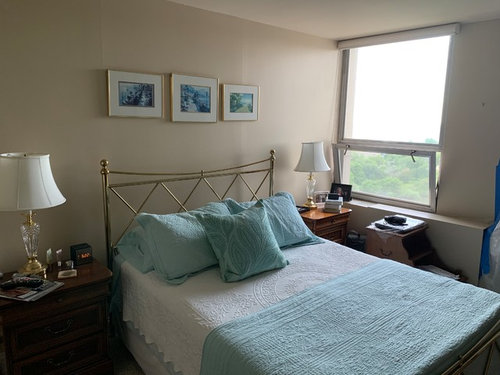
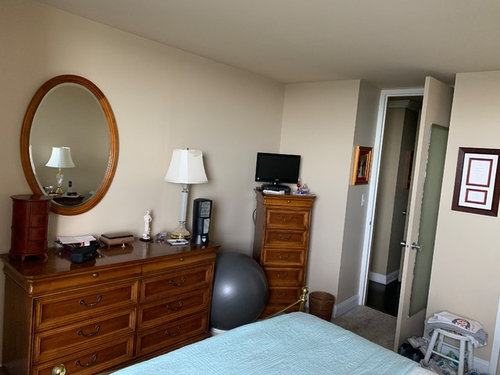
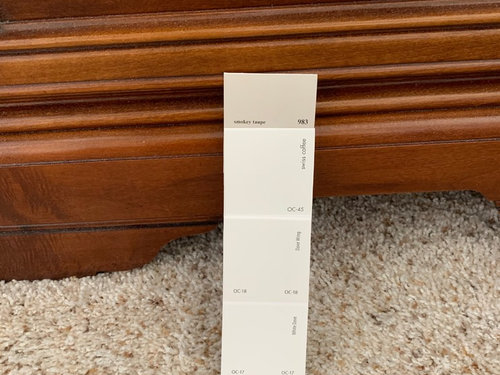
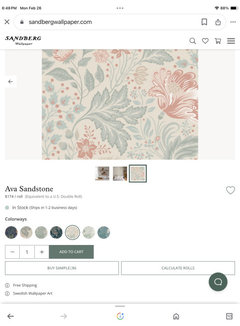
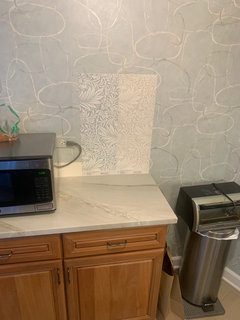
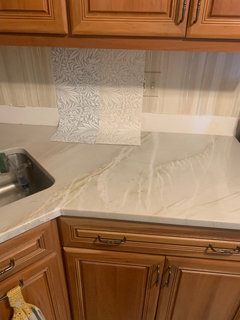
Time to Lighten & Brighten
Molly
4 years ago
Featured Answer
Sort by:Oldest
Comments (8.7K)

Molly
last month PRO
PROHome Interiors With Ease
last monthRelated Discussions
Painting cherry cabinets to lighten up kitchen -- long post, sorr
Comments (27)As a few people have mentioned before, posting a picture of your current space would really help! Painting your cabinets is, of course, an option (milk paint and chalk paint are two durable low-VOC options). However, I'd try a few simpler strategies first. 1. Backsplash. Try cutting sheets of beadboard to fit in that space. If your current backsplash is anything other than white, white beadboard will brighten it up quite a bit. 2. Mirrors. Do you have an area of wall where you can hang a mirror? To outsiders it may seem vain to hang a mirror in your kitchen, but reflecting what little light there is can really make a difference! 3. Appliances. Someone mentioned it before - black appliances will make the space seem darker. 4. Window. If you have any valances or window hangings, take 'em off! And check outside, too, for anything that's blocking light. 5. Upper cabinets. If you have ample storage space, consider removing a section of your upper cabinets. This is especially true if they're hanging over a peninsula or island. Other options in this vein include removing the doors on a couple sections, using glass inserts (frosted if you're worried about keeping things tidy), or replacing a run of uppers with open shelving. Or you could paint them. 6. Lowers. Cherry darkens over time/exposure to light, so it might be possible to lighten the tone by refinishing them and then sealing without a stain. 7. Counters. Replacing perfectly-good granite would likely be as expensive or more so than for professionally painted cabinets, but I think it would yield better results. Not an ideal solution, but still keep it in mind. 8. Flooring. Short of replacing your floor (what is your flooring, by the way?), try a couple of light-colored throw rugs. 9. Connections. How does your kitchen connect to the other rooms in the house? You mentioned you are in an historic district, so chances are you don't have an open floor plan. Do any of the adjacent rooms have natural light to spare? "Borrow" light with French doors or transoms above. Or remove a door completely (where it makes sense, of course), leaving a cased opening. 10. Declutter. A lot of extra stuff can make even a well-lit space seem claustrophobic. However, a few well-placed objects (especially reflective surfaces like a silver platter, or a small lamp for a dark corner) can brighten the room without having the overhead lights blazing. Let us know what you decide to do!...See MoreFood Photo Tips: Part 3 - Lighten or Darken Photos with EV
Comments (0)Posted by canarybird (My Page) on Wed, Jul 22, 09 at 14:41 FOOD PHOTO TIPS : Part 3 - Lighten or Darken Your Photos with EV Hi everyone! I'm back again with another chapter of hints on how to use your digital camera for taking tabletop photos. I hope everything so far has been easy to understand. But I'll be going over and repeating some things as well so they're not forgotten or misunderstood. For those who are unfamiliar with this very useful item, I want to introduce the EV function on your camera. EV stand for Exposure Value and the button or menu option is called the Exposure Compensation, or Exposure Bias. Here's the icon, which is a square with plus and minus signs inside. You may find this icon stamped on the arrow pad on the back of your camera as in Fig, 17. When that upper arrow is pressed, it produces a new icon in the top right corner of the LCD screen as in Fig. 18, where a black rectangle shows 0.0 and two blue right/left arrows. That tells you that you are now able to use the EV function, and by pressing the right and left sides of the arrow pad you will either increase or decrease the value which will appear in that top right corner of the screen. The increments go up to plus or minus 2 in steps of 1/3 or 1/2. Example: +0.3, +0.7, +1.0 etc. up to +2 (or minus when using that arrow pad.) So for what is that used? In short, you can manually lighten or darken the picture you see in the viewfinder before shooting by using this setting. Sometimes when your subject is dark against a bright background, the light meter adjusts the overall setting for the brightness, leaving your subject too dark. In that case you would (on my camera here) press the right side of the arrow pad as in Fig. 18a. Now you see the number in the top right screen corner has changed to +0.3 to brighten the picture. If I were happy with that, I would then press the OK button in the centre of the arrow pad and then press the shutter to take the picture. If I wanted the picture to be lighter still, I would press the arrow pad twice instead of once, which would give me +0.7. In the case where the overall picture was too bright and the subject was going to look lighter than I would like, then I'd press the left arrow and that would give me a minus value, darkening the photo Fig. 18b. You can get some very lovely effects with a -0.3 setting, especially outdoors where it is often so bright that your photos can look a little overexposed. I keep my cameras set at -0.3 for nearly all my outdoor photos. And my daughter was very pleased when I told her about that when she was getting used to a new camera. Her garden photos turned out so much better with the EV set to -0.3 on bright days. And some closeup flower photos can look quite dramatic at this setting. Here is where I find the EV option on my little pocket Stylus. By pressing the main menu in the centre of the back arrow pad I get these four options in Fig. 19. On this camera one presses the top and bottom arrows to lighten or darken the picture. Fig. 20. In Fig. 21 you see the EC has been set to +0.7. I show the example of this second camera only to illustrate that you may have to look in more than one place to find the EV function on your camera. I was setting up to illustrate the differences in EV settings and found another good use for a small bag of dry catfood! Fig. 22. Together with a clothespeg and a sheet of white paper it makes an idea reflector for the small object on the table. I changed my mind and used some orange poster paper as a backdrop for the following photos. So here we go with some examples of how a picture looks when taken at different EV values, ranging from 0.0 in Fig. 23 up to +0.1 in Fig. 26. Fig. 27 is back at 0.0 and Fig. 28 to 30 are minus steps increasingly dark. Click on photos to enlarge. Sorry I see that the Fig. numbers are only visible when you click on the below photos to enlarge them. The first and the fifth are without an EV adjustment. You can read the EV value in the clicked enlargements. (I do love those dark ones!) I just went outside and took some examples with our clerodendrom which was still in partial sunlight. I started with the first example without using any Exposure Compensation and took samples at different minus values of EV. I didn't include them all here but with these five you can see the difference between no adjustment in the first and six steps in the minus scale to -2.0, which is a little too dark. However I do like the effect at -1.0 and -1.3. All photos on this page were taken using the PORTRAIT setting in the SCENE option. Remember that the icon for portrait is a girl's head. The indoor photos had a WHITE BALANCE setting of "cloudy". I hope you will be able to give some of these options a tryout. You can do a lot to correct lighting when using automatic settings by making an adjustment with the EV function. I have the next chapter ready but I think this is enough for one day. It is a fun one....how to use a paper sweep for seamless backgrounds. Really easy! Please ask if anything isn't clear. If I know the answer I'll be back with a reply. Until then, thanks for joining me. I'll be uploading the next instalment soon. And please feel free to save the pages on your computer. Sharon (Canarybird) (All text and photos copyrighted) Free for personal, non-commercial use Follow-Up Postings: o RE: Food Photo Tips: Part 3 - Lighten or Darken Photos with EV clip this post email this post what is this? see most clipped and recent clippings * Posted by loves2cook4six (My Page) on Wed, Jul 22, 09 at 17:13 Sharon THANK YOU for these great tutorials. We are on vacation but I hope to do some experimenting with my camera's settings. I've been to scared to move off AUTO but you are inspiring me to take some "risks" lol o RE: Food Photo Tips: Part 3 - Lighten or Darken Photos with EV clip this post email this post what is this? see most clipped and recent clippings * Posted by canarybird (My Page) on Thu, Jul 23, 09 at 5:34 You're welcome loves2cook and I hope you will also try new settings while taking some vacation photos as well. Have a good rest of your holiday! SharonCb o RE: Food Photo Tips: Part 3 - Lighten or Darken Photos with EV clip this post email this post what is this? see most clipped and recent clippings * Posted by shaun (My Page) on Fri, Jul 24, 09 at 22:20 Thank you!!!!! o RE: Food Photo Tips: Part 3 - Lighten or Darken Photos with EV clip this post email this post what is this? see most clipped and recent clippings * Posted by momto4kids (My Page) on Wed, Jul 29, 09 at 10:21 Sharon, Just when I thought I'd have time to be a regular at CF again...my time gets zapped up so quickly. I wanted you to know I am thoroughly enjoying these posts! I am having a great time figuring out what you're saying with my own camera. My pictures have already improved remarkably. I've been begging (okay, whining) to take some classes and they just aren't to be found around here. Your tutorials are just what I need! Thank you for all your time! Deb...See MoreTime to lighten up
Comments (20)In the year 2005, the Lord came unto Noah, who was now living in the United States, and said, "Once again, the earth has become wicked and over-populated and I see the end of all flesh before me. Build another Ark and save two of every living thing along with a few good humans." He gave Noah the blueprints, saying, "You have six months to build the Ark before I will start the unending rain for 40 days and 40 nights." Six months later, the Lord looked down and saw Noah weeping in his yard ... but no ark. "Noah", He roared, "I'm about to start the rain! Where is the Ark?" "Forgive me, Lord," begged Noah. "But things have changed. I needed a building permit. I've been arguing with the inspector about the need for a sprinkler system. My neighbors claim that I've violated the neighborhood zoning laws by building the Ark in my yard and exceeding the height limitations. We had to go to the Development Appeal Board for a decision. Then the Department of Transportation demanded a bond be posted for the future costs of moving power lines and other overhead obstructions, to clear the passage for the Ark's move to the sea. I argued that the sea would be coming to us, but they would hear nothing of it. Getting the wood was another problem. There's a ban on cutting local trees in order to save the spotted owl. I tried to convince the environmentalists that I needed the wood to save the owls. But no go! When I started gathering the animals, I got sued by an animal rights group. They insisted that I was confining wild animals against their will. As well, they argued the accommodation was too restrictive and it was cruel and inhumane to put so many animals in a confined space. Then the EPA ruled that I couldn't build the Ark until they'd conducted an environmental impact study on your proposed flood. I'm still trying to resolve a complaint with the Human Rights Commission on how many minorities I'm supposed to hire for my building crew. Also, the trades unions say I can't use my sons. They insist I have to hire only Union workers with Ark building experience. To make matters worse, the IRS seized all my assets, claiming I'm trying to leave the country illegally with endangered species. So, forgive me, Lord, but it would take at least ten years for me to finish this Ark." Suddenly the skies cleared, the sun began to shine, and a rainbow stretched across the sky. Noah looked up in wonder and asked, "You mean, You're not going to destroy the world?". "No," said the Lord. "The government beat me to it."...See MoreTime to lighten up Master Bedroom Paint
Comments (3)You might want to post this on the Home Decorating forum....See MoreMolly
last month PRO
PRODesign Interior South
last month- PRO
Home Interiors With Ease
last month Molly
last monthMolly
last month
happyleg
last monthMolly
last month- PRO
Home Interiors With Ease
last month Molly
24 days ago- PRO
Home Interiors With Ease
24 days ago - PRO
Home Interiors With Ease
24 days ago 
justcallmepool
23 days ago PRO
PROWindow Accents by Vanessa Downs
23 days agoMolly
23 days ago
Parker Murphy
23 days ago
RedRyder
23 days agoMolly
23 days ago- PRO
Home Interiors With Ease
23 days ago - PRO
Home Interiors With Ease
23 days ago Molly
23 days agoMolly
23 days agolast modified: 23 days ago- PRO
Home Interiors With Ease
23 days ago Molly
22 days agoRedRyder
22 days agoMolly
20 days agoMolly
20 days agoMolly
17 days agoParker Murphy
17 days agoMolly
17 days ago- PRO
Home Interiors With Ease
17 days ago 
oportunitygreentea
17 days agoMolly
16 days ago- PRO
Home Interiors With Ease
16 days agolast modified: 16 days ago 
dsimber
16 days agoParker Murphy
16 days agoMolly
16 days ago
glschisler
15 days ago- PRO
Window Accents by Vanessa Downs
15 days ago 
kjoy1
15 days ago- PRO
Design Interior South
15 days ago Molly
15 days ago
cubby14
14 days ago
DD Deco
13 days ago
mary44
13 days ago
liasch
13 days ago


Related Stories
DECORATING GUIDESLighten Up — or Brighten Up — With Yellow
You can use this versatile color to create a buttery backdrop, add a zesty accent or make a bold design statement
Full Story
COLORGarden Color: Lighten and Brighten With Yellow
From mellow to far out, yellow plants and accent features can bring a taste of the sun close to home
Full Story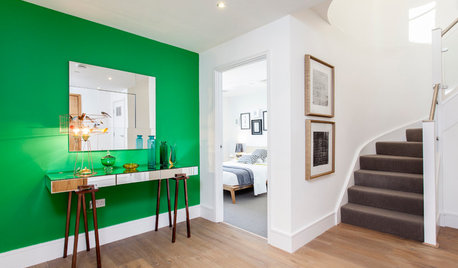
HALLWAYS10 Ideas for Brightening a Dark Hallway
Do you come home to a gloomy welcome when you open your front door? These solutions can lighten things up
Full StoryDECORATING GUIDES8 Decorating Tricks to Brighten a Dim Room
You might think to add white and provide adequate lighting, but you might not know about these other ways to lighten up a space
Full Story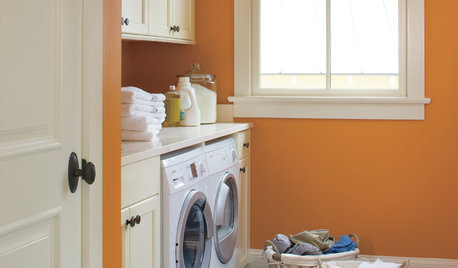
LAUNDRY ROOMS14 Ways to Lighten Your Summertime Laundry Load
Lessen up on washing and ironing chores, and make laundry time a livelier event, with these tips for summer and beyond
Full Story
PRODUCT PICKSGuest Picks: Decor to Brighten a Wintry Day
Warm neutrals and a touch of glimmer make these linens, furnishings and accessories bright spots during cold times
Full Story
LIFE9 More Ways to Lighten Up Your Design
Summer is the Perfect Time to Relax and Have Fun with Your Decor
Full Story
LIFEAt-Home Cures for Autumn’s Time Change Blues
The long, dark evenings of late fall and winter can be daunting. Lighten them up with these tips
Full Story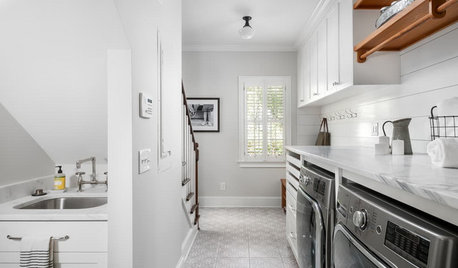
LAUNDRY ROOMSBefore and After: Remodeled Laundry Room Lightens Up
See how shiplap walls, marble countertops and a new glass door brighten this laundry-mudroom combo in Atlanta
Full Story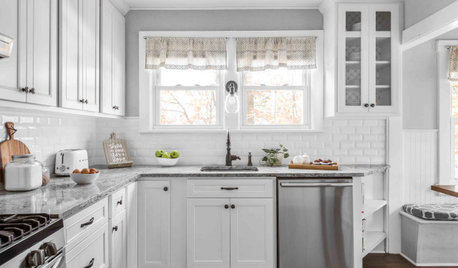
KITCHEN MAKEOVERSKitchen of the Week: Refaced Cabinets Lighten Up the Room
A designer saves her clients time and money by reusing what they already have in their 120-square-foot space
Full Story


ladma