


What's for Dinner #370
sleevendog (5a NY 6aNYC NL CA)
4 years ago
last modified: 4 years ago
Featured Answer
Sort by:Oldest
Comments (101)

sleevendog (5a NY 6aNYC NL CA)
4 years ago
annie1992
4 years agoRelated Discussions
Satoh s-370 desiel into pond.....how do i fix
Comments (14)tmajor is right about "none know the answer for sure". I'll add this to my little tirade. At your age, it is quite OK to be "ignorant" (and I mean this as "not yet aware or informed") of details. Not a problem, we have all been where you are right now. I worked with an experienced mechanic in my late teen years who was fond of saying "We don't care if you come here ignorant, ignorance is curable by administering a good dose of education, it works every time. Stupidity, on the other hand is most always terminal." I still grin when I play his words back in my head. I'm not as pessimistic about "whether this machine is salvable" as it might seem in reading my previous posts. What I'm trying to emphasize is: This will be a MAJOR undertaking (no pun intended). A project of this magnitude could easily require years of painstaking work (and some money). A big project like this must be divided up into different phases and also EACH member of the power train (engine-transmission-differential) and the other systems (electrical-fuel-hydraulic) will all need to be gone through systematically in order to determine IF they can be returned to operable condition before you put a bunch of money into any of them. Before you start taking parts off this machine you need to equip yourself with a shop manual or service manual and read the heck out of it to learn the components and their relationship to each other. And as I always stress about tear-downs of unfamiliar stuff, USE A DIGITAL CAMERA AND TAKE PLENTY OF PHOTOS. These photos should be taken from different viewpoints before and after each component is removed. You can build a photo file that is more helpful than some photos (or line drawings) in service manuals. Tag the individual items or sub-assemblies as to which position (like "left front" or "cylinder # 1 nozzle", or "front of head" and so forth) it came from where there are multiples of the same part (such as injectors, for example) Use see through "zip-lock" plastic bags to keep parts in (you can write on the bag with permanent markers and they will hold the nuts-bolts-pieces associated with those parts together). The spray nozzles you asked about: They will be the parts that are attached to the cylinder head with 2 (usually) bolts or nuts. They will each have a steel fuel line that runs back to the injection pump. They will also have a rubber or plastic (sometimes metal) "excess fuel return line or manifold" attached to them. You should remove the intake and exhaust manifolds before you begin the process of inspection. When you start removing the spray nozzles, remove the steel "Fuel injection line" from the nozzle first. DO NOT be tempted to "bend the line" out of your way to make clearance for extracting the nozzle assembly, follow the line back toward the injection pump and loosen or remove any holding fixtures or hardware, and loosen the line nut where the line attaches to the pump. The line needs to be loose enough for you to move it out of your way without bending it. Remove the excess fuel return lines from the nozzles. Remove any other objects or components (brackets, hangers, etc.) that may keep the nozzle from coming straight out of it's bore. Remove the nuts or bolts that hold the nozzles in place. Using a suitable prying tool under each mounting flange (area around where the mounting fasteners were removed) gently and evenly, pry the nozzle out of it's bore. There should be a copper sealing washer on the nozzle where the barrel rests on the cylinder head, be sure to retrieve and save this washer. Be extremely careful not to drop or otherwise damage the nozzle end that was inside the engine. The nozzle assembly could easily represent a couple hundred dollars or more (if it COULD be replaced. Pack the nozzles in individual bags and wrap with newspaper or other "cushiony" material and store the nozzles in a sturdy box where they will be safe. Once the nozzles are out of the engine, try blowing compressed air into the hole where you took out the nozzles (to see it any water is still there, a long thin tubed air blower works best). After you determine there is no water in the cylinders, pour the cylinders full of "rust bust" (or diesel fuel or kerosene mixed with a bit of auto trans fluid as preferred by some folks). You may observe some the fluid run out of an intake or exhaust port, this only means that the intake or exhaust valve is open on that cylinder. Let the liquid rust bust sit for a few days. You should drain the engine oil pan and replace the engine oil filter (at least take the oil filter off and empty it at this time). Fill the new filter (or the old one) with fresh oil. Fill the oil pan (crankcase) with fresh oil. This oil and filter will be discarded later in this restoration process but for now you want to make sure the oil pump has clean oil to deliver IF THE ENGINE WILL TURN. You should remove the valve cover and squirt or brush clean motor oil over the entire valve train, valve springs and push rods (or the cam gear, camshaft etc. if this be OVERHEAD CAM, but I doubt that it is). Leave the valve cover off so you and a helper can watch for any valves that might be stuck if/when you get the engine to rotate. You should also drain the hydraulic oil and transmission/differential oil to get rid of any standing water. Realistically speaking, you could drain the water out of each system by loosening the drain plug and letting just the water drain (the water will be on the bottom with the oil floating above it) out into a catch pan. When oil/fluid begins to come out, re-tighten the drain plug and add enough of the correct oil/fluid to the cavity/reservoir to bring the level up to correct. It is possible that ALL of the fluid escaped from it's respective system during the time the tractor remained submerged in the pond. If you ever reach the point of placing this machine back into service you will at that time replace all fluids in all systems. After the rust bust has sat for a few days, use a long breaker bar and socket to try turning the engine. OR ALTERNATIVELY, if this tractor has a gear box transmission and clutch, you can jack up ONE REAR WHEEL ONLY (make sure the front axle is not engaged if this is 4X4), and place the transmission into the highest SPEED gear position possible (this would be like 3rd or 4th and high range). Stand beside the rear wheel that is off the ground and place both hands on it. Now, rotate the wheel in one direction til there is no slack. Now SLAM the wheel in the opposite direction. Watch the engine fan or pulleys for rotation (to see if engine moves). If engine moves, make sure that the direction of rotation is what is normal for this engine (usually it is clockwise as seen from standing in front of engine while looking at the engine). Once you are sure of the correct direction of rotation, roll the engine a few revolutions (if it turns at all). Watch for any valves that don't move up and down as the engine turns. Expect to see the rust bust fluid run out the exhaust ports. If you get this engine to the point of turning freely (remember, you WILL NOT be able to detect compression at this time as the spray nozzles are removed), you will at that time be ready to advance to evaluating and cleaning the fuel system. Do all the above and report back at a later date with a fresh thread. Good luck yetty....See MoreFinal debate. What’s for dinner?
Comments (22)Split Pea Soup with chunks of ham. No debate for me....just can't....DH on zoom call with a friend he has a martini with every Thursday eve. All virtual since COVID except for once in our backyard with social distancing. They've done this for years. It's my quiet time :)...See MoreWhat’s for Dinner #398 Nov 2021
Comments (100)Mmm cheese sauce and gnocchi sounds good to me Walnut creek. Jasdip, your salad and drumstick followed by your caponata look delicious. I did look up the difference between caponata and ratatouille and it seems caponata has the addtion of olives perhaps capers... did you add these to yours? We had a few cool days and while I‘m not in a real cooking frame of mind at the moment... I did cook up Fish and six veg. I had some red sauce left over from the pizza so I made a sort of patatas brava with potatoes and sweet potatoes...See MoreWhat’s for Dinner 406 Summer 2023
Comments (103)Wow, 4 years. Such a cute age. And a cute cake. We have 5 under 5 with another on the way via 3 nephews. I meant 'passive' haha. Meaning, "you do your thing vegetables. I have no time to babysit." Next day it had a lasagna vibe with the top layer of the pasta. I usually make a harvest lasagna every early Fall...right around the corner. Another pic of the shrimp salad lettuce cups fell from the clouds, A couple weeks ago i sous vide four small sirloins. An easy taco pulling two out of the freezer and thawing with a dry brine, then a cast iron sear. Tossed in kimchi. Next day made a sirloin Banh mi for DH. I had a sirloin salad bowl. Side bean/corn salad About to hit the end of the Summer thread...bummer....See More
Jasdip
4 years agoannie1992
4 years ago
petalique
4 years agolast modified: 4 years agosleevendog (5a NY 6aNYC NL CA)
4 years agolast modified: 4 years agoJasdip
4 years agolast modified: 4 years agoannie1992
4 years ago
lizbeth-gardener
4 years agoCompumom11
4 years ago
neely
4 years agoJasdip
4 years agolast modified: 4 years agopetalique
4 years agolizbeth-gardener
4 years agosleevendog (5a NY 6aNYC NL CA)
4 years agosleevendog (5a NY 6aNYC NL CA)
4 years agosleevendog (5a NY 6aNYC NL CA)
4 years agosleevendog (5a NY 6aNYC NL CA)
4 years agoannie1992
4 years agoJasdip
4 years agosleevendog (5a NY 6aNYC NL CA)
4 years agoJasdip
4 years agolast modified: 4 years agoneely
4 years agoJasdip
4 years agoannie1992
4 years agoJasdip
4 years agolizbeth-gardener
4 years agoJasdip
4 years agolizbeth-gardener
4 years agoJasdip
4 years agolast modified: 4 years agolizbeth-gardener
4 years agoneely
4 years agoJasdip
4 years agosleevendog (5a NY 6aNYC NL CA)
4 years agoJasdip
4 years agoJasdip
4 years agosleevendog (5a NY 6aNYC NL CA)
4 years agoneely
4 years agoJasdip
4 years agoannie1992
4 years agolizbeth-gardener
4 years agoannie1992
4 years agoneely
4 years agolast modified: 4 years agosleevendog (5a NY 6aNYC NL CA)
4 years agoJasdip
4 years agosleevendog (5a NY 6aNYC NL CA)
4 years agosleevendog (5a NY 6aNYC NL CA)
4 years agosleevendog (5a NY 6aNYC NL CA)
4 years agosleevendog (5a NY 6aNYC NL CA)
4 years ago
catticusmockingbird
4 years ago


Related Stories

LIGHTINGWhat to Know About Switching to LED Lightbulbs
If you’ve been thinking about changing over to LEDs but aren't sure how to do it and which to buy, this story is for you
Full Story
MOST POPULARHouzz Tour: Going Off the Grid in 140 Square Feet
WIth $40,000 and a vision of living more simply, a California designer builds her ‘forever’ home — a tiny house on wheels
Full Story
INSIDE HOUZZHouzz Survey: See the Latest Benchmarks on Remodeling Costs and More
The annual Houzz & Home survey reveals what you can expect to pay for a renovation project and how long it may take
Full Story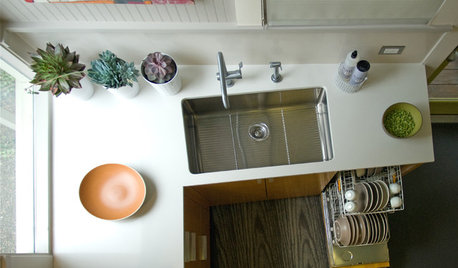
MOST POPULARHow to Choose the Right Kitchen Sink
Learn about basin configurations, sink shapes, materials and even accessories and specialty sinks
Full Story
LATEST NEWS FOR PROFESSIONALSUnderstanding and Attracting Luxury Clients
Designer Wendy Glaister shares tips for appealing to clients on the high end of the budget spectrum
Full Story
PRODUCT PICKSGuest Picks: Outfit Your Home in Fab Fashion Designer Accents
You don their clothes to look chic. Now your home can have its turn, with decor from some of the world's greatest fashion houses
Full Story
TASTEMAKERSPro Chefs Dish on Kitchens: Michael Symon Shares His Tastes
What does an Iron Chef go for in kitchen layout, appliances and lighting? Find out here
Full Story

annie1992