


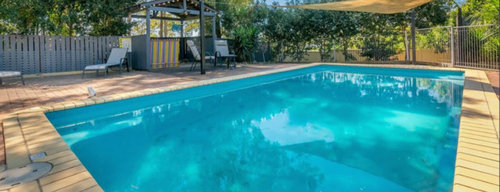
Improving pool surroundings suggestions
Brighley Dangerfield
5 years ago
Featured Answer
Sort by:Oldest
Comments (6)

cearbhaill (zone 6b Eastern Kentucky)
5 years ago
katinparadise
5 years agoRelated Discussions
Pool is in, now completing the decking ~ Suggestions?
Comments (1)Given you northern latitude, I strongly urge a compacted base of crusher, about 2 feet deep, six inch lifts. This will allow moisture to drain and any residual moisture to reside below the frost line. This will prevent frost related heaving and waviness. A couple of inches of paver base to set the pavers on and poymetric sand to keep them from wiggling. Scott...See MoreNo taxation on new pool.. capital improvement form?
Comments (4)mrs_mack, I'm pretty sure that you did not pay any sales tax on your pool. Sales tax is always noted as a specific line item in any sales contract I have entered into that is not considered a home capital improvement. The reason why the company that you used for your cover is suggesting that you fill the form out is because they are not in a business that typically does "capital improvements". The reason why you may be able to gain an exemption on the 7% sales tax on the cover is because is is a custom cover for the pool, which itself was the capital improvement (you can't move it)....trust me, though, the state, county, municipality and your school district(s) (we're in NJ, right....more school districts than most any other state....many towns have 2) are getting their share each year through your increased property taxes. One way or the other the "leaders" of this state get their take for the bloated state pension funds. (sorry for the rant....schools opened late here due to delays in a new school building that led to a $1000 property tax increase in addition to the increase from my pool)...See MoreSuggestions on how to improve clay soil - this entry is extracted fro
Comments (0)I had clay at my last house...everywhere. Really makes you appreciate nice black soil. This may be a long post, but I have a lot to say. In hindsight...and my main bit of advice to you...I should have spent 3-5 years (or however many years it would take) amending the soil before planting (anything, not just hosta)...and I should have spent the time, $$, and effort to amend the ENTIRE planting bed, OR...raise the beds way up high with good soil. Here was my big mistake...I only amended the hosta holes just where the planting hole was. I tried to go farther out & when I did it wasn't very far...a few inches maybe. Digging the bare minimum hole in clay was hard enough, ya know?...AND...hostas grow on the driveway, right? Growing on the driveway would be easier than in clay IMO. If the clay had any workability, I would throw away the clay chunks and mix anything workable with compost. The clay easily 'ate up' the compost, so in a year some of the hostas would sink down into their clay holes and have to be lifted due to not enough soil. Because of this, "tending" to my hostas did not mean walking around & enjoying the plants. It meant regularly monitoring the health of the plant, and digging/replanting. When I dug up and re-planted it meant amending the soil all over again. Spent a lot of money on bagged compost because I couldn't make enough to keep up. If I would have dug a huge honkin' hole & amended really far out from the hosta, I think I would have had a few less worries. Doing it the way I did, my hosta were more susceptible to squirrels and other surface-digging pests. Everything was clay and it was hard. Come up to a hosta...softer & squishier soil than everywhere else...you bet they are going to dig right there. Root sections would be exposed and/or displaced to the surface. Squirrels would plant walnut and buckeye seeds within inches of the crowns. I'd dig out walnut shells regularly. Disturbing roots is always a setback to some capacity. When I dug out a hosta and some roots made their way out of it's amended hole and into the clay, consider the new roots 'goners'. Soil was too hard & sticky to allow roots to release with the rest of the plant. The clay was so hard to dig, that attempts to excavate the new roots in the clay were not even worth it. The water issue was not pleasant. Because I dug out clay in plant spots only, visualize the planting bed like a muffin baking pan. Where does the water go when you pour it on top of the muffin pan?...it spreads and lands in the divots. Once the water was in the divots, it would disperse into the surrounding clay, but pretty slow. I was on constant watch for root rot because of that and lost a few. I also learned that I had to regularly water the entire planting beds and keep the clay lightly moist at all times. I had a moisture meter, and I was constantly digging experimental holes to see what the moisture was like below the surface. When clay dries out it's like a brick...literally...and repels water. Keeping clay slightly moist will allow it to take in more water...but there was and art and science to keeping the moisture at a good level...never too wet, never too dry. I remember I used to pray for NO rain because it was easier to water myself and keep my system going. Didn't want Mother Nature messing with my water schedule. I hope I'm not a downer to your day. I'm listing out problems & maybe you can come up with your own way of dealing with potential problems & know what to look for if your hostas are not thriving. I did grow hostas in clay, and many did quite well but it took a lot of work & learning. I'm thankful for my experiences with clay, but even more thankful my 70-year old current house doesn't have clay. Gayle ________________________________________ Gayle gave great advice, I wish she had posted it 5 years ago when I started gardening in clay, I would have followed every instruction to a tee. As it stands, I spend a lot more time improving the soil in new planting areas than I used to - I foolishly thought a lasagna bed could be ready in 1 season. Whn you have clay - it is easily 3 - 4 years before you have "good" soil unless you do a lot of tilling and amending along with the lasagna method and then tilling is defeating the purpose of trying to lasagna the easy way LOL! So anyway, yes, clay is a horror to garden in. Plan on watering a LOT even when you just got rain or it is about to rain but be cautious about it becoming water-logged. I actually lost hostas that were in the ground in an area I thought would be okay because they were in standing clay slop for part of last year. Good-bye Ocean Isle and Phantom, two I really terasured, because the clay was too wet. :-( If I ever decide to move, number 1 priority at new house will be decent soil, which means I probably have to wait until my kids are in college since school has moved to a distant second LOL! Alexa ________________________________________ ________________________________________ Sun, May 30, 10 at 9:21 I also have pure clay under the first four or so inches of topsoil that was added when my house was first built. Every garden that has been added here started with a major soil renovation. I dug out 12 to 16 inches of the clay, hauled it away wheelbarrow load by load and then backfilled with dozens of 40-pound bags of top soil, compost and some peat moss thrown in for good measure, tilling it all up to a wonderful mixture. A lot of work, but has paid off tremendously both during the initial planting and in subsequent years, as I can easily remove, add, move plants without having to dig new holes and amend soil. About five years later, I got smarter and realized that I could have accomplished the same thing by simply pulling off the sod and adding the layers of top soil, compost and peat moss above ground, using my usual rocks to form the edges. Duh! Last year, I decided to expand the section on the south side of my house. Unfortunately, my gas line runs right through this section, and I was unable to do any substantial digging or tilling. And since it was next to my house, going up was not an option either. So I compromised by digging out (yes, I had the gas line marked first) very large areas for each hosta - about 2 to 3 feet across, depending on the mature size expected for each plant, and 2 feet deep. Then I backfilled with my usual mixture. My hope is that the holes are large enough to allow the roots to grow to their desired state without hitting the clay. It's year two, and so far things look okay. But I added a few ground covers this spring and had to deal with the clay in those spots, so adding plants will be very difficult going forward. And I will be on the lookout for the types of issues that Gayle brought up. Again, this would not be my recommended approach but was necessary due to constraints of the specific location. Good luck - clay soil is a beast. ________________________________________ Sun, May 30, 10 at 18:46 Maybe a photo of your soil will help the more experienced folks give a seasoned opinion. It was easy for me to know that my clay soil would not support any plants for any length of time - red, hard as a rock when dry and very heavy when wet. A clear line where the topsoil ended at 3-4 inches and the clay began. No signs of earthworms. My soil renovation was a lot of work, but when completed allowed me to plant immediately. Given your description, it sounds like your soil may be in better shape, so maybe you can avoid having to go that extent. Here's hoping that's the case! ________________________________________ Just FYI, I had earthworms in my clay too. The presence of earthworms is not a good indicator on whether clay soil is gardening-friendly. I would take the info presented and just be aware of what happens with clay...make adjustments necessary for your site. I find as long as I'm aware of the worst-case scenarios, I can always know what to look for and be pro-active. Thanks for the nice comments about my post. That yard was definitely a learning-lab for many different things. Gayle ________________________________________ Mon, May 31, 10 at 8:44 Melissa, I have soil similar to what you describe. My gardens for the most part are/were 12 to 18 inches of very heavy black clay and topsoil. When I started gardening here 10 years ago my next door neighbor, who had been collecting hostas for 25 years at that time, offered me a dozen large (wheelbarrow sized) mature fortunei, ventricosa, sieboldiana, montana, lancifolia, and divisions from older named varieties, to make room for new introductions. He was in acquisition mode big time, so I got a wonderful start on my gardens from him. I planted them like gayle0000 did, making (albeit huge,) hosta-sized holes, improving the soil in the planting area, digging another huge hole, etc.. From digging those holes and wrestling the hostas into place with the help of my then-teenage son and his buddy it was more than clear that the soil needed a lot of help. Over the next many years until now I did a sort of lasagna gardening (without knowing it was that), spreading bales of peat, mulching 4 to 6 inches deep with shredded oak leaves every fall, covering bare soil with newspapers or cardboard topped with bark mulch to block weeds, tossing the coffee grounds around the gardens, spreading compost around and between the planted hostas, and recycling my homemade potting soil every 3 years into the gardens. It has made a remarkable difference in the soil over time. Whereas we literally needed a pickaxe to start the original planting holes, now I can relatively easily (for a 60-year-old) dig a new planting hole with a transplant spade and lift pretty large hostas with a 4-prong fork. If I could start over, I would remove the clay soil, double dig each bed, raise the bed level, and start with good soil, which I did last summer when I removed two beds of perennials-run-wild to plant new hostas. Still, those original hostas are giants now and the soil around them is plant-able with little need for amendment, in the areas that I improved from the top down. ________________________________________ Mon, May 31, 10 at 12:16 My gardens were all nearly unworkable clay when I started in 1998. Today, they all have beautiful, workable soil. I used TONS of compost...I bought humus in bags from Walmart, it's cheap and worked great. It was backbreaking work double digging all of those beds, but the effort plus time took care of the clay. Any time I re-planted an area, I would take the time to incorporate more humus or compost...it made every job big. There was a soil conditioner that was very expensive which I found at Bachman's in 20 or 40 # bags. I believe it made a HUGE difference, probably even more/faster than the Humus. It was in the 3rd or 4th year that I re-dug my gardens and mixed it in...I was really getting tired of that clay! Probably mixed more humus in at the same time, knowing me. My gardens got overgrown and were unmanaged the 5th and 6th year, as I was ill. When I went back to working them again, I had beautiful, friable soil that is now a pleasure to garden in. Very occasionally, I find a hunk of clay, but it's usually near an edge of shrubs or something that didn't get worked much with the humus or the soil conditioner. Bachman's has a good article on working with clay...to their credit, they don't try to sell you the conditioner and state that the jury's still out on that. I think it worked wonders, but since I did a lot of humus, too, it was probably the combination. And, somewhere along the line, I think I put gypsum in there, too. Gypsum is usually quite cheap. For the conditioner, I'm not sure if the brand was Shultz, or not, might have been Turface (Profile) or something else. In fact, I think the Turface people may actually sell the product to Shultz. bachman's link: Here's a description of the Shultz product, I nabbed it from the Amazon site for you: Instantly improves any soil! Turns hard-to-work clay soil into a loose, rich growing medium - permanently. Adds thousands of storage spaces that hold air and water in nearly perfect balance in the soil. Clay Soil Conditioner improves drainage and aeration in heavy, compacted clay soils and helps improve water and nutrient retention in dry, sandy soils. Made from 100% natural fuller's earth, this unique mineral is kiln-fired creating ceramic granules that work to improve soil structure. Just one application lasts year after year! Clay Soil Conditioner? is a stable mineral that will not break down or compact over time. Use at the rate of 15% by volume: (1 part Clay Soil Conditioner? to 6 or 7 parts soil.) Here is a link that might be useful: another review for soil conditioner ________________________________________ Tue, Jun 1, 10 at 0:54 I have clay soil. I started with 3 hostas, and just amended the holes. After 3 years, didn't see much, if any increase on the hostas. Then one winter I was going crazy and ordered a bunch of hostas online. I decided I wanted to have great looking hostas, not just so-so. So I pulled out the hostas that were already there, expanded the bed, and rototilled in lots compost and some peat moss. I can't believe what a huge difference it made. The hostas are growing great since they don't have to try to expand their roots into rock hard clay soil. The 3 hostas I already had really took off - they were finally happy! I've read many threads where folks say that tilling is unnecessary; just place the compost on top of the soil and let the worms work it through. However, I had tried that and it didn't work. I ended up with the top 3/4 inch of soil being nice, with rock hard clay underneath. Tilling is the way to go. Deanna ________________________________________...See MoreNeed budget-friendly suggestions for facade and adjacent pool area
Comments (12)Thanks for all your wonderful suggestions. I love both the grey and cream colour schemes. Provincial regulations require a fence around the pool which cannot be chain-link (which is climbable), however this unfenced pool dates to the 1960s, before those laws were in effect, and is therefore grandfathered. Needless to say, grandfathering doesn't prevent a child or pet from drowning, so one of our first priorities upon closing will be to erect a fence. To answer questions, and for clarification, the large entry door is not the main entrance to the house, unfortunately. The small door to the left is. The larger door leads to a room with a bar, which is directly under the master bedroom and connected to it with a staircase. We plan to remove the bar and make this area our home gym. The roof is not Spanish clay tile, but rather asphalt shingles in a mottled terra cotta, brownish colour. (The house - a second home for us - in the Laurentian mountains, an hour north of Montreal, so no terra cotta tiles around here!) It is indeed a very awkward layout that will be challenging. There are even weirder features inside, however the location (proximity to our home in Montreal) and large non-motorboat lake are spectacular, so those factors sold us!...See More PRO
PROPatricia Colwell Consulting
5 years ago
Brighley Dangerfield
5 years ago PRO
PROWater Scuppers and Bowls, LLC
5 years ago
Related Stories
TRENDING NOW6 Great Ideas From Spring 2020’s Most Popular Pools
Creative uses of decking, grassy surrounds, covered seating areas and beach inspiration made a splash this quarter
Full Story
GREAT HOME PROJECTSHow to Replaster (or Remodel) Your Pool
Have an old pool? It could be time to update the plaster, landscaping and more for a pool that works swimmingly with your current style
Full Story
HOUZZ TOURSMy Houzz: Dive Into a Cajun Country Home With an Indoor Pool
Drenched in sunshine from a massive glass atrium roof, this newly redesigned Louisiana home works swimmingly
Full Story
GARDENING AND LANDSCAPINGPool-Friendly Patio Materials
Get a pool patio to match your style at a price that doesn't leave you high and dry
Full Story
ROOM OF THE DAYRoom of the Day: Modern Pool House Nestled in Downtown Philadelphia
Homeowners redo an atrium with a pool to be a more pleasing and practical space
Full Story
GARDENING AND LANDSCAPINGPool Design Flows From Home Lines
From straight to curvy to free form, here's how to design a pool that reflects your home inside and out
Full Story
LANDSCAPE DESIGNNatural Swimming Pools: More Beauty, No Chemicals
Keep your skin and the environment healthy with a pool that cleans itself, naturally
Full Story
POOLSTrending Now: 20 Pools We Want to Dive Into
These dreamy backyard swimming spots are favorites with the Houzz community
Full Story
POOLS8 Ideas for Petite Pools
Modest in size but big on looks and function, pools like these offer a private swim space without requiring lots of room
Full Story
DREAM SPACESWorld of Design: 15 Swimming Pools With Dream Views
Join us on a refreshing tour of spectacular swimming pools from Sydney to Moscow
Full Story


The Garden Artist LLC