


Need help finding my post
charlotte farley
5 years ago
Featured Answer
Sort by:Oldest
Comments (8)

havingfun
5 years agoRelated Discussions
Need help finding an old post
Comments (3)Thanks to Phyllis_MN for clipping this old post and saving it from the cyberscrap heap... Rigid Wall Baggie-Udated Method posted by: monte on 02.25.2007 at 01:50 pm in Winter Sowing Forum As some of you know I like to tinker with "processes". This is an update on my previous posting on sowing in baggies. The original post is linked below if you want to reference it. Cardboard Supported Ziplock Bags Scrounged containers are a great way to reuse things that would wind up in the trash. But sometimes the "need for seed" exceeds our ability to gather enough containers to get the job done. This leads to, what some may believe, odd behavior. Late night or early morning trash raids are well understood here on the forum but the public at large may not get it. What to do? One option is to use common ziplock bags with an internal support made from corrugated cardboard. The cardboard form not only stiffens the bag but acts as a support to create some head room. Quick easy and effective. I think that for many of us this would be a very economical method of making many containers. If you want to precision sow you can easily insert dividers or use paper pots inside the bags. Materials Needed 1. Gallon Sized Ziplock Bags 2. Corrugated Cardboard 3. Hole Punch 4. Stapler Preparing the Cardboard 1. You will need to prepare strips of corrugated cardboard to form into cylinders to slip inside the ziplocks. I have found that a piece of cardboard 23 " wide and 5 ½" tall is the ideal size for a 1 gallon ziplock bag. You need to be sure that the "grain" or specifically, the corrugation of the cardboard runs vertically on the short axis of the piece. This ensures that it will easily form into a cylinder. After doing a number of these I found that after filling the bags with the soil it was sometimes more difficult than it needed to be to zip the bag shut. The tension also seemed to "squeeze" the cylindrical form into more of a football shape than I wanted. I shortened the height by ½" to 5" and this made it much easier to zip shut and it held a much rounder "open" form. 2. Tightly roll the cardboard to loosen it up a bit. This allows it to more easily form into a cylinder. Overlap the ends by about 1 ½ÂÂinches. Staple together to form your cylinder. Again it took doing a number of these but I found that it took considerable amount of hand strength to tightly roll the cardboard to make it more pliable and the resultant forms were not ideal cylinders. A lot of angular corners and such unless you rolled it very tightly. I thought that for someone with arthritic or carpal problems this would be a deal breaker. So I decided that I needed to "drag" the sections over some type of form to loosen them up. What I came up with was to grasp one end of the section with a pliers and, with a gloved hand, (paper cuts hurt) pull it over a something. After the first pass the cardboard is much more supple and the effort was considerably less than rolling. I usually make three or four passes flipping the section over each time. The piece then forms into and holds its cylindrical form very easily. Once you get a rhythm going you can rip thru a lot of pieces very quickly. Preparing The Bags 3. Take the hole punch and punch a few holes along the top and bottom edges. These are you drainage and vent holes. For efficiency I just fold the bag into quarters and make one punch at each end. The only change I made here was to eliminate the folding over bit. It was faster to just slip the edge of the bag into the hole punch without folding it. I worked out a pattern of five staggered punches along the bottom edge and three lineal punches under the zip. This created a grid of ten evenly distributed holes in the bottom for drainage and six at the top for venting. I processed thru a whole box of 80 bags in about 10 minutes. 4. Insert the cardboard cylinder into the bag. Once inserted it will hold the bag fully open. To insert the prepared cardboard sleeve I grasp it in what I call "pretzel fashion. I position the stapled section midpoint on the side as this seems to hold the ideal rounded form. Once inserted I tuck under the bottom corner points and slightly pull up on the sides of the bag to tighten up the form. 5. Fill with 3" of your favorite soil mix and sow seed. Once the forms are inserted I find it efficient to pre-fill a number of containers at one time. If I have found one downside to the baggies it is that the bottom tends to sag if you need to move them individually. So I decided to place them onto cheap aluminum cookie trays. Keeping them on a shallow tray supports the bottoms eliminating this issue. The pans are inexpensive (2 for $1 at one of my local dollar stores) and should easily be reused for many seasons without taking up much off season storage space. Each tray holds five containers. I also am going to scrounge or make myself a "pizza peel" to make handling the sown containers and pans less disruptive. Once I place a fixed amount of soil (in my case three scoops) in each baggie I tamp the surface down with a flat bottomed object. I am using an end cap from some irrigation pipe but anything will work. This tightens up the form somewhat and also makes it simpler to see where seed is being placed. After filling and tamping they are transferred onto a tray and I fold in the upper portions. Having all the units at the same height allows me to stack the trays up until I decide on what IÂm going to sow. One question that often comes up with Wintersowing is "how do you efficiently water hundreds of containers?" A very valid concern. I lost almost all my first Wintersowing efforts due to drowning or drying out. Natural watering from rain or snowmelt is a non issue as the baggie forms a natural concave catch basin and will drain thru. But as the season progresses additional watering becomes needed. Bottom watering is the clear favorite but that could entail moving lots of containers around. This brings up another benefit of placing the baggies onto trays. I put a couple of fairly large drainage holes along one edge positioned between two of the containers. These allow full drainage and can be temporarily taped over from the bottom with tabs of duct tape if you want to add water later in the season. A note on efficiency. One thing IÂm discovering with this baggie method is you can prepare quite a few containers and have them "Ready to Sow" in very little time if you break up the tasks assembly line fashion. Gather up and cut the cardboard in one session. Relax it for forming into cylinders in another and so on. I estimated that I could probably prep enough cardboard and baggies for a whole seasons worth of sowing in a couple of hours and just fill them with soil as needed. I filled and sowed twenty containers and had them set out in a 1 hour session. This is my favorite method so far. IÂm setting up some stair stringers with scavenged wire shelving on the side patio to lay the trays on. If I need to shade them at some point IÂll just set up the picnic table umbrellas. This is going to be a breeze....See MoreNeed to find post...HELP!!!!!
Comments (4)Hi... I think this is it. If you already found it, well... maybe this post will help others. Good luck! (the specific post you're looking for is towards the bottom, by 'nodirthere') Here is a link that might be useful: direction for how to fill grain and paint cabinets...See Moreneed paint help please (and posting again-couldn't find my post!)
Comments (1)Ella, Here's a link to some grey paint colors on the Gallery section of Home Decorating. It really helps to see the colors used in a space rather than on a little chip. Good luck and happy grey hunting! Here is a link that might be useful: Greys...See MoreI can't find my old post--layout help, please!!
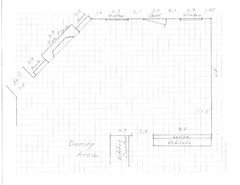
Comments (18)Glad you figured it out. I think your hand drawings are really good, btw. Above are the minimum recommended clearances for seating. If this is a high traffic corridor, I'd make it even wider than the minimum. Is the X the dishwasher? Do you plan a prep sink in your island? If you are, I think your plan looks pretty good but in order to have room for more than one person prepping/cooking, you'd want 48" aisles between the island and cooking wall. This means you'd need a narrower island. Since people really don't chat well together if they are all lined up in a row like a lunch counter, you might consider moving the seating down the island a bit with two on the side with the current seating and one at the end. This allows for better chatting there and people sitting are still close enough to chat with the cook. And it moves them down from a prep sink placed at the other end of the island so they're not likely to get sprayed. I think I would get tired of prepping at the clean-up sink as you would need to carry things too far to the cooktop and it's just adding a lot of extra steps. So, really, consider that prep sink. From the drawings, I think you are creating a very pleasing visual space but just a few tweaks would make it more functional....See More
charlotte farley
5 years agocharlotte farley
5 years agolast modified: 5 years agocharlotte farley
5 years agohavingfun
5 years ago
Related Stories

HOUZZ TOURSMy Houzz: Online Finds Help Outfit This Couple’s First Home
East Vancouver homeowners turn to Craigslist to update their 1960s bungalow
Full Story
HOME TECHAll Is Not Lost: New Gadgets Help You Find Your Stuff
If you lose it when you lose things around the house (and who doesn't?), one of these wireless finders may be to your gain
Full Story
LANDSCAPE DESIGNNative Plants Help You Find Your Garden Style
Imagine the garden of your dreams designed with plants indigenous to your region
Full Story
SHOP HOUZZShop Houzz: Fun Finds to Help You Spring Forward
Set your clocks for daylight saving time and awaken your home to the lighter days ahead
Full Story0

ORGANIZINGDo It for the Kids! A Few Routines Help a Home Run More Smoothly
Not a Naturally Organized person? These tips can help you tackle the onslaught of papers, meals, laundry — and even help you find your keys
Full Story
8 Ways Dogs Help You Design
Need to shake up a room, find a couch or go paperless? Here are some ideas to chew on
Full Story
WORKING WITH PROS5 Steps to Help You Hire the Right Contractor
Don't take chances on this all-important team member. Find the best general contractor for your remodel or new build by heeding this advice
Full Story
SMALL SPACESDownsizing Help: Storage Solutions for Small Spaces
Look under, over and inside to find places for everything you need to keep
Full Story
KITCHEN DESIGNHow to Find the Right Range for Your Kitchen
Range style is mostly a matter of personal taste. This full course of possibilities can help you find the right appliance to match yours
Full Story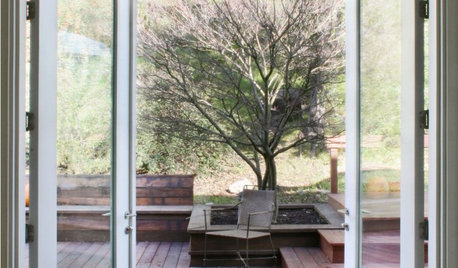
MOST POPULARFind the Right Glass Door for Your Patio
It’s more than just a patio door — it’s an architectural design element. Here’s help for finding the right one for your home and lifestyle
Full Story


shirlpp