


Post-flood surprise kitchen remodel for family of 5, planning help ple
Jon M
5 years ago
Featured Answer
Sort by:Oldest
Comments (16)
Related Discussions
After 8 years, the final touch on our kitchen/family room remodel
Comments (21)Thanks everyone for the compliments and good wishes! We can't believe how well it turned out either. We agonized a lot over which seating to order. Even though we played around with layouts on paper, I was worried that the theater seating group would be too big but I really wanted 3 seats there. The room feels much more spacious with the new seating then with the old couch - I think that's partly its a visual illusion because this one looks less bulky and partly the Space is less deep than on the old couch with its bulky cushions. mtnfever, the Couch Color pageant definitely helped us get clarity on the right color. For those who missed it, I highly recommend the approach of making large samples of a color to consider instead of trying to imagine with a tiny sample chip. I'll link the thread below for those who didn't see it. We knew we wanted to get rid of the hearth when we bought the house decades ago, but it took a long time to get around to it. On the other hand, I don't think we would have made as good decisions if we had replaced it back then. Bcafe, in the stores, they use the Stressless name and logo more than the Ekornes one so it would be easy to think that the company wasn't around. They still have the Ekornes non-reclining couches and chairs too. The website is www.ekornes.com/us. Enduring - yes it wasn't in scale and was way too dark. Even more, I hated it because it was fake stone. It always looked really fake to me though I've had others who were sure it was real stone. Gooster, yes all the front speakers are behind speaker cloth sections in the cabinets. The center is between the two drawers of the credenza; left and right on pull out shelves in the far left and right cabinets. The subwoofer is the black box on the floor and the rear speakers are white and mounted near the ceiling - you can see one in the first picture. Yes, we moved the fireplace to the right - doing so was only slightly more work than tearing out the hearth and installing a new one where the old one was. The hearth was fake stone on a metal mesh backing over a wood frame so that was much easier to remove than it looks like it would be. There wasn't a solid brick or stone chimney - just a flue pipe to remove and this is on an inside wall - the works were all in the empty space between the faux stone and an interior wall - so there was no external chimney to move to match except a little box on the roof. This is a one story which also makes moving things easier - the main work of moving it was patching the old hole in the roof and making a new one for the new flue to go through. We had moved it too far to be able to slant the flue to reach the old hole. When our GC took out the old hearth, there were some surprises. A joist had been cut for the old flue to go through the ceiling and it hadn't been sistered or anything - just two joist ends hanging in space in the ceiling. Our GC repaired that. There were electrical outlets on the bottom of the hearth and there were wire junctions just hanging in space inaccessible under the heart where the wiring was connected to wires from the wall. The fireplace was apparently a very early addition to the house poorly done. The TV is 65" - the size was chosen to be big enough that text viewed from the couch when using the screen for the media computer would be about equivalent to looking at text on a desktop computer screen. Also it works nicely for viewing while cooking and yet isn't overwhelming from the couch. The gap could accommodate a 73" screen, but I prefer having a little space around the screen. CEFreeman, the knobs took a lot of thought and work. He has made things like bowls and salt shakers before but never has made things that need to match as a large set. I came up with an initial design for the profile after seeing something similar in a magazine and then he made some initial variations so we could perfect the diameter, height and shape details. Then he made about twice as many as we would need since these are done freehand and the wood also varies. I sorted them into matched pairs and we used the best matches on the pairs of doors where the knobs are right next to each other in the wide cabinet and the credenza. We also put matched pairs on the left and right opening tall cabinets in case they are ever in a room where they are right next to each other. He also repairs furniture and is the only reason we still can use the rather fragile dining table chairs we have. But he does full time day care for our youngest grandchild so I only get so much project time from him. Bellsmom!! Yikes - so that's why we had to replace the hearth - to keep trolls from hiding there. I love your concept - so did my husband. (The eyes were elevations I made of our plans for the wall. When I asked about vertical blinds on the Home Decorating forum, there were a lot of people who were anti-vertical, but for the windows and style of this house, I think they are the best solution. Part of some peoples objections were based on cheap industrial metal verticals. These ones have fabric laminated to plastic for the vanes so they are quieter. We popped for the backstaker option so when partially open the stacked vanes are at the edge of the windows. We also like that the blinds can be tilted to block sun when needed while still letting us see the yard and monitor grandchildren on the patio. Marti8a, we chose to keep the same wood for the cabinets as in the kitchen - natural cherry - because we already have several woods in the area - maple floor, oak breakfast table and counter stools and some dark unidentified wood for some of the original built-ins and breakfast room doors. To differentiate them from the kitchen cabinets (because I didn't want the family room to look like the kitchen had extended into it), so we chose a different door style - a more sophisticated mitered corner raised panel instead of shaker, but still with simple lines and furniture style knobs instead of big kitchen ones. Here is a link that might be useful: Couch Color thread...See MoreLayout Help - Kitchen/Floor-plan Remodel
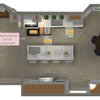
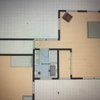
Comments (25)KathyNY76, We looked at the option of a longer island and would love to have been able to do that. The biggest issue the width of the kitchen. If you look at GreenDesigns drawing, the door that swings open would actually only leave a few inches of space between the door and island. The current island is only 30" from the base cabinets as it stands now, hence why we are considering eliminating it. The issue is the drawings I posted show a little more room width wise than what is actually there. My apologizes for this. For a better sense of what I am referring to, here are a few pics reposted. This is facing the wall where the peninsula is shown in the drawings. The wall is not load bearing. This is facing the same wall from the kitchen. There is currently 30" of space between bottom cabinets and island. This is facing in opposite direction. We usually use this door to come into the house. So given the above, any changes in opinion?...See Morehelp w/ kitchen lighting plan - x-post
Comments (19)Thanks, bmore! I tried to find your kitchen reveal thread and couldn't. I'd love to see pics of your lights and their placement in your kitchen. TIA! Thanks, cindallas! The cab next to the oven column has a base and an upper cab that is 15" or 16" above the counter and pulled forward so that its face is even with the base cab face. It will be similar to this set-up, except that the toaster oven cubby will only be 19 1/2" deep (the toaster oven, inc handle, will pretty much fill the space front to back). [Contemporary Kitchen[(https://www.houzz.com/photos/contemporary-kitchen-ideas-phbr1-bp~t_709~s_2103) by Charlotte Appliances DCI Home Resource I hadn't planned on adding UCL lighting here since it wouldn't do much beyond light the top of the toaster oven. The toaster oven has a lighted control panel so we won't have a problem reading temp, settings, etc. I realized that I'm adding 2 additional can lights to the kitchen so yes, definitely on the dimmer switch! I can't wait to see my kitchen either, Carol! =) The lighting rep recommended the 10" back from the front. I forgot to ask her if that was OC (on center) or to the front edge of the can but since we're talking about 2", I decided not to worry about it and go with the front to back position of my can in the corner above the windows since not repositioning it will save us a bit of $$. There won't be any work counter in the area next to the ovens, only a shallower than standard counter for the toaster oven. Everything else is floor to ceiling cabs so lighting in front of it is preferred. The can above my fridge and fridge cab was placed way too close to the cab face creating glare on the cab and shadows where I don't want them. Also, it's how our current cans are placed and it's worked well for 20+ yrs. Good luck with your kitchen planning!...See MoreRemodeling family room to kitchen...layout help!
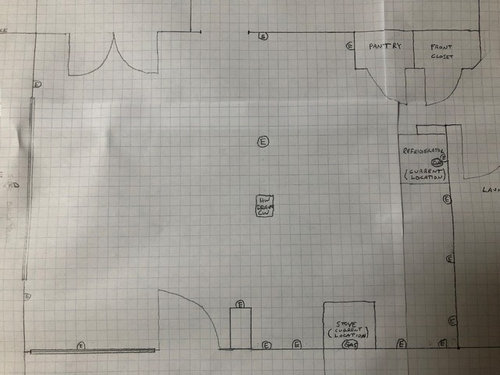
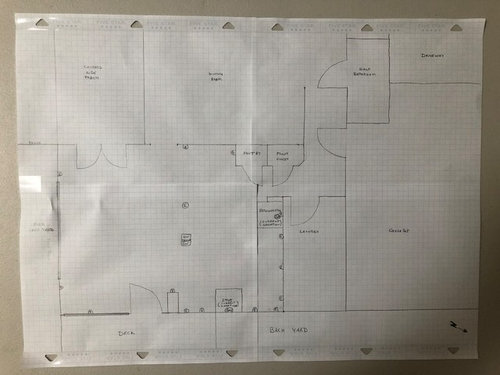
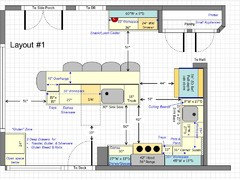
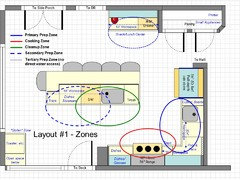
Comments (47)I like your inspiration photo. In fact, I think you can glean some good ideas from it with your layout. Gosh, that angled upper-view is hard to work from, isn't it? The red cabinet is the new pantry. You will want to check your aisle spacing there. You may need to go with shallower cabinets to keep your aisles wide enough. Actually, that is a good thing as pantry shelves should be shallower to allow for better access and less risk of losing food that gets hidden behind other items. While that cabinet may need to be shallower than when it was on the other wall, it can be longer so I think, in the end, you have just as much storage that is also more accessible storage. I definitely like the lack of traffic through the kitchen so much better with the door moved here. I was trying to decide if it would be better to have a counter in the red cabinet area or just floor to ceiling cabinets. Your inspiration picture gives a good mix of both. I think I'd be inclined to make that area into a beverage/snack center. Maybe move the microwave there, built in over the middle counter area, the toaster, and the coffee maker. It would also be a good space for a fruit bowl and such. This way if you're making dinner....and let's pretend it's a dinner that is going to cook for a few hours, maybe even something you're starting around lunch time, the rest of the family can come in and make a snack to tide them over without impeding on the cooking space. DH can make the morning coffee while you're making breakfast. Whatever. It would create a nice separation of space for different tasks. Think about what all you would store in the "red" cabinets. You may not want so many glass uppers if it will be food pantry storage. If you anticipate any nice glassware or serving pieces being stored there, the glass would be nice. If mainly pantry items, I think the open shelves would keep it open enough looking without needing the glass, too. Again, it depends on what you're storing there. I think you should keep the fridge where it is for easier access for snacks but also for grabbing that extra condiment or anything else forgotten....this is more important if you're sitting at the dining room table but I think it just fits better there.. And I'm not really one who likes looking at refrigerators that much. I think they tend to be big hulks in the kitchen. If you move it to the lower-right corner, you will see it from the dining room. Is that what you want to look at? Or would you rather look at your beautiful cupboards? All that said, moving it to lower-right would better fit the ice-water-stone-fire layout which is a great work flow. We move from fridge to sink/prep counter to cooking. If you recall, this is why we have been pushing you to consider a prep sink. So...hmmmmm...I'm just musing out loud here. If it were my kitchen, and because I have such a dislike for hulking fridges, I would really have to think about the extra steps from fridge to sink in this layout and weigh that against my fridge dislike to make a decision. You will be walking extra steps in this layout. I walk extra steps in my own kitchen just so I could put my fridge in a less-noticeable niche and I'm quite happy with that decision. It's only about 1.5-2 steps farther than the previous fridge placement but it has allowed me to have a baking center and made the view through my over-sink window better and easier seen from the rest of the house without the fridge sticking out and blocking it. So carefully consider whether those extra steps will be a bother for you. In the end, most of us have to make a compromise or two to get what we want. And, in the end, since we're all different, only you can make that final decision. It's really best to have as many options as possible to consider before pulling the trigger. If SIL is willing, I think you should have her draw up a plan with the door moved to the lower-left and the fridge in lower-right and share it here so we can all give you feedback on that plan. Or maybe someone else will pop in here and create one. I'm better at seeing problems than I am coming up with solutions so I'm not seeing a good way to do that and keep your sink under the window that you so desire which also keeps the DW out of the prep zone. And, to me, those issues are more important than a few extra steps to the fridge. Oh, gosh, sorry to ramble on so long. I probably wasn't much help, was I?...See More
Jon M
5 years agolast modified: 5 years agoBuehl
5 years agolast modified: 5 years agoBuehl
5 years agolast modified: 5 years agoBuehl
5 years agoBuehl
5 years agolast modified: 5 years agoBuehl
5 years agoJon M
5 years ago
Sammy
5 years agoBuehl
5 years agoJon M
5 years ago


Related Stories
REMODELING GUIDESPlanning a Kitchen Remodel? Start With These 5 Questions
Before you consider aesthetics, make sure your new kitchen will work for your cooking and entertaining style
Full Story
REMODELING GUIDES5 Trade-Offs to Consider When Remodeling Your Kitchen
A kitchen designer asks big-picture questions to help you decide where to invest and where to compromise in your remodel
Full Story
KITCHEN DESIGNRemodeling Your Kitchen in Stages: Planning and Design
When doing a remodel in phases, being overprepared is key
Full Story
KITCHEN ISLANDSPlan Your Kitchen Island Seating to Suit Your Family’s Needs
In the debate over how to make this feature more functional, consider more than one side
Full Story
KITCHEN LAYOUTSMove Over, 3-Zone Kitchen. Meet the 5-Zone Kitchen
With open-plan kitchens so popular, has the classic kitchen triangle had its day?
Full Story
REMODELING GUIDES8 Remodeling Costs That Might Surprise You
Plan for these potential budget busters to keep a remodeling tab from escalating out of control
Full Story
KITCHEN OF THE WEEKKitchen of the Week: A Designer Navigates Her Own Kitchen Remodel
Plans quickly changed during demolition, but the Florida designer loves the result. Here's what she did
Full Story
KITCHEN DESIGNKitchen of the Week: A Seattle Family Kitchen Takes Center Stage
A major home renovation allows a couple to create an open and user-friendly kitchen that sits in the middle of everything
Full Story
MOST POPULAR5 Remodels That Make Good Resale Value Sense — and 5 That Don’t
Find out which projects offer the best return on your investment dollars
Full Story
MOST POPULARRemodeling Your Kitchen in Stages: Detailing the Work and Costs
To successfully pull off a remodel and stay on budget, keep detailed documents of everything you want in your space
Full Story

Sina Sadeddin Architectural Design