


To Code? Hardie backerboard instead of plywood or ditra?
Edmund Lee
6 years ago
Featured Answer
Sort by:Oldest
Comments (21)

Edmund Lee
6 years agolast modified: 6 years agoRelated Discussions
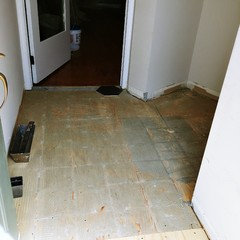
What to use between subfloor and tilebacker
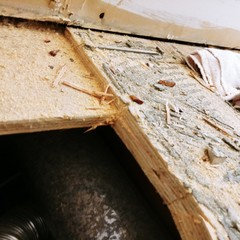
Comments (6)A Lowes employee suggested using 1/4 in. luan underlayment between the subfloor and the HardieBacker. Not only no, but HELL NO! Luan is instant death to a tile floor, even under backerboard. The guy WAS right about one thing, though-- you can't go directly over planking with the backerboard. You need a layer of plywood. Being that the planking has given you the strength in the subfloor, all you should need is 3/8" plywood, and then the cement baord, or if that's too much elevation, use Ditra instead, which is only 1/8" thick. I'm going to type that again, but in caps. This is a question that leads people to my site on searches on a constant basis-- YOU CAN NOT HAVE LUAN IN A SUBFLOOR UNDERNEATH CERAMIC OR STONE TILE. Period. Casey-- it's more than just being incompatible with thinset, although that's one of the reasons. But if that were the case, here, it would be fine, because you don't WANT it to stick in this case. It's there to bed the backerboard, not bond it. The biggest problem is that it can literally compress to half its thickness, causing bigtime voids under the tile, and ultimately failure in the floor. I've seen this happen within as little as 6 months. It was the very first time I ever used Ditra as an underlayment-- replacing a floor that was only 6 months old. I pulled up pieces of luan from under that floor where by the cabinet toe kick, it was full thickness (1/4"), and not a foot away, it had compressed to a shy 1/8". This is no exaggeration....See MoreDitra question...
Comments (31)should I buy a few more tiles just in case they break. You can if you like, but if everything was done properly, it shouldn't be necessary. Is it best to do the chalking around perimeter joints first so I do not get any grout in them or grout first then chalk. I'll usually grout first, making sure not to fill that joint, and then caulk. The reason is that if you grout afterward, you'll end up with spots of grout on top of the caulking. Grouting first just makes it easier to do a nice clean looking job. My space between the tiles is 1/8 inch and I have bought sanded Tec colour grout(polymer enhanced portland cement) and the matching colour sanded siliconized acrylic latex caulk. If this is not correct I can take it back and change it for the right product. You got the right stuff. You wait that long, and you'll be cleaning the excess grout with a jackhammer! Don't try and grout the whole area at one time. Go only as far as you can before you see the grout starting to haze up, and then go back and begin to wash what you have. As for the barely wet sponge, they're right, but just so that you understand, that means dunking the sponge and then wringing it out as well as you can. As for grouting tips, I have two. When you first start washing each area, wash in circular motions to loosen up the excess grout on the face of the tile, and "shape" the joints. Once you've done that, rinse the sponge out well, and take two swipes diagonally across the tiles-- one with one side, and one with the other, both in the exact same place. The first swipe will remove the heavy grout, and the second, you make with pretty much just fingertip pressure, so the sponge doesn't hit the joints any more than necessary, and that one should clean the tile pretty well. Then rinse the sponge out and move on. Once you're done with the area, you can get a clean pail of water, and go back and give it a final rinse, and when you're done the few minor streaks that are left should come up easily with a mop and water. If you see any HEAVY streaking while washing, though, don't be afraid to hit with the sponge again, but remember-- the big key is one swipe per side of the sponge before rinsing....See MoreUnderlayment Questions
Comments (3)Perhaps a tile and stone expert will chime in here. I have concerns about your particle board underlayment, as it adds almost nothing to the structural integrity of the floor system. A quick call to the technical folks over at Schluter might tell you if you can use Ditra in your application. Have a look at the Schluter site for good information. There are specific recommendations for what type of thinset to use below the Ditra and between the Ditra and the tile, as well as specific trowel teeth requirements. I would suggest that unless someone comes in here with expert advice, that you go over to the John Bridge Tile forum with your questions. However, for now, consider taking up the particle board and installing the right structural underlayment. I don't think particle board is acceptable under ANY circumstances, but I could be wrong. Find the Tile Council of America handbook on the internet or search for "tile or stone over wood substrates". Finally, ever consider installing your cabinets AFTER the slate is in? Here is a link that might be useful: Schluter Ditra...See MoreAnybody have experience with OSB plywood under cement board/tile?
Comments (4)weedyacres we had already bought the OSB before I started researching OSB vs. plywood. Although most articles seemed to prefer plywood, I did read that OSB is supposed to have the same performance. We had to rent a truck and everything just to get it from the store to our house, so we didn't think the cost/effort was worth returning the OSB for plywood (and hence my post, just to be sure :)). Why do you recommend it over OSB?...See More
millworkman
5 years agoEdmund Lee
5 years ago PRO
PROCinar Interiors, Inc.
5 years ago
SJ McCarthy
5 years agoEdmund Lee
5 years ago
ksc36
5 years ago- PRO
Cinar Interiors, Inc.
5 years ago - PRO
Cinar Interiors, Inc.
5 years ago ksc36
5 years agoSJ McCarthy
5 years agoUser
5 years agoEdmund Lee
5 years agolast modified: 5 years ago PRO
PROJoseph Corlett, LLC
5 years agoEdmund Lee
5 years agolast modified: 5 years agoSJ McCarthy
5 years ago PRO
PROAvanti Tile & Stone / Stonetech
5 years agoEdmund Lee
5 years ago- PRO
Avanti Tile & Stone / Stonetech
5 years ago  PRO
PROJames Hardie Building Products
5 years ago


Related Stories

GREEN BUILDINGHouzz Tour: See a Concrete House With a $0 Energy Bill
Passive House principles and universal design elements result in a home that’ll work efficiently for the long haul
Full Story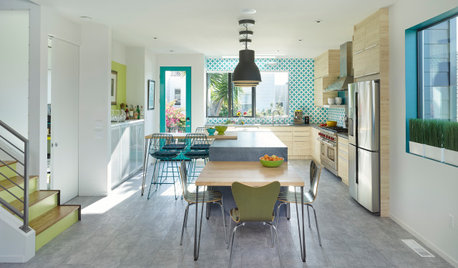
HOUZZ TOURSBold Color and Contemporary Barn House Charm
A designer with a love of bright color updates her 1890s cottage to create a modern-meets-traditional San Francisco home
Full Story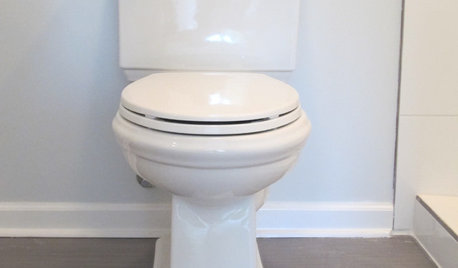
BATHROOM DESIGNHow to Install a Toilet in an Hour
Putting a new commode in a bathroom or powder room yourself saves plumber fees, and it's less scary than you might expect
Full Story
REMODELING GUIDESTransition Time: How to Connect Tile and Hardwood Floors
Plan ahead to prevent unsightly or unsafe transitions between floor surfaces. Here's what you need to know
Full Story
BATHROOM DESIGNHow to Settle on a Shower Bench
We help a Houzz user ask all the right questions for designing a stylish, practical and safe shower bench
Full Story
BATHROOM DESIGNHow to Design an Accessible Shower
Make aging in place safer and easier with universal design features in the shower and bathroom
Full Story
MOST POPULARContractor Tips: Top 10 Home Remodeling Don'ts
Help your home renovation go smoothly and stay on budget with this wise advice from a pro
Full Story
REMODELING GUIDESWhy Marble Might Be Wrong for Your Bathroom
You love its beauty and instant high-quality appeal, but bathroom marble has its drawbacks. Here's what to know before you buy
Full Story
BATHROOM DESIGNHow to Match Tile Heights for a Perfect Installation
Irregular tile heights can mar the look of your bathroom. Here's how to counter the differences
Full Story
KITCHEN COUNTERTOPSQuartz vs. Granite: The Battle of the Countertops
Read about the pros and cons — and see great examples — of these popular kitchen countertop materials
Full Story


SJ McCarthy