


Self leveler needed for engineered hardwood on basement slab?
Intoodeep
6 years ago
Featured Answer
Sort by:Oldest
Comments (20)

Intoodeep
6 years agolast modified: 6 years agoRelated Discussions
engineered hardwood floor over old hardwood floor
Comments (14)You need to do a little more archeological digging still. You need to know the whole construction of the floor before you can decide how best to install something new. I'd take up that plywood piece in the kitchen and see what's under it. It's higher than the surrounding floor, so needs to go. You should also be able to see from there what subfloor is under the original kitchen hardwood. It's too bad the space under your entryway is finished, but I'd still do some exploring from below to see what's under there, and to figure out the fix to stop it from squeaking. Is it drywall below or a drop ceiling? I know it probably seems like a pain to tear out drywall, but if you cut out a clean patch, like 2' x the width of the joists, it'll be relatively simple to repair. Just make sure to cut it down the center of the joists so that there's room to screw the patch piece to it later. Cut the hole under the area that squeaks the most, if you can. Have someone walk on and watch the floor from below to see what's moving. It might be as simple as pounding in a couple shims from below, or face-nailing a loose board from above. You want to find out what's underneath the hardwood. It might be laid directly on the floor joists, or there might be 10" wide boards that the hardwood is nailed to. Another thought is to take out a board in the hallway, since that's not original and you want to replace it. See what the subfloor is there. I am a bit puzzled at why, when you've stripped the kitchen down to the original hardwood, it's still higher than the hallway floor. Is your current surface perhaps not the original kitchen hardwood? Peeling back the plywood area will help determine that. BTW, I haven't heard of that stop squeaking product you linked to, so can't offer any personal opinion. And don't pour self-leveling compound over top of hardwood. It needs to go over plywood....See MoreCarpet or Engineered Hardwood in Basement-Vote
Comments (29)Thanks again to all the thoughtful comments. I have asked my neighbor who is a realtor what do customers in our area want. What would they expect in my basement if/when we sell. She said carpet. Sounds good to me. Cheaper, warmer. Just going with the best antimicrobial thickest carpet pad and the lowest pile rug we can get. I'm not saying anything about the dryness of my basement, because I don't know how to knock on wood in cyberspace. ;-) Regarding the radiant floor heating, I guess I wasn't clear. Yes, I do believe that it is a good thing, however, that is if it is true radiant floor heating, the kind you embed in the cement. This would essentially be a "carpet pad" of heat since it is on top of an existing slab. I am one to never say never, and who knows, maybe we will do it in part of the basement. But it really isn't in the plan. I suppose if we were going to use the room as an entertainment space, or a place to watch movies, then we might be considering something like this....See Moresolid hardwood vs. engineered hardwood
Comments (21)I'm a fan of Hickory. Love it! I love it's STRONG variation! Yep. Variation is the word that can be used for Hickory. If you are going for "mid-tone" then it means the Hickory is stained. No problem. That's fine. Hickory takes a stain very nicely. But it will still have plenty of variation. The stain will even that out a little bit, but not entirely. The finish is UV cured urethane. I'm not very excited about that finish. If you are going for factory finish, you will want to work with the TOUGHEST finishes on the market (that's why you go with factory finished...for the TOUGH finish). The UV cured urethane is a ho-hum type of finish. Average would be the best way to describe it. The thickness of the plank is 3/4" = normal for sold. The plank width is 5" with random lengths UPTO 60" (5ft). That tells me there will be many planks in the 3' - 4' range. Again, this is ho-hum average. And with a wide plank product, it will need "glue assist". And Hickory certainly needs it because it has a bit more movement (less stable) than white oak. And then there is the "low gloss" format. The low-gloss finish on this depth of colour = nightmare to live with. It will show dust, etc as well as oily foot prints, sock prints, paw prints and will look hazy at certain times during the day. The "haze" is part of the chemical make up of the finish itself = that's how they take away the gloss...they haze it with a chemical additive. The haze goes away when you sand and refinish the floor. That's the only way to fix it. If you must have a mid-tone floor, I would recommend a TOUGHER finish (aluminum oxide or ceramic infused polyurethane) in a satin. Satin is FAR MORE livable. It offers a lovely glow without being shiny. It hides skin oils (like paw prints from dogs) because it is the same gloss level as skin oils....it isn't hazy....you get the idea....See MoreWhat hardwood or engineered hardwood product best for concrete slab?
Comments (21)Leather is the most 'recognizable' pattern for cork (other than the ground up cork board look). When it is laid it looks like hardwood flooring using 'shorts'. It has a bit of a brick look to it. Ignore the 'pink' in the samples. The pink is the very first colour to fade away. It takes a few months for the pink to disappear but once it is gone the cork (Leather and Logan) will look more like oak in tone (yellowish with some hints of green and some gray). It is a 'directional pattern' which means it has a 'linear' sense to it. The Logan is the most expensive cork pattern you can get. The slices of pattern are random. They are hand cut and hand laid. It takes *roughly an hour for 1 person to arrange 10sf of the pattern. It is STUNNING. It looks more like stone. It is random...did I mention the pattern is random? Leather and Logan can have the extra 2 coats of the Loba 2K Supra AT = super tough. The Latte is a FANTASTICLY tough finish. It has the polypropylene finish on it. This is the 'non-vinyl' product Cancork sells. It is tough....right after that it is SUPER TOUGH. And then for good measure, it is TOUGH!!! For a Rental property, the Latte is a product I would recommend. It does NOT need the Loba product. That means you save $1.50/sf RIGHT AWAY. It can handle 3mm or 6mm cork underlay. If you are looking for temperature control, then I like the 6mm underneath...but CHECK your door heights, etc. All you need to do is take your floor sample and the underlay sample they sent you (their supposed to do that...sigh) and see if it 'slips' underneath the doors in your home. It is that simple. I hope that helps... As for the Tacoma...I'm guessing you are looking at KILOGRAMS (700 kg) as your weight limit = 1540 lbs. The weight of a standard skid of cork flooring = 1000sf (ish...depends on the product) = *roughly 2000 lbs. And the skid sizes are PERFECT to fit between the wheel wells of a truck bed. I've watched this stuff get loaded into pick-up trucks for 6+ years. A forklift operator can drop that baby into your truck (so long as you do NOT have a 'cap-it') and off you go. If you only have a short way to go, the 2000 lbs won't be much of a problem...I just wouldn't do a trip to Bella Coola with it. ;-)...See More PRO
PROMark Bischak, Architect
6 years ago
cpartist
6 years ago
just_janni
6 years ago
catbuilder
6 years agoUser
6 years agoIntoodeep
6 years agotrifecta264
6 years agostrategery
6 years agocpartist
6 years agostrategery
6 years agoUser
6 years ago- PRO
Mark Bischak, Architect
6 years ago cpartist
6 years agobry911
6 years agolast modified: 6 years ago- PRO
User
6 years ago cpartist
6 years agolast modified: 6 years agobry911
6 years agoIntoodeep
6 years ago

Related Stories
KITCHEN DESIGNThe Kitchen Storage Space That Hides at Floor Level
Cabinet toe kicks can cleverly house a bank of wide drawers — or be dressed up to add a flourish to your kitchen design
Full Story
BASEMENTSIdeas for Partially Finishing Your Basement
Transform your lower level into a living area, laundry, bathroom or office you can use now — without a full renovation
Full Story
REMODELING GUIDESTransition Time: How to Connect Tile and Hardwood Floors
Plan ahead to prevent unsightly or unsafe transitions between floor surfaces. Here's what you need to know
Full Story
MATERIALSWhat to Ask Before Choosing a Hardwood Floor
We give you the details on cost, installation, wood varieties and more to help you pick the right hardwood flooring
Full Story
BASEMENTSBasement of the Week: Modern Style Converts an Empty Concrete Box
From raw wasteland to fab living, sleeping and storage space, this snazzy basement now covers all the angles
Full Story
MOVINGA Guide to Self-Storage: Is a Mini Storage Unit Right for You?
We unpack the choices and costs involved in renting a place to stash extra stuff
Full Story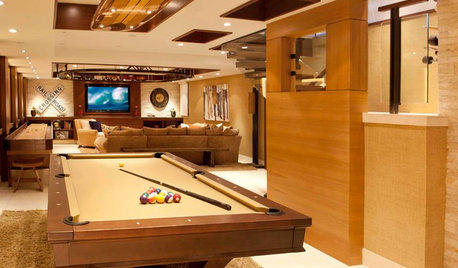
BASEMENTSBasement of the Week: For the Love of Sports and Games
Skateboards, an elevated train, a surfboard lighting fixture ... see how one family packed their basement with fun features
Full Story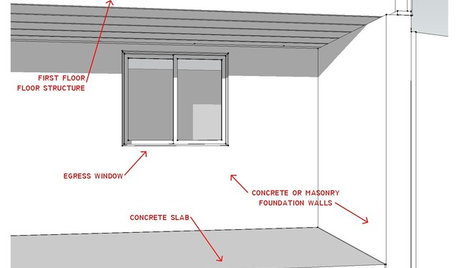
REMODELING GUIDESKnow Your House: The Steps in Finishing a Basement
Learn what it takes to finish a basement before you consider converting it into a playroom, office, guest room or gym
Full Story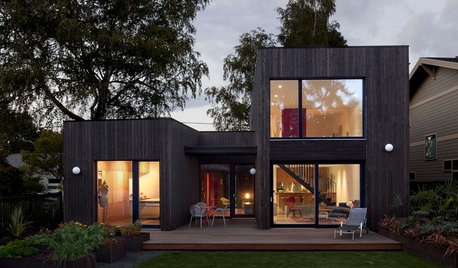
BASEMENTSDesign Workshop: Is It Time to Let Basements Become Extinct?
Costly and often unnecessary, basements may become obsolete — if they aren’t already. Here are responses to every reason to keep them around
Full Story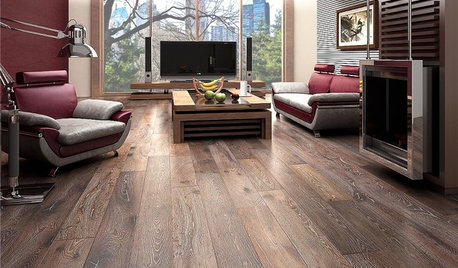
REMODELING GUIDESWhen to Use Engineered Wood Floors
See why an engineered wood floor could be your best choice (and no one will know but you)
Full StorySponsored
Columbus Area's Luxury Design Build Firm | 17x Best of Houzz Winner!

Mark Bischak, Architect