


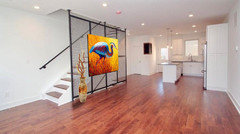
Help! What to do with this metal mesh panel on the staircase
Amanda O
6 years ago


Featured Answer
Sort by:Oldest
Comments (36)

Saypoint zone 6 CT
6 years ago
carolb_w_fl_coastal_9b
6 years agoRelated Discussions
Bill V and others, is a metal mesh embedded in cement-like...
Comments (43)I would absolutly follow Mongo's advise that he posted above on Fri, Mar 22, 13 at 22:31. Ditra is put under all kinds of stone and ceramic. As I understand it, it is a decoupling membrane that helps prevent shearing (horizontal) movements from cracking the tile. The subfloor and joist deflection issues help with preventing vertical movement that can also crack the tiles. How I understand it from the Ditra instructions is that, depending on the subfloor, you select the appropriate thinset to lay the Ditra. Then you lay the tile on the Ditra using appropriate recommended thinset. The orange will be completely covered. It will raise the floor a bit (1/4"?) more because the Ditra has a dimension to it. It is not recommended to be used for tiles smaller than 2" because of the waffle shapes. I bought the appropriate thinset that Schluter recommended at my HIGH END tile shop. It was expensive but a gem to work with. I have never used low end thinset and don't plan to. I have linked the site that makes Ditra. Look it over very well. There are great illustrations on how it works either on this site or others. When I did my floor (first time floor tiler) I used it and, while I took part of it up to get the lumps out, I thought it went well. The beautiful jobs of tiling by Bill V, and Mongct are all on top of Ditra, I believe. Here is my DH adding extra joists 2x8's to our under qualified 21"oc floor. Now it is 9-10" oc: Here is after I put down the (specific recommendation from Bill V.) underlayment of plywood onto the subfloor that was existing, and thick and newly re-enforsed. The only mistake I made was I snapped lines for the grid every 4" instead of the 6" that Bill stated. My mistake, but was not a problem for my DS to do:) Next came my warming floor system, stratigically laid out and planned to the hilt using drawing after altered drawing to get it to all work out. I am proud that I am only 8" short: Here is the floor with the self leveling compound being poured. It has a plastic lath that I put over the wires. I was recommended by the Moderate End tile store where I was going to buy my warming system. I changed my mind because I wanted 240v. But I had the lathe and I then read a tutorial over on the JB forum about using the lathe, so is used it in my installation. So: the BillV recommended underlayment, warming wire and 2 thermostats (1 is laying there not hooked up, as a backup down the road if needed), plastic lathe stapled closely, primer, self leveling compound: If you want to do self leveling compound read Staceyneil's thread on the topic from several years ago, I think it is in the bathroom forum. Here is my Ditra, set with the recommended thinset. After this picture was taken, I did take out some areas, about a foot square, in several places and reset them. I did this because there were large lumps, and I'm a 60yo lady with not as much strength as I used to have. So the thinset was uneven in a few spots. You can see it here. Not all of the lumps needed taking out but several were just too high. When I took it up and reset it it was fine! At this point you can seal the seams with Kerdi tape if you want to water proof it. I was going to do that :( but I forgot!!! If you are installing Ditra in a bathroom, don't forget:) Here I am setting my tile in the pattern I've chosen. Mongo was taken aback when I posted this because I turned the pattern on him :) He had initially helped me plan this out in a 90 degree angle. After it had been all laid and grouted with Spectralock epoxy grout: I post this to help you see the process and that it isn't difficult. The difficulty seems to be when people don't want to make adjustments with installations. There are a lot of people using this stuff. Edited to add: Please correct me if I am incorrect in anyway. This is how I installed my floor and I may have made an error either in the installation or my description. Here is a link that might be useful: The Schluter Site. This post was edited by enduring on Sat, Mar 23, 13 at 12:47...See MoreMetal/Iron Stair rail
Comments (3)Why don't you post @ the Home Decorating forum ... Since you're not a metal worker ~ posting in the Metalworking forum might not be the best place to ask... Here is a link that might be useful: http://ths.gardenweb.com/forums/decor/...See MoreInstalling open shelves on plaster over metal mesh - need help!
Comments (5)Hi, Maureen, Since we live in an old house with wet plaster walls, I asked my DH your question. He said there are two ways to go here: the first, more exasperating option would be to start out with a masonry bit and when you hit metal, switch to a hi speed bit. Your bits won't last very long, you risk taking out large chunks of plaster when the masonry bits get caught on the metal lathe, and you will make a lot of trips to the big orange box for more bits, so it's not very satisfactory and not necessarily cheaper in the long run. The better choice would be to go to the link below and order some Bad Dog Rover bits that will go thru anything - wood, masonry, metal, glass, even marble and granite. They are expensive, a small set costs more than $100, but will pay for themselves in the long run if you need to drill elsewhere in the house. Also, he mentioned that if the shelves will hold a lot of weight, they really ought to be anchored on the studs. He wasn't sure what you meant by the 'proper' positions (astheticly pleasing?). Good luck with the project. Here is a link that might be useful: Bad Dog Tools...See MoreMetal Spiral Staircase - Riser / Toe-Kick Retrofit for Dog Safety?
Comments (22)I moved into an apartment with a spiral staircase and trained my dog how to use it. Here's how I did it: Materials: Cheap sheets, about 20 small refrigerator magnets, a rotisserie chicken. I bought the cheapest sheets I could find and cut them into rectangles to hide the gaps in the stairs. I just used some cheap magnets to hold the sheets in place. Then I wrapped the first few stairs worth of railing in the other sheet so it looked like a totally enclosed staircase. I placed some chicken on the first few steps and showed my dog how to get up one of them. He had no problem on the first step so I started placing the chicken on higher stairs. My dog is suspicious and has stage fright so eventually I just left the chicken on the stairs and left the room so he couldn't see me. He started to get braver, going higher and higher. I never actually saw him go all the way up to the top, but one day about a week into training, I went upstairs and he followed me a few seconds later. Going down took a little while more, but he figured it out. I think just showing him that I was fine going up and down and covering the gaps gave him the confidence to do it. So my recommendation is to hide the scary parts of the stairs and don't pressure your dog, try to incentivize him with a high value treat. I should mention that we took down the ugly cut up sheets about a week later and he's still fine to up and down. Good luck!...See More
Ellie RK
6 years ago
arcy_gw
6 years agoRobyn Bagu
6 years agopalimpsest
6 years agoEllie RK
6 years agolast modified: 6 years ago
Melissa Gallagher
6 years ago
Carla H
6 years ago
Fori
6 years agoerinsean
6 years agorockybird
6 years agopalimpsest
6 years agoAmanda O
6 years ago PRO
PROCCM Countertop and Cabinet Manufacturing
6 years agosuero
6 years ago PRO
PROSabrina Alfin Interiors
6 years agolast modified: 6 years ago
bpath
6 years ago PRO
PROMIG Furniture Design, Inc.
6 years ago
Annie Deighnaugh
6 years agolast modified: 6 years agoAnnie Deighnaugh
6 years agolast modified: 6 years agoMelissa Gallagher
6 years ago PRO
PROBeth H. :
6 years ago
Melissa R
6 years ago PRO
PROJudyG Designs
6 years agolast modified: 6 years agopalimpsest
6 years agosuezbell
6 years ago
Andrea Long
6 years ago
DYH
6 years ago
littlebug zone 5 Missouri
6 years ago PRO
PROJoseph Corlett, LLC
6 years agosjsshank
6 years ago
mick50
6 years ago
KD
6 years agoarcy_gw
6 years ago


Related Stories
HOUZZ TOURSHouzz Tour: A Plywood-Paneled Beach Cottage Stands Out in Florida
Humble materials and a carefree design come together in a low-maintenance vacation home
Full Story
THE ART OF ARCHITECTUREDesign Workshop: Put Industrial Mesh to Work Around the Home
From open gratings to fine weaves, commercial metal mesh is a durable and beautiful choice for residences too
Full Story
REMODELING GUIDESHello Again, Corrugated Panels
Once-Shunned Material Finds Expressive New Role in Contemporary Homes
Full Story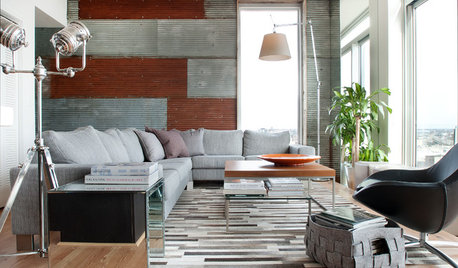
REMODELING GUIDES5 Places to Love Corrugated Metal in Your House
It’s budget friendly, versatile and even colorful. Is it any wonder this popular exterior material is making inroads indoors?
Full Story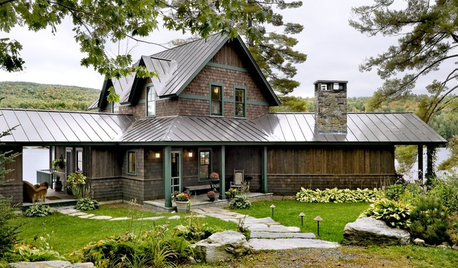
REMODELING GUIDESMaterials: The Advantages of a Metal Roof
Metal reigns in roofing style, maintenance and energy efficiency
Full Story
THE ART OF ARCHITECTUREHow to Use Perforated Metal in Your Home Design
The industrial material can bring strength, privacy and visual openness to stairs, walkways, screens and awnings
Full Story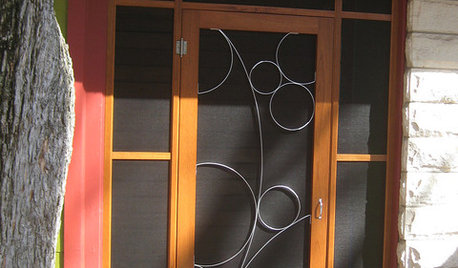
REMODELING GUIDESLet Screen Doors Mesh With Your Style
If you're spoiling all that lovely extra light and fresh air with a dull screen door, consider these imaginative options instead
Full Story
MODERN HOMESHouzz Tour: Heavy Metal Rocks a Modern Missouri Home
Steel shows up all over this single-level family home, but wood and other textures warm the look
Full Story
MORE ROOMSShhh ... It's a Secret (Door, Room, Staircase)
Whether you're the cloak-and-dagger type or just want some practical storage, hidden places in the home show their appeal
Full Story
COLORPick-a-Paint Help: How to Quit Procrastinating on Color Choice
If you're up to your ears in paint chips but no further to pinning down a hue, our new 3-part series is for you
Full StorySponsored


Joe