


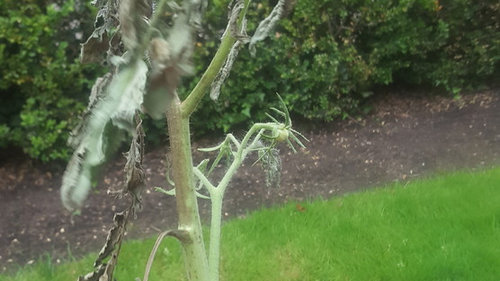
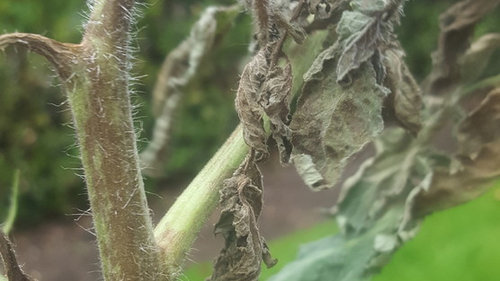
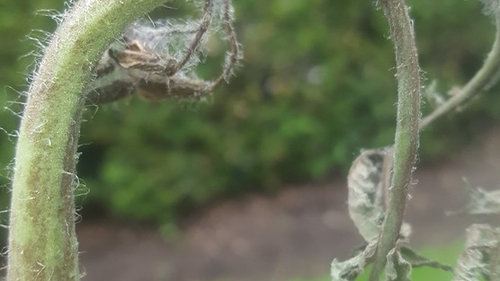
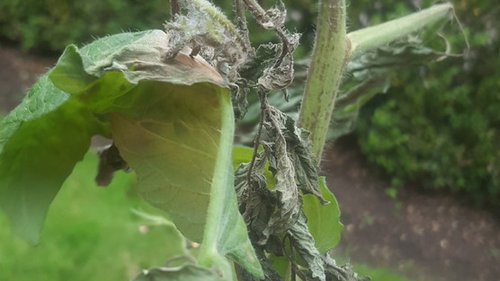
Help! ANOTHER Disease I can't figure out.
lillivewire87
7 years ago
last modified: 7 years ago


Featured Answer
Sort by:Oldest
Comments (8)

Seysonn_ 8a-NC/HZ-7
7 years ago
bau the man (uk, bristol,zone 7a)
7 years agoRelated Discussions
Argh, I can't figure out what is wrong with my peas!
Comments (27)I cut the fronts off the bags and parts of the bottom (though mostly I couldn't get to the bottom without upsetting everything). The soil was evenly moist all the way through, so I think that answers the drainage question. But there were two places which looked a bit root-bound. Which means they are probably root-bound in the places I can't see as well. It's not super bad, but that might be part of the problem. Kind of a bummer. I didn't have root issues when I grew them in a container this size before (which is why I thought it would work), but I forgot to take into account that they were not planted so closely (I think they were more like 4 inches apart in that container). I hope opening up the bags helps. =P...See MoreTomato Disease? Please help, can't figure it out
Comments (9)Thank you all for your advice. I do think it is just that the plants need energy elsewhere - not a disease. It hasn't spread anywhere else. I pruned some of the yellowed leaves off and they seem to be doing better. I am using the square foot gardening method because I have a limited amount of space in my yard where there is enough direct sunlight to grow veggies. I adapted a couple of things to make sure it is organic. So, my soil consists of 1/3 compost, 1/3 peat moss, and 1/3 course-grade vermiculite. So far, I've been very impressed with the results. Again, I really appreciate all the help. Happy Gardening!...See MoreI can't figure it out. Help!!!!
Comments (2)The stage of flowers you are describing are females and you will not see pollen at this point. The flowers do not turn into males with pollen until the flower is completely open. There is no mistaking which phase the flower is in because the pollen will be noticeable. You must collect the pollen at this point. I have an old 35mm film canister that I put the pollen in. It's small and easy to see the pollen inside. Gently snip off the flower by the stem with your fingernails and again, gently shake the flower over the canister. I then grasp the stem with one hand and the petals with the other (all 3 together). I then twist the stem around inside the petals trying to shed every bit of the stamens and pollen into the canister. Now you have some pollen. It is probably good stored in the fridge for maybe 24 hours. Tapping the canister quit a bit will help release pollen. I also take my little paint brush and swirl around and bang it inside the canister. You can definitely see where pollen has been released. The females are opened a bit. There's an old post on cherimoya pollinating by Eggo you can find if you do a search. It has excellent pics of the flower stages. The only thing I do different when pollinating the female flowers is to remove all of the petals first...where Eggo just clipped a single petal so he would know that the flower had been pollinated. I read in a publication that removing the petals on sugar apples is better and there's no mistaking which ones have been visited. I then make sure I get plenty on the brush and then remove the petals from the female. Swirl and roll the brush onto the remaining flower parts...holding the canister below to catch any pollen that drops from the brush. I treated the pollen like gold dust!! I believe there are certain stages of female that are more receptive than others...the flower is separated a bit more but no where close to opening fully. Same for the males. If you wait until the flower starts to turn a little brown, I don't believe the pollen is as viable...or it has been released already and is gone. I've noticed plenty of pollen and stamens resting on leaves below older males. You have to be on the ball in this game as well. Most publications state that it is best to collect during a certain time and to pollinate during a certain time. This may be true in general but I've found that the flowers usually advanced to different stages on their own terms. I would try to collect pollen and if possible, pollinate any females I could every morning before going to work, after work, and before bed. If I was home all day, I would constantly be on the lookout. The males are sneaky buggers! You can miss one hanging right in front of your nose! The first two years mine started flowering was a very harsh learning curve for me. The trees didn't produce many flowers and I was just not getting the timing down. But repeated readings of publications and Eggo's write-up, AND crap-loads of flowers this year, I was able to get it down pretty good. Don't get frustrated. Have fun with it but pay attention to what works and what doesn't. It will pay off in the end....See MorePlease help! trying to figure out what pest/disease I'm dealing with!
Comments (6)Flowerlillies: I have seen this before. It appears to be scale. Get several Q-tips and a bottle of Isopropyl alcohol. Pour some of the alcohol into the cap of the bottle. Dip the Q-tip into the alcohol. Now, wherever you see those white, powdery patches on the leaves and stems of your plants, rub the Q-tip on them. Make sure all the white patches are dabbed well. If you've already done this and still need help, you will not like my next suggestion. You most likely have them on the roots of your plants which is why you are seeing deformity. They are literally, slowly, eating the plants alive. What I have done in the past is re-plant any and all plants in the affected plants vicinity. I took no chances. I know this is a pain and labor intensive but being on a balcony actually makes this easier to do. If you have a lot of container plants, work them in batches. Unplant 3 or 4 of them. Make sure to do it over a box or trash bag to catch any of the possibly infected soil. get another plastic bag and gently wrap the roots of the plant and carry it over to the sink or bathtub. Submerge the entire plant in luke warm water with a mild dish detergent. Use just a capful of detergent. Dunk the entire plant, count to ten then do it again. Do this with the rest of your plants, again, working in batches of 3 or 4 if you have many. Before you re-plant make sure you use fresh, new soil. Discard any old soil you've had. There is obviously something in there that is attractive to this pest. Also, what I do is take the soil in batches inside a large plastic container and Nuke it in the microwave for at least 1 minute. This will kill nearly anything such as larvae living in the soil. When the soil has come back to a normal temperature, I mix in my fertilizer, perlite and any other additive. But, more importantly, I spray the soil with Neem Oil. Spray liberally and mix it into the new soil. Make sure to wash your containers in hot soapy water. Now you can re-plant. I would spray the plants with Neem oil at least every 7-10 days. Once this infestation is over with, I would still as a preventive measure spray them once a month and lightly spray the top part of the soil as well. Hope this helps, best of luck- NJC...See More
fungus
7 years agolast modified: 7 years agolillivewire87
7 years agolast modified: 7 years agotete_a_tete
7 years agolillivewire87
7 years ago
Barrie, (Central PA, zone 6a)
7 years ago
Related Stories

GARDENING GUIDESTree Care: Common Tree Diseases and What to Do About Them
Learn to recognize trees that may be affected by diseases or pests so you can quickly take action
Full Story
Figure Out Your Art Style
Bemoaning bare walls but flummoxed by all the choices for art? Here's help deciding on a style
Full Story
HOUSEKEEPINGAnother Independence Day: When Kids Can Do Their Laundry
Set yourself free and give your child a valuable life skill at the same time
Full Story
MOST POPULAR9 Real Ways You Can Help After a House Fire
Suggestions from someone who lost her home to fire — and experienced the staggering generosity of community
Full Story
EVENTSDon't Throw Away Another Household Item Before Reading This
Repair Cafe events around the world enlist savvy volunteers to fix broken lamps, bicycles, electronics, small appliances, clothing and more
Full Story
HOUSEKEEPINGDon't Touch Another Stain Before You Read This
Even an innocent swipe with water may cause permanent damage. Here's what to know about how rugs and fabrics react
Full Story
REMODELING GUIDESAsk an Architect: How Can I Carve Out a New Room Without Adding On?
When it comes to creating extra room, a mezzanine or loft level can be your best friend
Full Story
LIFEYou Said It: ‘Put It Back’ If It Won’t Help Your House, and More Wisdom
Highlights from the week include stopping clutter from getting past the door, fall planting ideas and a grandfather’s gift of love
Full Story
STUDIOS AND WORKSHOPSYour Space Can Help You Get Down to Work. Here's How
Feed your creativity and reduce distractions with the right work surfaces, the right chair, and a good balance of sights and sounds
Full Story
LIFEYou Said It: ‘You Can Help Save the Bees’ and More Houzz Quotables
Design advice, inspiration and observations that struck a chord this week
Full StorySponsored
Labradors