


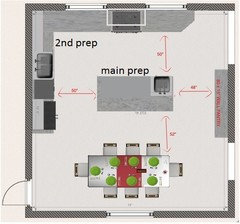
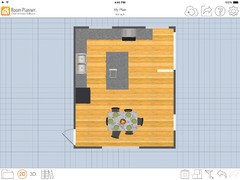
Final rendering! Layout help, please. Photo below.No home plate,yay!
Meris
8 years ago
Featured Answer
Comments (30)

Meris
8 years agolast modified: 8 years agoMeris
8 years agoRelated Discussions
Finally Posting My 'New' Layout
Comments (18)Wow HollySprings - tell me how you really feel. This design is a colloboration between me and the KD, not just the KD trying to make a showy kitchen. This is also after I have thought about, researched, read a lot on GW (on zone areas specifically), posted some intial layouts and gotten feedback and made some changes. Yes, I need to continue to tweak it and incorporate the feedback I am getting - like making the left side of the sink 18" and moving the MW (which I need to change anyway b/c of how much it sticks out it makes the counter top space underneath it almost unusable and that is suppose to be my baking area). I don't understand why you don't think someone can prep and someone else clean at the island at the same time? I did have a trash pullout in the island originally but moved it out so I would have more storage where I use it daily/need it. Instead, I incorporated 2 trash pullouts instead of just one (left of the cooktop, opposite the island and far left of the oven - but still close to the sink). I don't bake that much and I almost never do "sear and finish in the oven" dishes so yes the oven is far away but that was a compromise I was willing to make. I don't know where a "better" place for it would be. The door to the garage is actually going to be on the "other' side of the couch so right next to the mudroom-like lockers. Basically where it is in the as-built image below. We already have hook for coats there and use it regularly. What everyone is referring to as the Butler's pantry isn't that exactly. It is more of a bar area and will be used to store liquor, wine, tumblers and wine glasses - no dishes or silver. We need to have a place for this stuff and this is what worked so it was away from the action in the kitchen but you could still stand there and make a drink for someone who is sitting at the island or in the keeping room and converse with them while doing it. And, someday when the dining room is a DR again, it will work well to have the bar there. I realize it sounds like I am trying to defend myself and the design. That's not my intention as I am open to suggestions but I am trying to give the rational behind why things are currently designed the way they are. Here is the as-built with dimensions: Starting with a "clean slate" what would you do, to open the space and make the kitchen better for casual entertaining and a comfortable place for family and friends to hang out? Would it be helpful is a posted photos of the existing space? MtHouse - very interesting idea. The thing is it would work well to have the playroom at the back of the house, but I wouldn't want it there once it is a dining room again. It would be a waste of the view and windows to the backyard for a room that is rarely used as a DR. The other potential problem is the current playroom is right at the front of the house so I'm not sure I would want to make it into a mudroom. I hadn't thought of making the current breakfast room into the kitchen but I'll give it some thought. I wonder if it would be big enough......See MorePlease review 3 different finalized layout options
Comments (30)Oh rhome... thank you so much . That's awesome. The more I look at this, the more I like it. I'm really really starting to get excited that WE'VE come up with a layout. It just seems to fit the house, DH will not be adverse to it, I'll be able to afford to outfit it with any materials I want since I'm not asking for major plumbing moves, and it'll be a good working kitchen. My 2 biggest "wants" were a nice expanse of prep space by the cooktop and a bigger then 3' baking counter. With this I'll have both. Here's my layout tweaked. It's really just a 2D version of what rhome generously did for me. I think I'd rather have the prep space then the oven higher. Plus, I don't want to give up the pantry. I had thought about doing separate base/upper pantry so to maintain the counter space but I don't want pullouts or have to open and close different cabinets. I want a simple closet with shelves for the bigger pantry. The 24" next to the frig can be a cabinet. I thought I'd store cleaning and paper goods in the small one by the frig and food stuffs in the other. If the lower cab is an issue due to the oven door; I can always get a side opening oven like the Gaggeneau. (great excuse to get an awesome oven). I think supermom has a point that if one can go below a CT, then it can be in a 4" lower cab. I may also lower the cooktop cab. I had saved a pic about 3 years ago because I loved the look. Can't find the pic but I've seen it done and it should work great for a shrimp like me. It's sometimes uncomfortable when I use a large stock pot to make sauce or soups. So do you all think I've/we've got a winner here? OH.. I'm figuring I can do the sink run 30" deep....See MorePlease help with layout--it's like a jig saw puzzle.
Comments (32)I like the pantry swap. It is something I actually considered way back when - long runs of shallow shelves/cupboards are the best pantries in my opinion. And the kitchen feels so much roomier now. And it is another (42"!) work space to the right of the sink. Put the microwave under the counter in the 42" section, and it is a great snack spot with its proximity to the fridge and sink. And if the hutch is where your dishes go (which it should be with the dishwasher right there), that works very well for people grabbing dishes for their snacks without entering any primary prep/cooking areas too. However, I really preferred your last island configuration. In this new one, you have nearly no drawers at all in the kitchen, and the chair opposite the fridge is going to be a terrible point of congestion. A lot of room is needed in front of the fridge for the common situation where a person is standing in front of the fridge with the door open taking many minutes to decide what to eat. The depth of fridge door + the outstretched arm holding it + a body is usually enough to block or severely impede any walkway. The standards for walkway space needed if people are going to be passing behind a sitting person (just passing, not even the extra-depth-requiring-fridge-situation behind them) is 60". There is a similar walkway issue with the chair closest to the stove backing up to the pantry. I had thought it so clever when you had the two chairs in the island only and had bumped them to the right, so they could both back up against that big open doorway. That allows for tons if room for people to walk by and created such a natural place for the marble opposite the stove where it is handy to the ovens but won't be warmed by them. I really think you should go with that plan for the island. It just worked SO well. Also, a suggestion. Make the pantry only 12" deep (depth of an upper cabinet) from the wall, but inset all the stud bays inside the pantry for extra depth (what you were planning to do for can storage). That would make your actual pantry cupboard depth about 14-15" in most places, which is ideal (deeper than that, and stuff gets lost in the back), but it takes only 12" from that walkway. Then both the counter left of the stove and the width of the island can go back to being 36" without pinching the dining room doorway. That is more counter, more marble, and more storage (5.5' length of island x 6" extra width x 35" height = 8 cubic feet of more storage just in the island, plus 24" depth next to stove x 6" extra width x 35" height = almost 3 cubic feet more storage next to the stove not including the extra space you'd also gain in the upper cabinet). All without really sacrificing anything from the pantry. Lastly, I think you will find that the tall pine cabinet pinches the walkway too much, but that is a decision you can make when everything else is in place. And having the trash in the walkway still isn't my favorite plan. Maybe you can do a 12" trash pullout in that 12" base cab between the stove and sink that is just for the prep spaces to use and put another can where you wanted the tall pine cabinet to go for all other trash. Just make that can not so wide that it pinches the walkway by the island corner, and use the above the fridge cabinet for your tall vertical storage that you have wanted that 12" base for. Like this:...See MoreLayout:Finally an organized presentation - Please help make it fa
Comments (24)I'm sorry, I'd like to help you but your plans are difficult to read. Since you are planning on doing Ikea boxes, could you possibly use their planner to show the room dimensions and post the result here? That would help us to help you immensely! In the mean time, (this is all from looking at your renderings, not the diagrams, which I cannot see well enough) I would suggest getting rid of the tall shelves that block your view of the rear door. I would hope that door has some glass to it to let in light, and if not, consider replacing it with one that does. I would center the range between the two windows on the back wall as a focal point, and use cabinetry to the counter to the right of the second window to create a "hutch" type of storage. Put the sink on the peninsula, and again, place cabinetry on the wall on the left, facing outward towards the peninsula. Again, take it all the way to the counter in order to maximize storage. Maybe use glass to keep it less of a visual barrier. That could be your main dish storage area, and if you did an appliance garage under it instead of another cabinet, you could store your coffee maker and toaster there. I'd use a smaller sink, and that would leave the peninsula as the social center of your prep....See MoreMeris
8 years ago
Buehl
8 years agoMeris
8 years agodesertsteph
8 years agoMeris
8 years agoMeris
8 years ago
funkycamper
8 years agomathteachr
8 years agoMeris
8 years agoMeris
8 years agoMeris
8 years agoMeris
8 years ago


Related Stories
ORGANIZINGGet the Organizing Help You Need (Finally!)
Imagine having your closet whipped into shape by someone else. That’s the power of working with a pro
Full Story
SELLING YOUR HOUSE5 Savvy Fixes to Help Your Home Sell
Get the maximum return on your spruce-up dollars by putting your money in the areas buyers care most about
Full Story
MOST POPULAR7 Ways to Design Your Kitchen to Help You Lose Weight
In his new book, Slim by Design, eating-behavior expert Brian Wansink shows us how to get our kitchens working better
Full Story
SUMMER GARDENINGHouzz Call: Please Show Us Your Summer Garden!
Share pictures of your home and yard this summer — we’d love to feature them in an upcoming story
Full Story
BATHROOM WORKBOOKStandard Fixture Dimensions and Measurements for a Primary Bath
Create a luxe bathroom that functions well with these key measurements and layout tips
Full Story
Storage Help for Small Bedrooms: Beautiful Built-ins
Squeezed for space? Consider built-in cabinets, shelves and niches that hold all you need and look great too
Full Story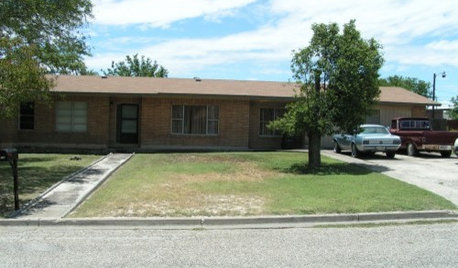

ORGANIZINGDo It for the Kids! A Few Routines Help a Home Run More Smoothly
Not a Naturally Organized person? These tips can help you tackle the onslaught of papers, meals, laundry — and even help you find your keys
Full Story
SELLING YOUR HOUSE10 Low-Cost Tweaks to Help Your Home Sell
Put these inexpensive but invaluable fixes on your to-do list before you put your home on the market
Full Story
UNIVERSAL DESIGNMy Houzz: Universal Design Helps an 8-Year-Old Feel at Home
An innovative sensory room, wide doors and hallways, and other thoughtful design moves make this Canadian home work for the whole family
Full Story


Buehl