


Announcing the "germination" of my "Miniature African Violet Tree
The project is not complete yet, but I think it has grown enough so you can at least see what I am trying to accomplish.
When I was growing orchids in a very small greenhouse, I was always searching for ways to pack just a few more plants into the existing room. One of the most effective ways I found was to hang little decorative chains from the rafters of the house, and hang orchid pots from these. I could usually get 4 or 5 pots in much less space than I would use putting the plants on the table.
When I came back to Gardenweb after a long, long absence, I began to develop an interest in African Violets, and especially miniatures. I no longer have a greenhouse, and in winter all the plants I want to keep must come inside. Adding a dozen or so AV's to this collection was going to be just about Impossible.
When I saw a couple of posts here about wick growing miniatures in plastic cups and canning jars, I saw the light! One of the major obstacles to hanging pots inside was the uncontrollable drip problem when you water. These wick systems had eliminated this problem, and I saw a way to grow my violets inside...lots of violets inside.....well, at least a good many...for me, anyway.
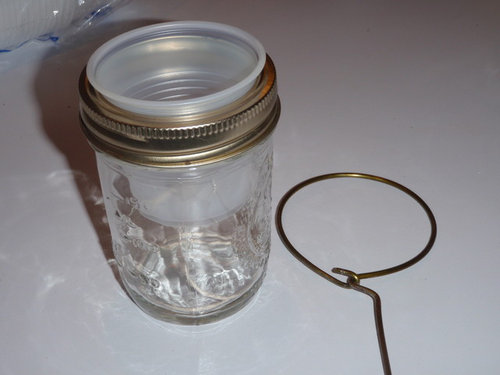
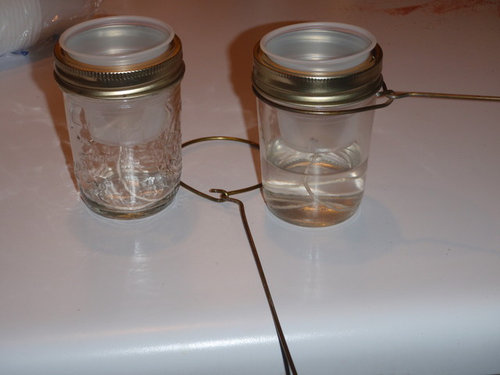
We had a few tapered canning jars (about 6 oz. I think) around the house so I chose these as the outer containers for the little project I was thinking of. The tapered sides are important, for if you use the jars with sides larger than the necks, you will not be able to remove them easily once they are mounted. The tapered jars slip right out of the rings and can be carried to the sink for refills. They can also be removed and used as decorations around the house, and moved to different locations on the tree. Very versatile.
Old frugal (cheap) me slipped a few wire coat hangers from our closets, and proceeded to wrap the wire around the neck of my jars, and making a hook to secure the loop of wire. I left
enough wire sticking out to go through my choice of a "tree" and fasten on the opposite side in a way that would prevent the loop from turning in the hole.
Below is one jar with the wire ring that will hold it on the tree.
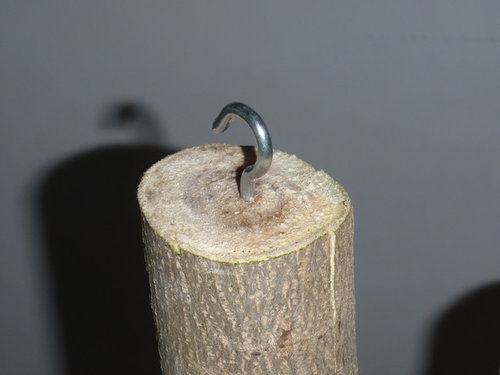
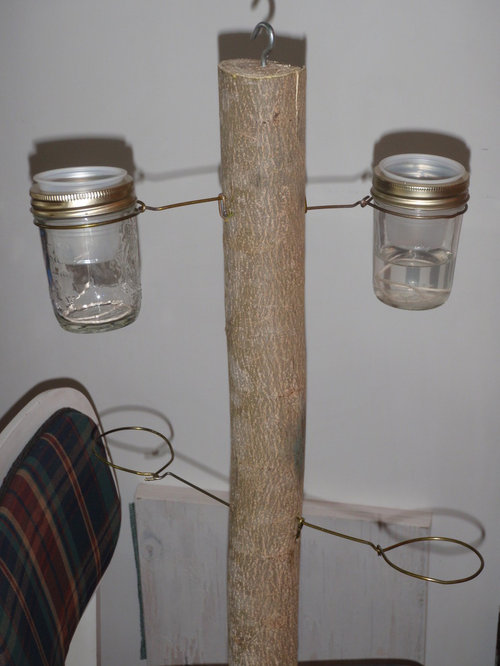
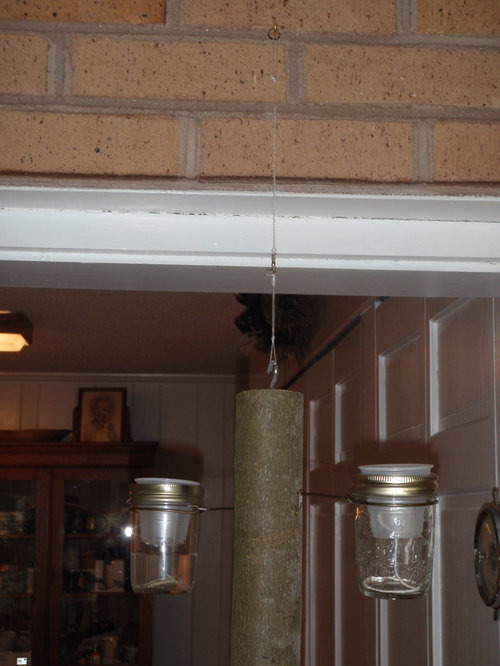
I next chose the tree trunk...A piece of a Mimosa tree that had taken up residence between our house and a neighbor's. I needed that tree to be gone anyway, and there just happened to be a limb that was a bit over 2" in diameter, and straight for about 4 feet. Once that was cut, I screwed a large hook in one end of it, brought it inside and proceeded to drill holes in it.
I decided to be a bit fancy and mount my holders in a spiral around the trunk, so had to do a bit of figuring with a ruler, but I did manage to place holes for 10 jars around the trunk. here is still room to mount at least six or eight more, but that will come later.
I used a Dremel tool to drill my holes through the wood. For a bit I used a piece of the clothes hanger wire that the jar holders were made from. (it cut exactly the right sized hole) You have to be a bit careful with this, but I cut a piece of the straight wire a good bit longer than needed to get through the wood, and cut one end of the wire at a sharp angle with the pliers. Cutting the wire like this leaves a sharp point on the wire and two sharp sides to cut through the wood. I carefully started the hole in slow speed, then went to high and zipped right through the wood, smoking and steaming...It does generate a lot of heat. If you are drilling a lot of holes and your drill gets dull just snip off a short piece of the end and keep going.
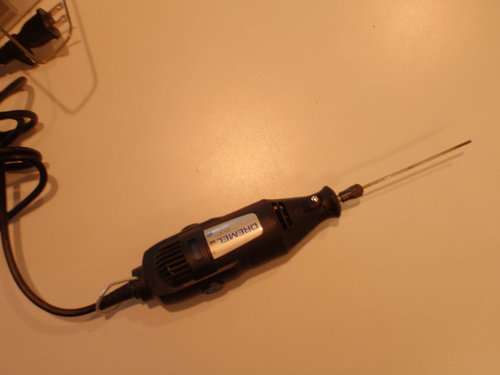
Dremel with wire drill bit.
I chose to mount holders on opposite sides of the trunk, and if you look closely, you will see that one of the holders is slightly higher than the other. The reason for doing this is so that I could use the end of the wire sticking out of the trunk from the opposite holder to wrap around the wire from the other holder to keep them from turning in their mounting holes.
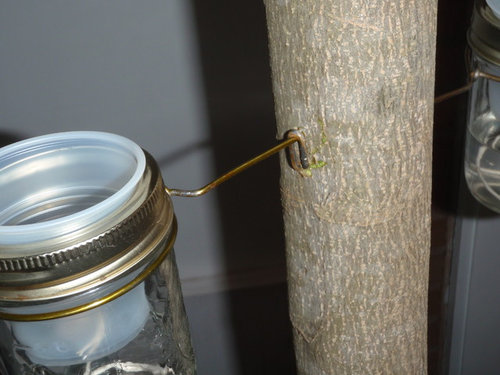
Note how jar holder from the opposite side is locked around the other holders wire to prevent the holders from turning.
To hang my tree, I platted four strands of 30# monofilament fishing line. There is a loop at both ends and a double eyed fishing swivel mounted in the middle, hopefully the swivel will allow me to spin the entire thing to access plants, and also perhaps reduce the inevitable spinning that almost everything hanging does at one time or another.
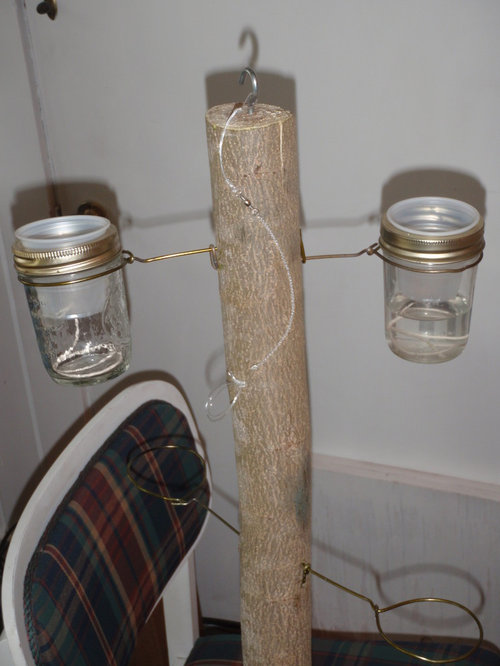
Hanger cord with swivel in middle.
These things can be made as fancy or as simple as you choose. 2X4, or 1X1 pine or cedar lumber would work as well, but I would suggest as soft wood as possible to make drilling easier and not quite as dangerous.
I'm looking forward to getting my first plants soon and beginning to fill my tree with something pretty instead of just jars and wire sticking out of a log.
And for all of you who thought AV's didn't grow as trees...well, I guess you may have to rethink that one.
It was/is a fun project, and a good way to put lots more plants into a small space....now that that pesky drip problem has been solved. And by the way, thank you to whoever thought of that.
Bill


frankielynnsie
User
Related Discussions
Micro mini violets
Q
African Violets in Terrarium?
Q
Species violet...
Q
Growing African Violets Outdoors.
Q
BillOriginal Author
BillOriginal Author
dbarron
BillOriginal Author
dbarron
Karin
jujujojo_gw
Rosie1949
fortyseven_gw
BillOriginal Author
dbarron
fortyseven_gw