


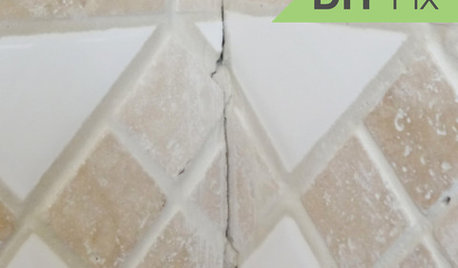
Kitchen Tile Repairs
Joseph Corlett, LLC
9 years ago
Related Stories
BATHROOM TILEQuick Fix: Repair Cracked Bathroom Grout
Banish an eyesore and safeguard your bathroom from water damage in 30 minutes or less with this DIY repair
Full Story
KITCHEN COUNTERTOPSKitchen Counters: Tile, the Choice for Affordable Durability
DIYers and budget-minded remodelers often look to this countertop material, which can last for decades with the right maintenance
Full Story
KITCHEN DESIGN10 Gorgeous Backsplash Alternatives to Subway Tile
Artistic installations, back-painted glass and pivoting windows prove there are backsplash possibilities beyond the platform
Full Story
KITCHEN DESIGNKitchen of the Week: Tile Sets the Tone in a Modern Farmhouse Kitchen
A boldly graphic wall and soft blue cabinets create a colorful focal point in this spacious new Washington, D.C.-area kitchen
Full Story
KITCHEN DESIGNCloser Look: Faux Ombre Kitchen Tile
See how this green-apple colored backsplash gets its extra shine
Full Story
KITCHEN DESIGNKitchen of the Week: An 'Aha' Tile Moment in San Francisco
Design inspiration sometimes strikes in the place you'd least expect
Full Story
KITCHEN DESIGNKitchen of the Week: Turquoise Tile and a Dining Nook for 16
Entertaining is a piece of cake in this remodeled beauty with an extra-large stove and seating for a crowd
Full Story
REMODELING GUIDES10 Tile Patterns to Showcase Your Floor
There's more to a tile floor than the tile itself; how you lay out your tile can change the look and feel of the room
Full Story
DECORATING GUIDES7 Design Rules and Why You Should Break Them
Think tile is only for kitchens and bathrooms? Art should hang at eye level? Time to consider breaking these old rules
Full Story
KITCHEN DESIGN8 Top Tile Types for Your Kitchen Backsplash
Backsplash designs don't have to be set in stone; glass, mirror and mosaic tiles can create kitchen beauty in a range of styles
Full Story

rantontoo
Joseph Corlett, LLCOriginal Author
Related Discussions
Tile repair help...missing underlayment
Q
Trying to repair kitchen table legs
Q
repairing ceiling tiles that are loosened & dropping
Q
kitchen remodel: cabinets hung before drywall repair
Q
caseykees
jerzeegirl
SparklingWater
Shelley Graham
Joseph Corlett, LLCOriginal Author