


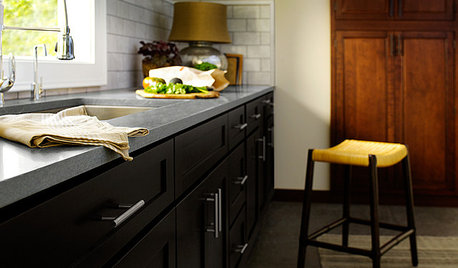
Finished Kitchen - torquay, espresso cabs
modern_mom35
11 years ago


Featured Answer
Sort by:Oldest
Comments (62)

badgergal
11 years agolast modified: 9 years agoLiz
11 years agolast modified: 9 years agoRelated Discussions
White Cabs, Espresso Island, Bianco Antico - Lots of Pics!
Comments (24)Wow what a beautiful kitchen! I love the granite, the hood, and the windows flanking the stovetop. Can you explain how you got such a great deal on the hood? I'm so glad I stumbled across this post because I'm looking to use the exact same Aspen light from Circa Lighting for our master bedroom! We're going for a craftsman feel and the iron finish would work well with the iron handles on our dresser. My only concern is that there is no diffuser on the bottom which might might be too bright when we're laying in bed. The light isn't over the bed but centered off the end of the of the bed a few feet away. What is the wattage of the lights you have in there for those pictures? Do you think that fixture would work well in a bedroom?...See MoreHelp me remember - who stained their kitchen cabs darker with gel
Comments (7)I found the link under RE: Best Advice Recieved on This forum. Near the very end, also another DIY gel stain person was linked. Csquared, I got an email I think was from you, but it said I couldn't answer because your email is private. Ditto when I tried to email through your name here. With apologies for the length of this, I'm just gonna paste the whole bit here for you. You are welcome to this writeup I did a while back. A couple people tried it and reported all went well. You just need time, maybe $50 in supplies, and patience. No skill. Here's more than you need to know: My cabinets are frameless, good condition and good layout. But the finish had gone orange and ugly, with the oak graining too busy for me. Cabinets are 18 years old, very poorly finished oak veneered slab doors. Plain with no crevices. They didn't even take the doors off to finish them!!! No stain or finish on the hinge side edges. Cheezey, huh? I looked into changing out cabinets, but that was way too much money, since my layout was OK. Painting didn't seem right because the doors were plain slabs. I considered new doors but that still meant a lot of money. For a few years I tried to figure a way to add molding toward a mission look, but the rounded door edges made that impossible. Then trolling in a kitchen emporium showroom this last year I noticed dark wood slab doors, kind like mine, but darker. That was the answer. First I tried Minwax Polyshades. Dicey product. Hard to brush on neatly, then gummy, then seemed to leave a sticky tacky residue. I did a thread on the Woodworking Furum "Evil Polyshades to the Rescue" which elicited a lot of conflicting "expert" opinions and arguments that one must strip to bare wood. (Thread may still be around as that Forum moves slow.) I properly stripped acres of woodwork in an old Victorian when I was young and stupid. Never again! Jennifer-in-clyde (in the same boat) and I stumbled around on that woodworking thread to get to this method. SHOPPING LIST: -electric screwdriver or screw drill bits -mineral spirits to clean the years of gunk off the cabinet -miracle cloths (optional) -fine sandpaper -box-o-disposable gloves from walgreens or the like -old socks or rags for wiping on coats -disposable small plastic bowls or plates, and plastic spoons or forks for stirring/dipping (optional) -General Finishes water base Expresso stain (pretty thick, but not quite a gel) This one may not even be a needed step if the Java gets it dark enough. -General Finishes Java gel stain (poly based) -General Finishes clear top coat (poly based) -old sheets or plastic sheeting or newspaper Rockler woodworking stores are a good place to find the General Finish products. Or some larger hardware stores. Quart of each was more than enough for my 60 doors and drawer fronts and goes for $12-14 at Rockler. There are smaller sizes if your project is small. SETUP AND PLANNING: You will need a place to work and leave wet doors to dry overnight - I set up 2 spaces, garagefor sanding/cleaning and basement for staining/sealing. Use newpaper or plastic to protect the surface and floor. Figure out how you will prop doors to dry. Plan blocks of 20-30-minutes for sanding/cleaning bundles of, say, 6 doors at a time. Then just 10 minute sessions to wipe on coats. The coats will need to dry for about 24 hours, so figure that each section of the kitchen will be doorless for 4 or 5 days. Divide the job up into manageable chunks. PREPARATION: Take off doors and drawer fronts. Use screw drill bits on an electric drill if you don't have an electric srewdriver. Remove all the hardware. *Mark alike things so you know what goes back where.* Clean the doors thoroughly. Not with TSP but with something pretty strong and scrub well. There's years of grease there. Sand LIGHTLY, just a scuffing really. Just enough to break the finish and give it some tooth, no more than a minute a door. A miracle cloth is good for getting most of the dust off. Then wipe well with mineral spirits to clean and get the last of the gunk off. . STAINING: In order, we're gonna put on: -General Finishes Expresso water based stain (1-2 coats) - optional -General Finishes Java gel stain (couple coats) -General Finishes Clear urethene gel topcoat in satin (couple coats) But first put on work clothes, tie up your hair (Tom, you may skip this step, LOL) and pop your phone into a baggie nearby (you know it will ring). Glove up. *First do a trial on the back of a door and check if Java coats alone suffice. If the Java alone is to your liking, just skip the Expresso and return it.* Open and stir up the Expresso stain, then spoon some into a plastic bowl. Close the tin so it doesn't get contaminated. Slide a sock over your hand, grab a gob of Expresso and smear it on. Wipe off the excess. Let it dry well - overnight is good. It will lighten as it dries, but then darken again with any other coat or sealer. A second coat can end up with a deeper tone at the end - though it might seem like the second coat is just dissolving the first. YMMV. Repeat with Java gel. This is thicker and poly based (*not water cleanup!*= messier). Color is a rich dark reddish brown. Wait for the second coat to judge if the color is deep enough for you. I wanted a very deep dark color, like melted dark chocolate. So I went pretty heavy on these layers. *I did not sand between coats*. Repeat with clear gel top coat. This will give you the strength you need in a kitchen. Do the same process with the cabinet sides, face and toekick area. Might need to divide that up also, and stagger the work: doors/cabinets/doors/ etc. NOTE: The cloth or socks used for the gels are very flammable! Collect and store them in a bucket of water as you go and then dispose of them all properly. FINISHING AND REASSEMBLY: I suggest you put the doors back up after one clear coat, then you can check everything over and darken an area with more Java if needed, followed by a clear coat. When it all looks right, go over it all again with another clear gel coat. Or two. Install your hardware. The feel of the finish should be wonderful, really smooth and satiny. Color deep and rich - way nicer than that faded, beat 80's oak color. FINAL THOUGHTS: Definitely experiment first with the back of a door or drawer front to be sure it is the look you want. Yes, this takes a couple days to coat, dry, recoat, dry, etc but you may discover that the Java alone does the trick and this will save you A LOT of work. Front end patience is worth it. This is a pretty easy project to do. Hard to screw it up. The worst is the prep - relative to that, smearing on the coats is cake. I had over 60 pieces (big kitchen) AND island sides and book shelves, etc and I admit I lost steam partway through. Had to push myself through the last of it. But it was worth it. Folks think I got all new cabinets - it looks that good. Now the finish will not be as durable as factory finish - go at it with a Brillo pad and you WILL abrade it. But it has held up pretty well. And after a year of pretty heavy use, I've just had a few nicks, easily repaired. I added smashing hardware, raised my passthrough, resurfaced the Corian (also simple but messy and tedious) and replaced the DW and sink. It looks gorgeous to me and I really enjoy the space - how it sits all quiet, clean and serene, then gets all crazy with the food and folks du jour. I couldn't be happier, especially that I didn't have to work another year just to pay for the update!! Link to cabinets in progress: http://photobucket.com/albums/b45/celticm00n/kitchen%20cosmetic%20update%20project/kitchen%20during/ Link to almost finished cabinet pix: http://s16.photobucket.com/albums/b45/celticm00n/kitchen%20cosmetic%20update%20project/finished%20bit%20by%20bit/?start=20 Good luck with your project!! Feel free to ask me any questions as you go. And let me know if you try it and how it turns out....See MoreCoordinating counters with mid-range cab finishes
Comments (20)We are using quarter-sawn oak in a medium finish with white oak floors with a natural finish and a light counter. That River White is great! I also am drawn to the quartzites that look like marble (we could never maintain it in our busy family). Very much like that gorgeous bathroom vanity. Carol - what flooring is under that cardboard? Do post pics! These cabs are lyptus ($$) but this granite is pretty (Venetian gold?) [Craftsman Kitchen[(https://www.houzz.com/photos/craftsman-kitchen-ideas-phbr1-bp~t_709~s_2116) by Columbus Architects & Designers Andrew Melaragno...See MorePlease: pics of your granite with espresso cabs!
Comments (3)I feel your exhaustion. I can't get good pictures with my cell. It just causes glare. However, I have Shaker espresso maple cabs in my MBR and used Emperdor Dark in mine, with chrome (shiney silver) fixtures. My sinks are very light/white cream. I love my bathroom. The floor is a tile with lighter and darker browns in it, but my dark oak flooring is very visible from the bathroom area. I think it's beautiful. Don't dispair. There's also a lighter Emperdor (I'm not sure I'm spelling that right.). This is marble, so you'll have to go through all the hoo-ha about whether or not you should/shouldn't put marble in a kitchen. However, it remains your choice. There's also no reason you couldn't put a butcher block counter top in there, and before it's sealed, rub very, very watered cream or white paint into it and wipe it off immediately. Then seal. It would give you a beautiful wash and a lighter look. This would probably help your costs immensely in your not-forever home....See More
ck_squared
11 years agolast modified: 9 years agocardamon
11 years agolast modified: 9 years agoJoga
11 years agolast modified: 9 years agoTxMarti
11 years agolast modified: 9 years agojaynees
11 years agolast modified: 9 years agoselphydeg
11 years agolast modified: 9 years agocottonpenny
11 years agolast modified: 9 years agobeekeeperswife
11 years agolast modified: 9 years agotaggie
11 years agolast modified: 9 years agoyoungdeb
11 years agolast modified: 9 years ago
a2gemini
11 years agolast modified: 9 years agomodern_mom35
11 years agolast modified: 9 years agogo_figure01
11 years agolast modified: 9 years agomodern_mom35
11 years agolast modified: 9 years agolalithar
11 years agolast modified: 9 years agoSherriode
11 years agolast modified: 9 years agorosylady
11 years agolast modified: 9 years ago
enduring
11 years agolast modified: 9 years ago
ILoveRed
11 years agolast modified: 9 years agoMarinaGal
11 years agolast modified: 9 years agococo4444
11 years agolast modified: 9 years agoOlney
11 years agolast modified: 9 years agoUser
11 years agolast modified: 9 years ago
poohpup
11 years agolast modified: 9 years ago
Linda
11 years agolast modified: 9 years agoheidia
11 years agolast modified: 9 years agocj47
11 years agolast modified: 9 years ago
motherof3sons
11 years agolast modified: 9 years agorhome410
11 years agolast modified: 9 years agoa2gemini
11 years agolast modified: 9 years agopps7
11 years agolast modified: 9 years agoandreak100
11 years agolast modified: 9 years agohuango
11 years agolast modified: 9 years agocolorfast
11 years agolast modified: 9 years agodeedles
11 years agolast modified: 9 years ago
teeda
11 years agolast modified: 9 years agoMGDawg
11 years agolast modified: 9 years agoUser
11 years agolast modified: 9 years agodrybean
11 years agolast modified: 9 years agoao34
11 years agolast modified: 9 years agomodern_mom35
11 years agolast modified: 9 years agoppbenn
11 years agolast modified: 9 years agomodern_mom35
11 years agolast modified: 9 years agomamasheshe
11 years agolast modified: 9 years ago PRO
PROEpiarch Designs
11 years agolast modified: 9 years ago
dejongdreamhouse
11 years agolast modified: 9 years ago
Kelly Kay
3 years ago

Related Stories
KITCHEN DESIGNAre You Ready for a Dark and Sophisticated Kitchen?
Black kitchen cabinets have a rich, timeless look. Get ideas for your next cabs — and how to paint the ones you have
Full Story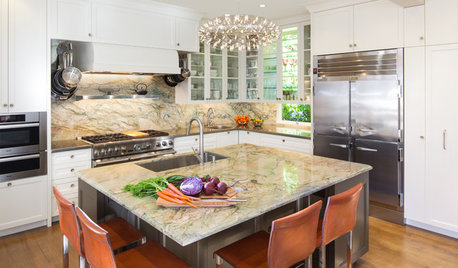
KITCHEN DESIGNKitchen of the Week: Elegant Updates for a Serious Cook
High-end appliances and finishes, and a more open layout, give a home chef in California everything she needs
Full Story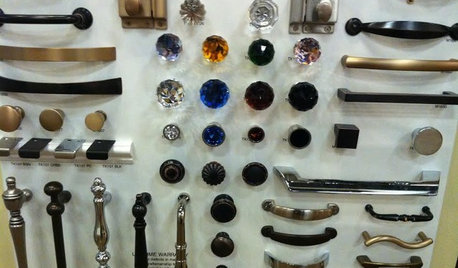
KITCHEN DESIGNGet a Grip on Kitchen Cabinets With the Right Knobs and Pulls
Here's how to pair the right style, type and finish of cabinet hardware with your kitchen style
Full Story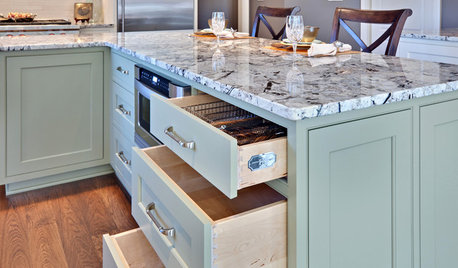
KITCHEN DESIGNWhat Goes With Granite Counters?
Coordinate your kitchen finishes beautifully by choosing colors that complement granite’s natural tones
Full Story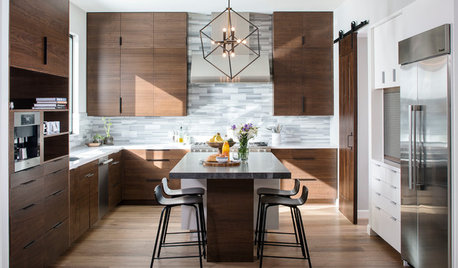
KITCHEN DESIGNNew This Week: Moody Kitchens to Make You Rethink All-White
Not into the all-white fascination? Look to these kitchens for a glimpse of the dark side
Full Story
MOST POPULAR8 Great Kitchen Cabinet Color Palettes
Make your kitchen uniquely yours with painted cabinetry. Here's how (and what) to paint them
Full Story
KITCHEN DESIGNCountertop and Backsplash: Making the Perfect Match
Zero in on a kitchen combo you'll love with these strategies and great countertop-backsplash mixes for inspiration
Full Story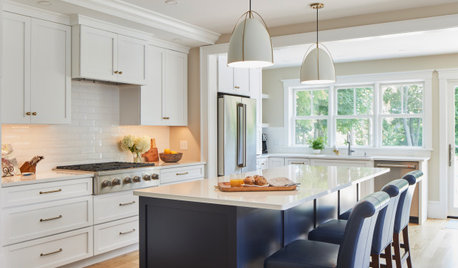
KITCHEN DESIGNPopular Cabinet Door Styles for Kitchens of All Kinds
Let our mini guide help you choose the right kitchen door style
Full Story
HOMES AROUND THE WORLDThe Kitchen of Tomorrow Is Already Here
A new Houzz survey reveals global kitchen trends with staying power
Full Story
KITCHEN DESIGNKitchen of the Week: Barn Wood and a Better Layout in an 1800s Georgian
A detailed renovation creates a rustic and warm Pennsylvania kitchen with personality and great flow
Full Story


ck_squared