


Those who have DIY'ed -- Would you do it again?
uncledave_ct
14 years ago
Featured Answer
Sort by:Oldest
Comments (17)

funyellow
14 years agolast modified: 9 years agoRelated Discussions
If you have composite decking, would you do it again??
Comments (4)We have a Monarch Composite with EB-TY concealed fasteners. It replaces our 30 year old clear, old growth, Redwood deck. (80% of which was still in good enough shape to sell for re-use!!!) So far, so good. Termites are no longer a problem....See Moredid you tile your subway tile backspash? would you do it again?
Comments (22)Ok - another tip - clean up the grout lines the next day if you use thinset to set the tiles. It takes several days for the mortor to fully cure, and it will be quite soft and crumbly the day after - makes cleaning any high spots out of the grout lines rather simple. If you wait several days, it will harden (like cement should) and it will be very difficult to remove. I spent about 30 mn this morning carefully going over the grout lines in my one wall (I have learned to be anal about this so I don't have "spots" when I grout) - I normally end up ruining a fingernail or two in the process but that is normal for me. BTW - here is what I got done yesterday. I mixed up too much thinset the first time, I forgot I was dealing with a small wall area and not a big floor! it looks a lot better after I took down the spacers and cleaned it all up. I had one "sliver" I had to cut for up by the range hood, it was 1/4" wide by 2" long, and the tile saw handled it fine. Ceramic is so much easier to deal with than porceline as it's softer and does not crack as easy when cutting. I used the rotozip for any "U" shaped cuts around the outlets and the tile saw for everything else. Here is an "in process" picture I had boards cut for the area needed for the border. By using them I could get my tile edges very straight - just make sure you don't accidentally cement the boards to the wall. This is what I got done the first "batch" and then I fitted and cut the rest of the perimeter tiles (they are laying on the coutner in this picture - ready to install). I put the border in after all the rest of the tiles were set. Here is my mixing setup. I use our smaller hammer drill (but not hammer mode) and a five gallon bucket so things don't splash. I have a scale (it's a fish scale, I'm not using a good kitchen one on this) to measure the powder and measuring cup for the water. Add the water to the bucket and carefull add the powder - if you simply dump it in, you'll get a plume of cement dust! And I have a timer - you mix for five minutes, wait for ten and mix for two and then use. one wall down - one to go! Now, we'll see if the resident experts come on here and rip me a new one for all the things I've done wrong. I think I'm learning why people rarely show "in progress" pictures on this forum. I'm showing the way I did things, I am not saying that I think this way is the only way to do it....See MoreMarmoleum - Who has it, who loves it, and would you do it again?
Comments (267)Sometimes an old thread like this one can very interesting, so - I installed Marmoleum click in my kitchen 10 years ago. Verdict: very disappointing and now I'm looking to replace it. I loved the original color and the way it felt underfoot, but in so many ways it has been subpar. It stains so easily - I have a permanent dark circle from a pet food dish that had a black rubber ring underneath it, and that happened in a very brief time period. That's only one of several stains. The seams between tiles are lifting and puckering. The floor has faded in color very unevenly. It looks like it came from two different color batches, which it didn't when new. And, as several people have commented, it dents easily. Time for something else!...See MoreHow many times have you remodeled? Would you do it again?
Comments (22)I remember after renovating my kitchen and bathrooms the first time, I had acquired all this knowledge and skill and felt that I should use it. It seemed so pointless to have gone thru and learned so much to get it done, to just throw that away. So I totally get that you are still keen to do another one. We had a house fire and ended up redoing everything (hard but fun). I got to fix everything I wished I'd done differently (I'd recommend the site finished hardwoods), but now I'm totally burnt out and am happy to live with what we have. It sounds like you still have the energy. If you get it at a reasonable price, I'd do it....See Moresweeby
14 years agolast modified: 9 years agoguppy_2009
14 years agolast modified: 9 years agomacybaby
14 years agolast modified: 9 years agouncledave_ct
14 years agolast modified: 9 years agoccoombs1
14 years agolast modified: 9 years ago
weedyacres
14 years agolast modified: 9 years agostudio460
14 years agolast modified: 9 years agotiskers
14 years agolast modified: 9 years agostudio460
14 years agolast modified: 9 years ago
Stacey Collins
14 years agolast modified: 9 years agostudio460
14 years agolast modified: 9 years agoasheavenue
14 years agolast modified: 9 years agostudio460
14 years agolast modified: 9 years agojakabedy
14 years agolast modified: 9 years agomelisande
14 years agolast modified: 9 years ago
Related Stories
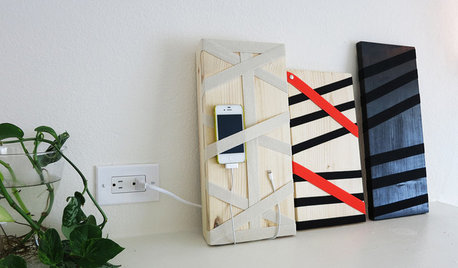
DIY PROJECTSHide All Those Wires in a DIY Charging Station
Keep your gadgets handy and charged with a flexible storage board you can design yourself
Full Story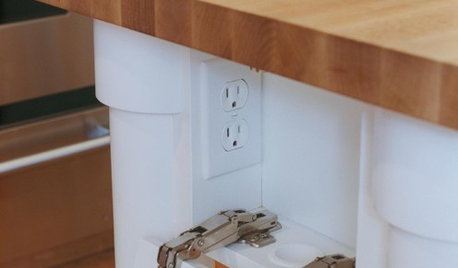
KITCHEN DESIGNHow to Hide Those Plugs and Switches
5 ways to camouflage your outlets — or just make them disappear
Full Story
HOUSEKEEPINGGet Those Carpet Stains Out: Best Nontoxic Methods for Spot Cleaning
Banish blotches the safe way with pantry staples, to get your rugs looking as clean as the day they came home
Full Story
ORGANIZINGStorage Tricks for Those Who Love Their Stuff
Get ideas for clearing the decks without getting rid of all the lovely things you want to keep around
Full Story
MOST POPULARHow to Get Rid of Those Pesky Summer Fruit Flies
Learn what fruit flies are, how to prevent them and how to get rid of them in your home
Full Story
DECORATING GUIDESFix Those 'Whoopsies': 9 Fast Solutions for Decorating Mistakes
Don't suffer in silence over a paint, furniture or rug snafu — these affordable workarounds can help
Full Story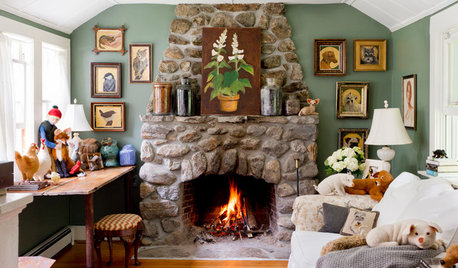
HOUSEKEEPINGBefore You Roast Those Chestnuts, Make Sure You've Got a Clean Chimney
Here's how to ensure your chimney is safe for holiday gatherings by the fire
Full Story
DECORATING GUIDESKnot Again! Macrame Is Back
It's happened. A craft that typified 1970s style (the owls, the spider plants!) is back, but better
Full Story
REMODELING GUIDES11 Reasons to Love Wall-to-Wall Carpeting Again
Is it time to kick the hard stuff? Your feet, wallet and downstairs neighbors may be nodding
Full Story
TRADITIONAL STYLEFarmhouse Style: Windmill Power Comes Around Again
Windmills helped win the West. Today these hardworking features are still winning our hearts
Full Story

saskgal