


Review of Lee Valley blind corner unit...
doggonegardener
13 years ago
Featured Answer
Sort by:Oldest
Comments (8)

ae2ga
13 years agodoggonegardener
13 years agoRelated Discussions
Review of Lee Valley Seed Starting Kit
Comments (2)They do look like a nice set-up. Too bad they are so expensive and only do 24 plants. Sounds like you good a really good deal on so many of them. ;) Dave...See Moreblind corner unit by Lee Valley Tools
Comments (5)I also cannot say enough good things about Lee Valley. Only problem is that they are so popular, that shopping there in person (I'm lucky enough to live close to an outlet) can involve a long wait in line. I had a problem with a slide-out pantry unit, being 'jerky', so they sent me new sliders. I was able to replace them myself (pats self on back). Works like a charm now, and price was a small percentage of what other similar units cost....See MoreDoes anyone have Lee Valley Kitchen Pantry Hardware Unit?
Comments (3)I have the Lee Valley pullout pantry next to my Twins freezer/fridge unit. I know that you are looking at the larger unit but I wanted to tell you that after using the unit for 6 yrs I am still very pleased with the quality . The customer service at Lee Valley was very helpful when we 1st got the unit and had questions about install. I have a lot of very heavy cans etc in my pullout , It pulls out well and the items stay in place. So at least you have a review of one of their products. c...See MoreWay cool Lee Valley organizers: way too much?
Comments (29)lowspark--OT, but can you tell me what your counters are? They're lovely. Thanks! Sorry I'm just now answering this! But thank you!! They are Paradiso granite. I love them! A question for those of you who constructed a sleeve of wood around the perimeter of the box for the Lee Valley channels to attach to -- is that sleeve made of the same 1/4" lathe material? How did you make it come together, just glue it at the ends? It doesn't need to be held together. Everything just slips into the drawer and interconnects and fits. It's just a frame made from the wood strips. The LV brackets are pounded into those strips just the same as they are pounded into the divider strips in the middle of the drawer. As long as you measure and cut everything to fit, you don't need glue or any other kind of attachment. Did you make it or did your cabinet guy. Does this have a bottom or only the sides? I made it all. And I'm generally NOT handy. No bottom, just sides. So, what I did was put all my utensils in the drawer as I wanted them to be laid out. Then I measured everything and drew myself a picture. Measure the inside perimiter of the drawer. Measure how long each divider should be. Then I diagram this on paper, noting the length of each divider and the location of each bracket on the diagram. Note when measuring: keep in mind that the bracket itself has some thickness. So if you are going to nail a bracket into one strip of wood and the opposite strip, and slip the third strip into those brackets, if the strips of wood are say, 5" apart, your connecting strip is not going to be 5". It'll be something more like 5-7/8". I don't remember exactly. So do an experiment with your first cut before doing all the permanent cuts. Measure, cut, then see how far apart the border strips are compared to how long the connecting strip is. That'll tell you how much shorter to make the strips than the actual width. Then I count up what to cut. Make a list: 2 14", 2 12", 6 5.5", etc. Like that. Then I cut. Then I sand. Then I lay all the strips in the drawer just to make sure they were cut right. It's sort of a manual process: hold this strip here and this strip there and make sure the third strip fits where it's supposed to. It's a confirmation I cut everything right before going on to the next step. Then I stain & lacqueur. Staining and lacqueuring is extra and optional but I wanted to give it all a finished look. Then I go back to my diagram and see where each bracket needs to be on each piece of wood and measure and mark the wood with pencil. Then I pound in each bracket using a rubber mallet. Then I begin placing each strip of wood in the drawer. Start with the frame which, if you measured and cut correctly, will slip right into the drawer, meeting at the corners. Then the strips which connect to the frame go in by just slipping them into the divider channels. Then the strips that go into those strips, etc. Till all the strips of wood are in, all the brackets are occupied. So for me, the process takes a couple of hours of work on the first day to measure, cut and sand. Then I lay out all the strips and do the staining and lacqueuring which spans over 4 days as I do side one, let it dry, then do the flip side each for stain and lacqueur. Once everything is dry on the fifth day, I put it together inside the drawer as described above. Like I said, I'm not generally handy. This was somewhat labor intensive by MY standards but not really hard. The hardest part was measuring and remeasuring to make sure everything was cut right. I used a jigsaw to cut the wood strips because they are thin and don't need a heavy duty saw. I did them over time. For each drawer, I set aside a day of a weekend for the main work then did the wet stuff over the week and installed on the following weekend. Took me about two months before all the drawers were done since I didn't do them all at the same time or even on consecutive weekends. I will say that I'm thrilled with the results and it was worth the effort! The whole frame lifts up and can be removed for easy cleaning Yes, and if at some point in the future, I decide to reconfigure it, the drawer itself is intact with no holes or damage. That was important to me so the frame was a requirement. I was not going to pound a bunch of holes into these drawers I'd just gotten through shelling out thousands of dollars for! LOL...See Morenatschultz
13 years agoae2ga
13 years agowritersblock (9b/10a)
13 years agodoggonegardener
13 years agoartemis78
13 years ago
Related Stories

LIFECould You Be a Landlord?
Sure, the extra income would be great. But jumping blindly into owning a rental property could be disastrous. Here's what you need to know
Full Story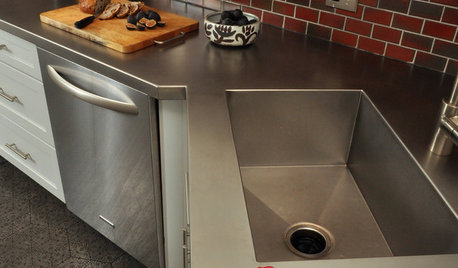
KITCHEN DESIGNKitchen Counters: Stainless Steel, the Chefs' Choice
Professional-grade strength and shining beauty unite in classic stainless steel countertops for the kitchen
Full Story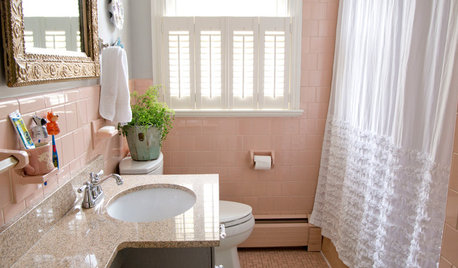
BATHROOM DESIGNHouzz Call: Have a Beautiful Small Bathroom? We Want to See It!
Corner sinks, floating vanities and tiny shelves — show us how you’ve made the most of a compact bathroom
Full Story
DECORATING GUIDESCalifornia Law: License to Practice Interior Design?
A proposed bill that would require a license to practice interior design in California has Houzzers talking. Where do you stand?
Full Story
MEDITERRANEAN STYLEHouzz Tour: A Modern Take on Southwest Style
A designer updates a classic adobe home with lighter furnishings, fresh finishes and complementary ethnic motifs
Full Story
MODERN ARCHITECTUREHouzz Tour: Stacking Up to a Modern Master in Kansas
A nearby Marcel Breuer house was the inspiration for this double-volume home, but it beautifully fits its time and place
Full Story
HOUZZ TOURSMy Houzz: Peeling Back Layers in a 1908 Home
Hidden fireplaces, buried hardwood and covered beadboard resurface thanks to a Mississippi couple's DIY efforts
Full Story
REMODELING GUIDESHow to Remodel Your Relationship While Remodeling Your Home
A new Houzz survey shows how couples cope with stress and make tough choices during building and decorating projects
Full Story
GREEN BUILDINGHow to Harvest Rainwater for Your Garden
Conserve a vital resource and save money by collecting stormwater for irrigation in a barrel or tank
Full Story
LIFECould Techies Get a Floating Home Near California?
International companies would catch a big business break, and the apartments could be cool. But what are the odds of success? Weigh in here
Full Story

writersblock (9b/10a)