SHOP PRODUCTS
Houzz Logo Print
little_country_gal

DIYer wakin up from winter What? We're not done yet?

little_country_gal
16 years ago

Yes I admit it, Ive seen too many cool pool pics not to have my own. We started this DIY vinyl in-ground pool project last summer. (Wow! Have we really been at it this long?) I posted the starting designs and proposed pics, and Ill link to that thread at the bottom. Thanks for all of the great advice from everyone!

Unfortunately, I kind of left that thread hanging. My bad. We ran into major problems with the supplier (after I had already pulled the permits), and were forced to go with a different supplier at the last minute, which sent us in a panic. We rescheduled the diggers for 6 weeks later and found a new supplier, pulled new permits in a whirlwind of chaos. Before it really sunk in, the diggers were here! Then the panels! Then the pump.

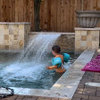
This is what it is supposed to look like when finished.

The dig was a huge undertaking which also included clearing trees and stepping the soil down to the pool on the upper side, and building it up on the lower side. We hired this out as it was just not possible with our shovel and chainsaws! (So far it is the only part that we have hired out!)


Then we set the panels ( I thought that we would never get them level!) But we finally bought a rotating laser level. During the daylight you could set it to just see the spot you were working on, but during the evening it worked fabulous! It could be set to spin and you could see the laser line just skimming the tops of all of the panels. Oh yeah! The pool was finally level.


So we poured the concrete bond around the back side of the panels, and moved some of the dirt around with a bobcat that we rented for the weekend. It felt soo good to have that done. Now the rain cant hurt it!

(Or so I thought!)

Then came the rain It came in the cracks between the panels and washed everthing out again!!!

So we worked as fast as we could to put the bottom in

And the deep end return plumbing

Concrete bottom

Sand and Portland cement on the side walls.

Then the shallow end cove.

{{gwi:2026374}}

Then finally the shallow end bottom..

We thought surely we were OK now.

Then it filled up with water everytime it rained It took days to pump out. Then it rained again

We finally measured for the liner. (What a job!!!) But by the time the liner got here it was Jan. 4th!!!!! Way too cold to do the install So we waited.

But we should have been plumbin.Ooops! Got that step backwards. We figured that we would drop the liner in as fast as we could, to keep the water out! Then plumb and backfill. Its winter, you cant run the pumps in the winter anyway. But thankfully we realized that this was not going to save us either. A friend pointed out that we were "Taking 2 steps forward and 1 backward" with the water. So last weekend we dug a trench around the upper part (where the retaining wall will eventually set and the permanent water diversion will be). We are also trying to get a french drain pipe that is in the bottom of the trench around the pool working better. (Did I mention that Im cant feel my arms anymore?) It rained Sunday night and no flood in the pool. It is supposed to rain hard Wednesday evening, and this will be the true test.

Our current plan is to prepare for backfill. Which is no small task, as the footers for the waterfalls and the small boulders around the pool edge have to be made. And then the plumbing ran behind the waterfall retaining wall.

We are currently working on a plan for the waterfall support. I posted a thread in the fall in regards to how to do this and got some wonderful advice. We are planning on constructing a 12 long curved block wall up against the pool wall. (but not leaning on it) It will sit on the concrete bond around the pool. Were going to bridge over the pool supports, so as not to transfer any weight of the waterfall to the pool. We are going to go to just below pool wall height, and then add a galvanized plate across the top of the blocks and extending over the pool to the coping strip. Then after liner installation and backfill, we are going to continue upwards 3 or 4 courses to use as a retaining wall and support for the upper waterfall and main spillstone. When I install the block coping (similar to brick, but grey in color), Im going to use rock for the coping under the waterfall, and extend it up to cover the block retaining wall. (Ive mortared rock before, and Im not too bad, its kind of fun!) The rock coping/retaining wall veneer will rest on the galvanized plate as well as the pool. A similar technique is used to veneer block walls with rock when the footer is not large enough to hold all of the rock. My intention is to transfer most of the weight back to the block wall. If anyone can think of a better way, please let me know. Ive read all the books and reference material that I can get my hands on. This is what I came up with, but I dont know if it will work.

As far at the plumbin goes, Im working on that too. Ill post a separate thread on it as more folks seem to have similar plumbin issues :) And it makes it easier to follow.

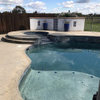
Now the pool bottom is a different story, OK a sad story! I hand tooled every piece of it myself. I wanted it perfect! And it was really close. My only real issue it that it took me 6 weeks, not 3 days as I had planned. Ive got cold joints everywhere! I did a good job with them, and I can live with it. But I grabbed anybody that would hold still long enough to run the mixer for me. Probably not the best idea in hind sight! Some of the sections are still great, but some now look like the surface of the moon! Im guessing that either the mixture was off, or they got dirt mixed in the sand. Or both! We found one small section that looks like it was 99 percent sand. I think they forgot the Portland entirely, and it just has what was left over in the mixer from the last batch! Combined with all of the water on it, and then the freezing temps in the winter, it just looks aweful!!!

Im trying to patch what I can, but some sections are soo bad that my husband busted them up with a sledge hammer. I just got sooo discouraged that I couldnt bring myself to work on it any more. So my husband tried to patch one section. Will somebody please take that trowel away from him!!!! Yikes!!! OK, Ill work on it! (I think Im going to have to bust his section up and redo it as it might even look worse!) Oh, and one section moves when you step on it! Whats up with that! Im thinking that it has water underneath it!

Any suggestions for the bottom? Right now I guess its pretty close to what you would get while doing a liner replacement. How do you guys fix it?

My plan is to work on plumbing and supports right now, let the bottom dry out a bit, then tool it the day (or 2) before I drop the liner in. Keep your fingers crossed.

As we pause momentarily to review our progress, are we glad we did this ourselves? Yes, as we will certainly get more for our money this way. But man what a job it has been!!! I cant wait to sit back and sip a cold one while soaking my aching back on the cozy cove jets, while the kids do spectacular cannon balls off of the Baja Spring Board!!! Oh well! Not just yet!

Comments (17)

  • snookums
    16 years ago
    last modified: 9 years ago

    Wow. I can't believe you did all that yourself!! Amazing!

    I do have to say, though, and you aren't going to like hearing this, is that I think you need to get a professional to repour the bottom or it will wind up costing you more money in the long run. Concrete isn't supposed to move when you step on it, and isn't supposed to be peeling like that.

  • tresw
    16 years ago
    last modified: 9 years ago

    Very impressive DIY project!

    Quote: "Im guessing that either the mixture was off, or they got dirt mixed in the sand. Or both! We found one small section that looks like it was 99 percent sand."

    This is likely why there are so many problems with the concrete. If it wasn't mixed properly and in the right percentages of cement, water and aggregate; then there is no telling what you have. Even with a DIY project it's probably well-advised to order the concrete from a batching plant. I'm not a vinyl pool expert and don't know how sound your substrate needs to be, but I would think that even with vinyl you would want to consider removing all the concrete and replacing it with good, sound product. If you can live with the pool being slightly less deep, you could put a sand cushion over what's there and pour a new reinforced slab over the top of it.

    Good luck!

  • Related Discussions

    I can't be the only one not done yet

    Q

    Comments (33)
    I've got the double whammy here. We got this prematurely frigid winter weather like a lot of you guys, plus I gimped up my ankle last week. I'm waiting for it to heal and the swelling to go down but it doesn't seem to be getting better, its been over a week now. I must have really strained it with all that back and forth walking around I frantically did in the garden before the front hit, savoring the last few days and digging up that Flame Acanthus didn't help. I also broke the shovel trying to get it out. The arctic front killed stuff back and now there's piles of green leaves everywhere along with fallen branches but there's plenty of dead looking green leaves still up in the trees so its just the beginning of the leaves. I guess its good that its so cold which helps force me to stay inside like a good patient and off the ankle. I look out the window and it appears overwhelmingly depressing looking out there at the moment, like a disaster in fact. Today is sunny and 50 degrees and I'm dying to get out there to start cleaning up the mess but I don't dare. I guess I will get it cleaned up finally but usually I do it in stages. I'm kind of pitted with this weather and the rest of it.
    ...See More

    Are we done yet?

    Q

    Comments (34)
    Make the best that you can of your surroundings. Sometimes it is easy, sometimes it is toooooo late. Sometimes we scratch our heads - - when , how, what tha, where. Gardening sure makes you think. Wish that I could plug into alabamaicole and many others at times to figures something out. An overall plan which I can not grasp. What goes with this, how big will this get, where is the best placement for this or that. Research is great, but I sure don't believe everything I read ......if someone from the GW has input into a problem that I am having trouble with ( thinking it out ).....I tend to go with the hands on person here....it is like having a hundred PLANT DOCTORS... helping solve or come up with a solution. Garden people who ReAlLy c-a-r-e are right here to keep frost off your plants, to prune, how to care for with years of experience. If my computer goes out, I will surly go bald.....er. As for "Are we done Yet?" Hot August nites are on there way. Alabama Power says "Thank You."
    ...See More

    Winter not done yet?

    Q

    Comments (20)
    Lee, I was joyful, to say the least, when I noticed a couple of days ago that the models were backing off on the cold weather predictions. How joyful was I? I promptly moved all my flats of seedlings out of the house and into the greenhouse. Then, I immediately sowed more seeds in more flats and filled up the light shelf again. If the weather turns cold again, I'm not carrying 15 flats of plants back indoors. I'll just put a space heater in the greenhouse and keep them warm through any sort of late cold spell, should one develop. I wish it was that easy to get the garden itself through a late cold spell. The prospect of a more active severe weather season isn't good, but let's face it----we live in the land of extremes here, so we're either having little rainfall and lots of drought issues, or we're having lots of rainfall accompanied by periods of severe weather. Or, half the state is in drought and the other half is flooding and drowning. Weather here is never dull but it keeps life, and gardening, interesting. Dawn
    ...See More

    Fed up with winter yet?

    Q

    Comments (23)
    MasLovesRoses, my soil is acidic. if yours is alkaline, you might not need the lime - delphiniums like alkaline-ish soil, or neutral anyway. I think it's well worth growing them, even if they won't be perennial, or perfect for that matter. I was in Alaska this past summer, and the delphiniums there are glorious - huge, tall as me, and they grow everywhere, even in vacant lots! Mine will never be like that, but those gorgeous blues and purples are like nothing else, and I love the graceful spike shapes - they always make me think of Debussy's "Sunken Cathedral" - the spires rising from the ocean. So beautiful! And just incredible with roses!
    ...See More
  • muddy_water
    16 years ago
    last modified: 9 years ago

    What a job!!!!do you want a job? Ok I think I would put a skim coat of vermiculite on the whole bottom of the pool (or just the bad areas) remove the dirt areas and replace with vermiculite. I drop my liners the same day the floor is put in so weather will not damage it. Since you have a water problem I would run a 4' drain pipe all the way around the pool and backfill with gravel to keep any water from getting under the liner once installed....For the plumbing stay away from flex pipe or you will have trouble later. I would really think about hiring the liner install also..The link below should help on the waterfalls.

  • little_country_gal
    Original Author
    16 years ago
    last modified: 9 years ago

    Thanks for your insight. However, the pics are a little tricky. The concrete is actually not peeling, it's just the dirt that has washed in and leaves that have blown in that make it look like it is peeling. (But I can see how you might have thought that it was from the pics!) I'm going to wash it down again this weekend (Gentle stream with the hose, brush it to the deep end with the push broom, and sump pump it all up, then shovel out the leftover muck!!) Not lookin' forward to it, but it must be done!

    And we can't alter the bottom depths either as the liner is sitting in my house already!

    These are the worst spots, for the most part, it's held up just fine! The coves are perfect, the ramp is perfect, the deep end sides is OK except for that one crack.

    I'm avoiding the local pros (sorry guys) as I tried to get them to build this pool from the start, and they just don't build this type of pool. I didn't want a rectangle. (Ok, that right there ruled out 3/4th of them from the start!) The slope is a bear! Everyone refused to deal with the waterfalls. (Nobody has them here, NOBODY!) They were going to leave them to me to figure out after the pool was installed. But that just won't work! I've already installed extra main drains to supply the waterfall pump, and I've got to set the footers before the backfill, not after the fact. I've just seen too many sloppy jobs. And I can't afford it in gunite. So, I'm not going back to them now. I'm a pretty good DIYer, from a long line of DIYers and so is my husband. Yeah, we make mistakes. But we fix 'em! When this pool is done it will be unlike anything else for hundreds of miles.

    I think that our troubles boil down to the water issue. Muddy: we did put a 4" corregated drain pipe around the pool from the beginning. However since it was laying on the concrete footer (which is relatively level) we didn't figure that it would work until we backfilled, so we didn't connect it out to the yard. (And not to mention where I wanted it to go, was under a big mound of dirt!!!) Well that was a dumb idea on our part!! Last week I found an alternate exit for that pipe, and me and the kids dug a huge ditch (4' deep x 10' long x shovel width) and fixed that one!!! My husband connected the corregated pipe to solid pipe and we tried to slope the corregated pipe slightly by compacting clay under it at the opposite end. We also made a "clay burm" between the pipe and the pool to direct the water toward the pipe. When we get the plumbing run, we'll fill on top of the pipe with gravel! Yeah! That should work!?!? So far, it's made it through 2 storms(along with the other big ditch), and it's working.

    We made a direct correlation to that crack in the deep end wall (last pic) and a dip in the ditch around the pool. I believe that it is because there is water building up under the concrete and forcing it's way out the wall (without the water in the pool to hold it back, it's the weakest point.) Also the one spot that the concrete is moving (second to last pic) in the corner is right near that water backup. I think that the water is also the culprit here as well. (By the way, my neighbors professionally installed pool has a much bigger section that moves too! And it's under the weight of all of that water.) So, both of those spots are slated to get the sledge hammer treatment! (Maybe I should let them dry out for a day or so before I patch 'em?)

    We already sledge hammered out the mostly sand part and patched it. It looks good!! I'm happy with it.

    tresw:
    The mixture can't be ordered from a batch plant and must be mixed on site. Even the pros do it that way. There is no aggregate in this mix. It's 7 parts sand to 1 part portland cement, and then enough water to get the proper consistancy. (Except the deep end floor which is a typical concrete mix) We purchased a nice sized mixer to help us. I had originally planned on completing the task with the following taking 1 day each to complete:

    Deep end bottom
    Deep end sides
    Deep end ramp
    Shallow end elevated section (by the main steps)
    Shallow end coves
    Shallow end bottom

    However the deep end sides took 2 days, the ramp took 2 days, and the shallow end bottom took 4 (I think that I just ran out of steam at that point!!! And the days were getting colder and shorter!) Wish I could have done it faster and then dropped the liner in, but I couldn't. Maybe I'm just a little wimpy! By the time we finished and measured for the liner, it was mid-November. I'm in zone 7, and the weather was still warm enough. Unfortunately, the liner didn't arrive until Jan 4th, with the holidays and all I guess. Too cold then. Oh, well! Then it froze, then the problems started.

    Muddy:

    As I already have the liner, I can't skim coat it. Can't change the depth. However, do you think that the vermiculite mixture would do a better job patching the surface marks? (See 3rd pic from the bottom.) I patched a few with sand/cement mixture, and it works OK, but it's a real pain to blend in with the already cured parts. I'm also worried that it (or the sand/cement mixture too) won't adhere properly because it is really thin, and the next time it gets really wet that it will come apart. If I can get the liner in right after I patch, I think it will work fine. As the weight of the water will hold it in place.

    Flex pipe: well I do understand some concern with it. We've run a little in it (mainly straight though). With the tight curves around this thing, I don't know if we can avoid it all together. On the sections that we ran, it is on solid ground (mainly the footer) and we were careful not to get any ups/down to avoid creating any air pockets. Is there something else I need to know about it? I'm working on my plumbing schematic, and I'll try to post it tonight. I think I may have already messed up, and may need to re-run it.

    I'm getting ahead of myself, and it's time to turn to others for advice. So that's what I'm doing!

    Thanks for everyone's help! Couldn't do it without ya!

    -Renee

  • muddy_water
    16 years ago
    last modified: 9 years ago

    Vermiculite is what we use to patch ruts in pool floors when replacing a liner and yes it will be alot faster for you because you just mix it with water. Sand cement is by far the best foor and will give you the smoothest bottom so you did the right thing in useing it. Some builders use vermiculite for the total floor so don't worry about repairing your damage with it. Most Liners are not made to spec and allow for a little stretch so recaping the floor could be done. Call the manufacturer and ask and you will know for sure sometimes it can be 3'or more. The problem I see with flex is bugs eating into it and causeing leaks for a pool like yours I prefer useing a pipe heater/ bender it reduces the fittings. Your liner is not going to be easy to install because of all the seals for the steps and swim outs that why I suggested you call a pro because of the amount of seams in the walls I would consider duck tapeing them all before I set the liner. Was the link for the footer for the waterfall what you had in mind?

  • little_country_gal
    Original Author
    16 years ago
    last modified: 9 years ago

    I understand the liner install is going to be a bear. We've talked frequently about getting someone else to do it because of the sheer size of the beast! The cozy cove should be easier than the curved entry steps. But the thougth of cutting into it scares me to death! I suppose I should see if I could find any locals with some time to spare. At least I'd sleep better at nights!

    And yes, I'll duct tape the cracks. I was waiting until the day before I installed the liner, because I figured without the weight of the water in the pool, if water wanted to come in from the outside it would just push through the duct tape and leave me with a bigger mess. I'm also going to put wall foam up too.

    Could I intall the liner now (once the bottom repairs are made) or should I wait until the plumbing and electric is complete?

    And yes the waterfall footer link is what I had in mind. Someone sent it to me before, it was probably you! (I have been carring that pic of the footer around with me for the last few weeks!) For the most part I plan on following it exactly. We are actually going to build 3 or 4 seperate falls, along the whole back side. All but 1 will be exactly as the link. The only tricky part is an approx. 8 foot section that is going to need a retaining wall right up to the pool edge. (My husband decided to "save" a tree up close for shade. Don't even get me started on the problems that I know it's going to cause!) The wall will hold back the soil, and and also allow for a nice drop straight into the pool. (I already found the spill stone!) I want to make sure that I don't put any of the weight on the panels here (block wall behind the panels), but I'm also trying to use the rock verneer (real rock) as a coping. The problem is that this "coping" will be 2 foot tall. I don't want to transfer that much weight to the pool, so I was considering using a galvanized metal plate to transfer it's weight back to the wall (similar to the technique used to support rock on a block wall without a proper footer) (They used one on the arch in my fireplace) I need to draw a pic. I'll do that.

    Right now, I've got plumbin' on the brain. I'm gonna post that thread in a minute, then I'll work on the waterfall support.

    Thanks for all of your help!

    I hope to get this together soon. Maybe someone can even learn from my mistakes!!

    -Renee

  • little_country_gal
    Original Author
    16 years ago
    last modified: 9 years ago

    Update: Moving pool bottom

    Good News!!! The cracked sections don't move any more when you step on them! I think that we finally have the surface water issue under control. I'm guessing that it was water building up under the pool and pushing out that made it crack. And since the water was sitting just under the pool bottom, the soil was so wet that it made the cracked sections of the pool bottom move when stepped on. No more water - no more movin' pool bottom!!! Yeah!

    Hope this fixes it, we're still planning on patching those sections, but now that the water is gone, the patches should hold!

    -Renee

  • snookums
    16 years ago
    last modified: 9 years ago

    "Good News!!! The cracked sections don't move any more when you step on them! I think that we finally have the surface water issue under control. I'm guessing that it was water building up under the pool and pushing out that made it crack. And since the water was sitting just under the pool bottom, the soil was so wet that it made the cracked sections of the pool bottom move when stepped on."

    I'm no expert, but this freaks me out. I would feel really uncomfortable moving forward even with concrete that USED to move when stepped on...

  • little_country_gal
    Original Author
    16 years ago
    last modified: 9 years ago

    Yes! I was really freaked out when I first noticed it! My heart just sunk. I had worked for weeks getting the bottom on this pool perfect, just perfect. I wanted those expensive ColorLogicLEDs to look perfect when reflecting across this glassy smooth pool bottom (OK, maybe it wasn't glassy smooth, but those lights were all I could think about when I was troweling it on!) This pool bottom was really really smooth.

    But unfortunately I couldn't drop the liner in immediately due to the irregular pool shape. The liner had to be custom measured (using point-to-point) and custom made. It was supposed to take 2 weeks to get here, but the manufacturer ended up taking nearly 2 months!! By then the weather had turned cold. We left standing water in the pool bottom and around the pool itself. The water was freezing and thawing (both on top of, and underneath the surface) which cracked the pool bottom. We never even realized it until it was too late.

    However just before we drop in the liner, we are going to COMPLETELY remove those "cracked" sections with a sledge hammer, and totally replace it with a new bottom in those places. Can anyone think of anything better to do? (short of demolishing the whole thing) What would you do if this was a liner replacement?

    My biggest concern with the moving sections was not just to repair them, but to determine what caused them in the first place. The "Good News" was that I'm fairly certain that it was the standing water/freeze/thaw conditions that created the problem. By knowing that, I can redirect the water, let the soil dry out, and then feel confident that repairing the section will work.

    I'm just a simple DIYer, so I may be missing something here. That's one of the reasons that I'm posting it. Can anyone think of a better way to handle it? Would it be helpful to add rebar in those sections? (I wouldn't think so, as the rest of the pool doesn't have it.) This pool bottom seems really fragile. The directions for the installation say to only walk on it with soft bottomed shoes, don't spray water from a hose directly on it, etc. When I work with the portland cement/sand mix, I feel like I'm building a giant sandcastle! It's not at all strong like cement or even mortar. My personal feeling is that the sooner the liner is on it the better. My mistake seems to be letting Old Man Winter get here in between finishing the bottom, and dropping in that liner!

    Please keep the suggestions comin'!!
    -Renee

  • jmas65
    15 years ago
    last modified: 9 years ago

    Hey Renee,
    How's the project coming? Any updates?

  • little_country_gal
    Original Author
    15 years ago
    last modified: 9 years ago

    Thanks for asking!

    Well, this soggy spring Virginia weather hasn't exactly been kind to the weekend warriors! I think it has rained for the last 8 weekends. (With the exception of last weekend, which we had previously made a commitment for our son - it figures it would be sunny!)

    We've chunked out, and patched what we're gonna patch on the bottom, and just about got the footers all finished for the waterfalls. I didn't get any takers on reviewing my plumbing diagrams :( Oh, well! Can't say that I blame 'em, it's a real mess! So, we're just doing our best on it.

    I took muddy_water's advice on hiring out the liner. We finally found a local that was willing to take the task on. We also got his opinion on the bottom. He thought that it looked pretty good (even better than some of the local experts - Wow! He should have seen it last fall when it was "perfect"!) but he also thinks that eventually it will crack. He suggested putting a layer of pool foam on the bottom instead of a skim coat of vermiculite, so that years later when it does crack, it will have some padding between those cracks and the liner, and hopefully will keep the liner longer. It's funny that he suggested this approach, because I was thinking about it myself when I was ordering the wall foam. So, that's what we've decided to do. I ordered Happy Bottom foam for the bottom. We're gonna put the foam down, then he's gonna put the liner in the next day, and we'll add water and backfill.

    At that point, the plumbing will only be stubbed out at the pad location. So, liner, water, backfill, but still no circulation system. (I won't be swimmin, but I should have algae in no time!)

    Currently, I have the Intelliflo 4x160 and a sand filter, but I want to order the EasyTouch and a Salt-water generator, but I can't find one that will run a 56,000 gallon pool. Intelliflo maxes out at 40K, and there's another brand (can't remember with one right now) that maxes out at 50k, but I don't think it will be big enough. I looked at Chlorine Free etc., but I'm convinced that it won't work for me. Still workin' on it...

    Right now we're trying to squeeze a long weekend in this weekend (in between the predicted thunder storms) and maybe be adding H20 next week.

    It's getting hot here! Where's that water?

    -Renee

  • jmas65
    15 years ago
    last modified: 9 years ago

    Thanks for updating - I'm so impressed that you've taken a project like this on... I wish I could help you with your plumbin' (I'm a southerner too!)- too bad somebody more knowledgable hasn't chimed in. Hope you make it in the water sooner rather than later... and please update when you do.

  • susannap2
    15 years ago
    last modified: 9 years ago

    I am so impressed with your work so far! Good luck on the plumbing issue, maybe someone will still chime in for you.
    We are acting as our own contractor so I understand some of what you are going through. And I thought it was difficult guiding the work crews...ha!

    Can't wait to see your finished project!

  • barco
    15 years ago
    last modified: 9 years ago

    Wow! This is a pretty big DIY project. I thought I was catching grief for building my DIY firepit, and a 8 foot circle of flagstone which will probably take me 6 months to a year.

    I don't understand exactly what you are doing.

    Did you trowl out 7 parts sand to 1 part portland cement mixture. Thats a weak mortar mixture, regular mortar is 4 parts sand to one part portland. How thick is this? From what your describing...this will never do more than crack unless I'm missing something with even the smallest amount of weather. A normal inground pool is shotcreted typically at 8-12 inches with rebar... And mine shot at 12 inches still had tiny cracks with water/lime leaks before it was plastered. When they gunite, they poke holes in the bottom of the gunite to ground so the huge gunited pool won't "float". Don't underestimate water in engineering concrete.

    If you are saying you floated a mortar finish on top of sand at 1 inch thickness this will all be completed cracked within 2 years....and with ragged edges it liable to destroy your liner.

    I must be missing something....

  • little_country_gal
    Original Author
    15 years ago
    last modified: 9 years ago

    Nice to know there is still support out there!

    Barco:

    Yes, I did trowel on 7:1 sand to portland. And yes, it is a week mixture. I'm no pool expert, so I'm not sure exactly why, but that is the recommended ratio. The choices for a liner pool were 7:1 sand/portland, or a vermiculite mixture. We were hoping for a smooth surface and went with the sand/portland. It's 2" thick minimum, and in some places it's slightly thicker, (mainly the shallow-end coves).

    I think the main "mistake" here it that we weren't able to place the liner in immediately after completing the bottom. It's just not ment to stand up to the weather. Everybody, and I do mean everybody, that I have talked to installs the liner the next day. We didn't have that option as our pool "kit" had never been built before. It was custom designed for me. We had to take measurements for the liner using a point-to-point method which was actually quite complicated. Then it had to be custom manufactured and delivered. This was supposed to take 2 weeks. Unfortunately, it fell in the winter holidays. The bottom was finished by the end of October. Measured first of November, but the liner didn't arrive until Jan. 4th!!!! Yikes! By that time the weather was too cold for me to install it, and the damage to the bottom had already been done.

    Despite the fact that I felt more comfortable building a liner pool myself, and the idea of a gunite pool seemed too intimidating, I think that gunite would have actually worked better when you consider the 56,000 gallon size and my desire to landscape the surroundings with rocks/waterfalls. Live and learn!

    Right now my focus is getting the liner in and getting this massive project back on track!

    Thanks for your concern!
    -Renee

  • barco
    15 years ago
    last modified: 9 years ago

    Ok...I assume if thats what they called for than an engineer came up with it. Just my experiences with building walls and other masonary endeavors is that the hydrodynamic forces are incredible...they can take down a solid 8 inch wall of concrete if you haven't planned for the water to get around the wall somehow.

    Gosh thats a lot of work....good luck to you....I hope it all works out without any more delay or problems.

  • mstrmotion
    15 years ago
    last modified: 9 years ago

    This is the first time I've seen this project. What an undertaking. If/when you pull this off, it will be incredibly beautiful in that setting. Looks enourmous. Will you be sharing your target DIY budget?

    I have to agree with the concrete mix ratio. Surprisingly weak in cement. Seems that ground water is able to leave the site, down the grade, so I'm guessing that's what's saving you from more dramatic ruptures. However, it does appear there are some already. But then again, I've never built a DIY pool, so just relating this back to experiences with hydrostatic pressure and concrete structures. At this point, I think I would take considerable measures to ensure water cannot ever accumulate against the pool by installing drains deeper than the pool structure and piping it off down that grade. Filter the drain lines properly as well to prevent clogging.

    2 cents.

    Best of Luck! Great project!