


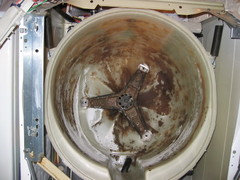
Moldy Fisher-Paykel washer-anyone else have this problem?
vatmark
15 years ago
Featured Answer
Sort by:Oldest
Comments (28)

lkplatow
15 years agoRelated Discussions
Does anyone have a Fisher & Paykel double oven OD302SS?
Comments (15)The buttons were a problem, not because of how they look, but because they don't really 'seat' in anything behind the panel, so they tend to shift a little, so don't necessarily 'catch' and control things on the first try. Like spinning it and not getting any changes. Or the main button sticks and then the rest don't respond. If you try it a couple times, it will eventually work, but that shouldn't have to be the case. Just not a great design...Unless they've made a change. The one I had was one of the first of that style. As for 'clean'...It's a clean looking design, but mirrored black glass only stays that way with some work and constant attention. With the amount of baking we do and the number of kids working in my kitchen who don't pay that much attention to 'detailing' the appliances, I wasn't a fan. I can recommend it as having great baking performance, and the racks work nicely. I wouldn't recommend self-cleaning unless you don't mind the pits and chipping in the porcelain that may occur. I have to say they were great about replacing my first oven for that, and not all F&P ovens seem to have that problem, but having it happen twice to me, I'd just avoid self-cleaning. That's disappointing, since it should work and not damage the oven...but I think it's a risk. At least it didn't seem to fry the electronics as it did with earlier F&P ovens and other brands, which makes me think they learned from that and did something to make sure the electronics were protected during the high heat. I would buy the old F&P oven again (stainless front, blue interior), but one experience with the black mirror finish doors was enough for me. Too many finger prints and smears, and it doesn't take much of that to make it look yucky....See MoreUpdate on moldy Fisher and Paykel Washing MAchine
Comments (27)Fact is, you hijacked a thread that had NOTHING to do with FL so you could post the same c*** you�ve been posting ALL over this forum. No one reading this post about TL issues cares about what you perceive about FL. If you can prove exactly 80% of what I say is BS - everyone on this forum would love to read it. You're just a bully who thinks he's always right and who thinks everything he buys is "THE BEST". I perceive that�s because you perceive you are SO much smarter than everyone else. Ya, sadly I�ve seen your posts on the appliance forum also. You have to jump on every thread you can find to tell everyone all about your great stuff. We've all read it OVER and OVER again. Don't you get tired of typing the same words all the time?? I sure get tired of reading them. Why don�t you try adding real value to a conversation?...See MoreFisher and Paykel GWL11 Top Loading Washer
Comments (344)Yes, the motor board can fail in a way that keeps the diverter powered continuously (whenever the machine is connected to power). Unfortunately, the board probably has gone bad again for some reason. From where did you source the new board? Display boards can go bad but less common than motor boards. Did you remove the display board from the console during your investigations? Is it perhaps askew such that the far-left buttons are misaligned from the overlay? There's no way to access diagnostic mode or any other set-up mode (such as machine size) if the machine is non-responsive. Fault codes are viewed by pressing Spin Speed (up or down) until both Slow and Hold are lit. You did that procedure correctly when checking? Machine Size is set (with power off) by pressing/holding Water Temp Up (instead of Temp Down for Diagnostics), then Power. The selected size is indicated by Cold (small tub), Low (medium tub), or Hold (large tub). Press the the appropriate Temp, Level, or Spin Up button to select, then Power to exit. All US machines are large tub. You can try swapping-in the old board if you still have it to see what happens. It works other than the diverter problem? The various wire connectors are different sizes so should only fit to the correct locations (other than a smaller connector possibly into a wrong larger socket)....See MoreQuestions about Fisher & Paykel washers.
Comments (165)We have both the GW11 Washer (good choice and ok) and my wife insisted she wanted a new dryer to go with it (the old dryer did need a new timer but ok). I was no keen on the DGGX1 dryer due to its complicated machinations of side winder drum and door closer setup. What killed the original washer was lint build up as my wife does some fabric work and gets a load of that at the time and the rep said the GW11 was designed to avoid that, it has 100% good with that, never another lint problem. We had it 10 years and it started to make god awful squeals. After a lot of trouble shooting (there is a diagnostics for that) the pump was bad. Replacing the pump is a bit of a pain as you have to lay it on its side but otherwise easy as you release a tap and it pops out. Yes I tested the old pump and it was awful (I do a lot of mechanic building work so that is not new) One thing that fooled me was not reading carefully that the washer does a recycle water rinse soap thing and the pump would act up during that, so knowing the sequence and how it works points to the pump despite most washers using just fill water. However, in the course of making sure all was clean and ok I shined a light up the drain tube and saw a flapper. I am thinking its the diverter valve and in the wrong position but its not quite where the valve would be and its bright shiny silver, hmm, the size of a dime>? Yes a dime and plug of stuff. so you darned well better look or you can replace the pump and still have an issue. I pulled the other hose and made sure it was clean too. AND YES A SMALL OBJECGT CAN SOMEHOW GET INTO THERE SO DON'T BELIVE THE ONE POST, AT LEAST LOOK!!!!!!! Last they want you to splice in a fuse to the main board to protect it, they missed that. Its a dicey operation as the wires on the machine are tiny and the fuse wire is huge. Poor kit. I cut it in where there was a lot of room to res-plice if the splice went bad, they say right by the plug, if you do and you fray the wires you have no wire left to work with. Top loader is No Longer Made I believe, so only repair for old ones. As for the DGGX top loader, it worked ok until it got a squeeek/squak. Wisdom was the right side bearing, got it and nada, it was fine (typically we do 3 loads a week so we are not heavy users). What I found was the tensioner was making noise, I found if I moved it to one side it quit, so I wired it over a bit and ok for some time. 11 years into it and suddenly it goes nuts, squeeling, squalling and impossible. So I did the check of both ends, cleaned the right bearing, made sure the stub shaft was ok, cleaned the other end up and it worked ok for a week. the first screen assembly on the left end comes out easy as its a obvious Phillips screw and pops off. The assembly that holds the lint filter is a bugger as the screw is in the bottom and its a combo hex and Phillips type screw and its in there hard. Better off if you can get a thin wall socket in there (I got it out with Phillips but it better be a GOOD number two and you better be strong. Hex size is 7mm and not sure even a slim line socked will go in the hole. If not it might be worth drilling it larger if the screw will not move with a number 2 Phillips. the lint screen also had huge holes torn in it and no idea how or why, but that's 70 some bucks too. I think this needs to be checked about once every 4 years. then worse than even. Time to disassemble and look at that tensioner. Its fairly easy but you do need to know the steps and screw locations. This is a good guide. http://www.frontloadbearings.com/fisher-paykel-degx1-dggx1-dryer/#.VVa0DGzTmwV More or less you lift the lid, pull it straight up and it comes off. Remove the rubber plug left and right front and two screws come out (Phillips 2) and you lift the top and lay it back. At that point you need to unplug the connector that connects the display to the controller as the whole assembly will roll forward soon. then two screws on the front (smaller ones), spread the side and the front cover comes up a bit and comes off (ground connection also that needs to be put back. Once done then the whole drum rolls out and you can get to the tensioner (screwdriver to pry it off as there is an opening and pry against a bar. Our had one that was totally trashed with huge cleaned and uneven wear. Lubed and back together until parts get here. It was worth taking the front cover off as huge amounts of lint in the bottom including some that was blocking gas flow tube and covering up the intake about 25%. Not exactly maint free but reasonably done if you are handy. so line screen every 4 years inspect and clean it up at the same time and should be good. I don't know about the pulleys, why one is bad and one good when they both tension is mystery, kit comes with two and you may wind up if you have it long enough putting the second one on in the same place if it has more thrust or whatever took it out and it starting making noise 6-8 years in so it went quick for pretty light use....See Morevatmark
15 years agodadoes
15 years agofordtech
15 years agofordtech
15 years ago
cynic
15 years agobookert
15 years agograinlady_ks
15 years agofordtech
15 years agojanonsussquehanna
15 years ago
whirlpool_trainee
15 years agobookert
15 years agocinspring_sbcglobal_net
13 years agoBgstringfellow_att_net
12 years agokimnicho
12 years agojosiejo
11 years agodadoes
11 years agoshoponl
11 years agojilliansatterfield
8 years agosparky823
8 years ago
dudleyfuddpucker
8 years agoken c
8 years agodudleyfuddpucker
8 years agodadoes
8 years agosuburbanmd
8 years agojilliansatterfield
8 years agolast modified: 8 years agodadoes
8 years ago
Related Stories

KITCHEN DESIGNBetter Circulation for a Family Kitchen and Bathroom
An architect’s smart design moves helped rearrange this Louisville kitchen to create a more sensible workflow
Full Story
MOST POPULAR10 Smart Ideas for Your Laundry Room Remodel
Make washing and drying easier and more comfortable by considering ergonomics, storage and special features
Full Story
LAUNDRY ROOMSClever Ways to Hide a Laundry Station
When you don’t have a whole room to devote to the wash, use these solutions to tuck the machines out of view
Full Story
KITCHEN DESIGN7 Steps to Pantry Perfection
Learn from one homeowner’s plan to reorganize her pantry for real life
Full Story
HOUSEKEEPINGDishwasher vs. Hand-Washing Debate Finally Solved — Sort Of
Readers in 8 countries weigh in on whether an appliance saves time, water and sanity or if washing by hand is the only saving grace
Full Story
LAUNDRY ROOMS8 Ways to Make the Most of Your Laundry Room
These super-practical laundry room additions can help lighten your load
Full Story
KITCHEN DESIGNA Cook’s 6 Tips for Buying Kitchen Appliances
An avid home chef answers tricky questions about choosing the right oven, stovetop, vent hood and more
Full Story
LAUNDRY ROOMSTop 10 Trending Laundry Room Ideas on Houzz
Of all the laundry room photos uploaded to Houzz so far in 2016, these are the most popular. See why
Full Story
THE HARDWORKING HOMESmart Ways to Make the Most of a Compact Kitchen
Minimal square footage is no barrier to fulfilling your culinary dreams. These tips will help you squeeze the most out of your space
Full Story
KITCHEN DESIGNStay Cool About Picking the Right Refrigerator
If all the options for refrigeration leave you hot under the collar, this guide to choosing a fridge and freezer will help you chill out
Full Story

dadoes