Two weeks ago I finished re-finishing our oak living room floor, and thought that some forum DIY readers might like to hear about my experience, and maybe add their own. The bottom line was that this project was a lot more work that I had expected but proved to be worth it. Although some of the things I did may not be the norm, Im happy to say that the result is a near perfect stained and polyurethaned wood floor. But it was definitely a learning experience!
By way of background, the project involved just one room (living room) that measures 23.5 feet long (with the grain) and 14.5 feet wide. It is wide plank white oak that alternates with narrow planks. There is radiant heating underneath. There was no stain on the wood, just a clear satin sealer of some sort, that was pretty beaten up and dull after a 2-year remodel. We decided that we wanted a medium, orange-y brown stain, with a satin finish. We also wanted a urethane, as weÂve gone the oil, and oil plus wax, routes in a previous house, and didnÂt want to repeat them here. I did virtually all the work single-handedly and now know that it is possible!
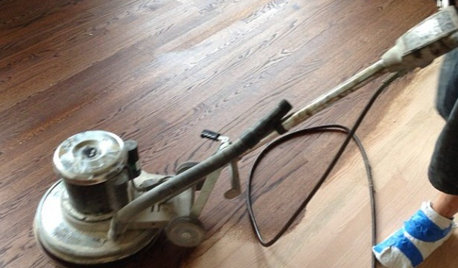
I did the sanding using the Varathane EZV sander that I rented from LoweÂs. This is a 3-disc orbital floor machine. I used all 3 gritsÂ36, 50 and 80. All the heavy duty work is done with the 36 gritÂthe others are basically just for smoothing. This machine was great for me but it might not be for everybody. First, IÂll just say that Varathane really should rent a weight pack with this machine, or somehow make the machine able to "bite" faster. Although it is heavy to get out of the car and inside (I had to have help with this), IMHO it needs more pressure of the head on the floor to speed up the sanding. If it had this, however, I think the sanding speed would be fine. I used a lot of the 36 grit sandpaperÂas soon as I thought a set of discs werenÂt taking off as much wood, I changed them. The vacuum ability was great. I had hardly any dust in the room. But something important to know about this machine is that it definitely left very thin, hair-like scratch marks on the wood from the orbital pattern of the sanding discs. I can only see these if I get down on all fours and stare at the planks, but they are there and they make an overall difference in how the floor looks, IMHO, even from a standing position. You might be able to get rid of these by going over the floor afterwards with another kind of sander such as a vibrating one, but I didnÂt. In fact, I actually *like* these marks, because I wanted to end up with a floor that didnÂt look like it was just refinished. I live in an adobe house in Santa Fe, and was already considering distressing the floor slightly. What I found was that the light and fine scratch marks created just the feel I was after in the floorÂnot a large amount of distressing, just what is to me a warm, lived-in look.
To prepare for the stain, I put 2" wide blue masking tape completely around the perimeter of the room. I pressed it down hard with a putty knife and this was very effective in stopping bleeding of the stain under the tape and onto the wall. This was especially important for us since our house has no molding to cover the join between the floor and the wall.
As to the stain, I had a good experience mixing stains from 2 different manufacturers, even though I wasnÂt sure at first how this would be. I used equal proportions Varathane Gunstock and Zar Salem Maple, both oil based. This gave exactly the color I wanted. Immediately after finishing with the final sanding, I rubbed on 2 coats, using a t-shirt type rag and taking off the excess after about 10 minutes with the same type of cloth. 24 hours passed between coats, with no buffing. After the second coat had dried, there were differences in what turned out to be the reflectivity of different areas of the floor. In one place, for example, you could see what looked like a somewhat darker circle on the floor, and a set of 3 parallel 2" wide lines in another. I thought maybe it was uneven sanding but a touch test said no. The good news is that all of these "marks" went away when the poly was applied. The finish evened out the stainÂs differing reflectivity. But at the time I had no idea what would happen.
After the last stain coat, I buffed with a Scotch-brite maroon pad. Since I had only 1 room and not a whole house, and since I really really didnÂt want to haul a big heavy rental buffer in and out, I used a hand-held electric polisher often used for car detailing (Porter Cable 7424). I found 5" and 6" round maroon discs online at a marine supplier, which fit the polisherÂs Velcro pad. Although it was hands and knees work, I ended up being glad I used the hand held polisher for buffing. I could really see what was going on with the floor and got some of my best problem-solving ideas from this close view. It took me about an hour each time to buff the floor this way.
We went away for 2 weeks after the last coat of stain was put on and so it just sat there and dried really completely. In retrospect I think this was a good albeit largely unplanned thing.
I decided on oil-based poly because of my only previous experience with wood floor finishing, in which I used a waterborne (Bona Mega). That finish when put on right is lovely but having so little experience, I had a really hard time keeping a wet edge due to the quick dry time. And wanting to do it "right," I used a t-bar and had a hard time turning it at the end of a run and keeping the poly looking decent. Plus now at our present home, I also have a warm floor due to the radiant heat, even when itÂs turned down. I originally was going to use Varathane oil based finish, but after scouring the web I decided on Fabulon satin, which I had to order online. IMHO, the great reviews of this product were right on. It is beautiful and with a technique that works (which took me several tries to get) has resulted in a great floor that "glows" similarly to the waxed floor I used to have, but thankfully without the water spotting headaches.
The problems I had almost all had to do with reflectivity of the finish. In my experience, getting this right is the big thing with a poly floor. At night, with dimmer or indirect lighting, all can look great, But in the daytime, when the sunlight pours in (and it does here), all sorts of reflectivity problems show up, that can make a floor look amateurish at best. I think Fabulon is a very cooperative finishÂitÂs just that creating a single, unified sheet of finish in such a big area is a real challenge even with the best of products. I can see what pros are paid for.
In my web research, many people said they have great results rolling on the finish, and the roller most frequently mentioned was a Purdy White Dove 3/8" nap on a long pole. So this is what I did for 2 coats. The finish is sort of bubbly/foamy when it first is rolled on but as people said, the bubbles go away as the finish settles. Fabulon is very good at this settling out. I thinned it a little, maybe 10% with odorless mineral spirits to retard the dry time and give the bubbles more time to go away. I rolled everything in the same direction, which I had read was important to reflectivity with a satin finish. The problem was that after the finish dried there were what looked like wave patterns in it, that were reflectivity differences. Although I had done it before, on the second roll coat (24 hours later) I was even more careful to keep hand pressure off the roller, just holding the pole by a couple of fingers and pulling it along. Again, quite regular wave patterns of reflectivity in a nearly perfectly flat-sanded floor. Frustration plus. I finally concluded that there must be some sort of irregularity in the roundness of the roller frame that caused the sleeve to press harder in some parts of the rollerÂs revolutions than others, making the finish "dotty" for a part of the sleeveÂs contact with the floor each time it went around. I had changed the roller sleeve and still got the same results. I could see that a difference in the coverage evenness was causing the waves in reflectivity when I really got down and looked. I was planning initially on 3 coats of poly with buffing between each with the faithful maroon padsÂshould I try rolling again a third time with a new frame? But how could I tell at the store if the new frame would result in balanced revolutions?
In the end, after another 24 hours, for the third coat I picked up my 4" wide, 1.5" thick Olympian china bristle brush that I used quite happily for deck stain and painted on another coat by hand (no extension pole). ItÂs not a poly brush but I like it and thought it might do the job. Thinking that I would have a shorter distance for keeping a wet edge by dividing the room widthwise in thirds and doing a third at a time along the grain of the boards, I painted on the poly. Voila, the wave patterns were totally gone! But instead of achieving total bliss, I now had 3 mostly continuous reflectivity lines across the width of the room where I had cut my separate painting areas. And, I had some reflectivity lines along the grain of the boards, where my line had wandered from the edge of one board to, say, the middle of the other. This was despite keeping a wet edge. I could really see these during the buffing after this coat. And, the Olympian brush, being as thick as it was, created at least in my hands a few poly puddles that showed when dried. I buffed yet again and to keep from going out of my mind, used the time to really *plan* the next and fourth coat. This was the one that worked.
I went and got a 3" Corona chinex brush with a nice chisel on the edge. 3" is about the biggest brush I can handle easily. I waited 3 days this time before the next attempt. This was partly because I was tired of doing this and partly because there were 3 coats on there already and I didnÂt want to end up with a soggy sticky mess, of which I had read gruesome stories. This time I did my with-the-grain strips no wider than 15" along the entire 23.5Â length of the room. I made each strip go exactly just to the edge of a board, so there would be no lap marks in the middle of the boards like before. Like a mad dog (or so it felt), I put the poly on the entire 23.5Â length of the strip as quickly as I could, brushing feverishly in any direction to spread it. Then I eased the brush down at the very beginning of the strip and combed the poly in a single direction while walking backwards without lifting the brush for the entire length of the room. I repeated the combing with just a little overlap until the entire 15" strip was combed in the same direction, and then started the next one. (A tip is to use a little masking tape on each wall to mark where the strip starts and stops, to keep track.) This was tiring to say the least but it worked. It worked fabulously. No bubbles, no misses, no lap marks, no reflectivity problems.
IÂm sure there are easier ways than what I did. If, for example, you are lucky enough to get a roller frame that gives an even-pressure revolution, I would think you are in business. I certainly wish I had tested mine before doing 2 whole coats with it!
Happy refinishing!
Katie


katie_crOriginal Author
blackeyedpeas
Related Discussions
Ad'Vent'ures in Ventilation
Q
Continuing my adventure in my basement....Chair Info
Q
My doorbell's most excellent adventure (many pics!!!)
Q
Refinishing Original Pine Paneling 1954 Ranch
Q
carolbarrel07