So, Im going to try to get a good jump on my shower over the holiday break, since I have about a week & a half off work, and am putting together a detailed list to follow so we stay focused and donÂt skip any steps. Do you guys mind taking a look at it and telling me if IÂm on/off track, somethingÂs missing, etc.? There are a few lingering details that IÂve bolded & bracketed belowÂ
Thanks so much :)
Lisa
(cross posted on johnbridge forums)
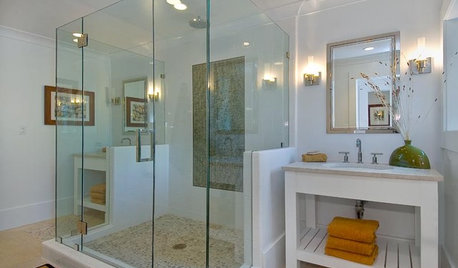
This will be a 42x42 shower in a new alcove. I plan to put in a framed pivot or hinged door with a panel.
Facing the alcove, the panel will be to the right, about 16" or so wide; the door will fill the rest of the entrance, opening at the left end of the alcove.
Working counterclockwise, the right side wall is an existing wall framed with 2x6Âs and will have the plumbing  supply lines to a diverter valve/mixer, and lines up to a traditional shower head mounted on that wall at ~7 feet, and to a rain showerhead in the middle of the ceiling. [this will be running through an attic space  any tips on making sure this does not freeze? I live in Ohio]
The back wall is shared with an insulated garage. I plan to put 2 pre-formed niches next to each other near the left corner of this wall, as well as the smallest Better Bench in the far left corner to use as a foot rest.
The left wall will be made out of a commercial metal stud system since we have such a narrow space to fit it into. It will have only tile plus the end part of the door frame, IÂm assuming (I donÂt know details about these doors yet)
We will be using the Kerdi shower kit, including the sloped pan, drain, and curb.
I plan to use 6x6 glossy ceramic tiles on the walls, and am trying to find matching 2x2 floor tiles for the shower floor. In case it matters, we plan to use ditra on the bathroom floor with 12x12 ceramic tiles.
HereÂs my proposed processÂ
1. frame the walls and include wood for future grab bars [any suggestions on where to put these?]
2. screw cementboard (durarock) to framing - [do we tape the seams? I read that this would add unnecessary thickness, but Mongo, it looks like you did tape your shower] [also, how far down should the durarock go?]
3. cut holes in the durarock for the valve assembly and the 2 niches
4. attach valve to the roughed in plumbing
5. sand down flanges on niches so they are flat
6. attach niches to durarock by applying kerdiFix to the back of the flanges and putting them into the precut holes
7. starting at the far right edge, where the panel of the door will eventually be attached, dry-fit kerdi to go from just below top of tile down to [how far down do I run the kerdi, given that we will be using their pan?] Cut a hole just smaller than the valve assembly.
8. use a level/plumb line to mark with a sharpie a line from top to bottom at ~ 41" wide (though for me this will be easier since my walls are only 42" apart, so I may just let the wall be my guide)
9. mix up some unmodified thinset [any particular brands you guys are fond of?]
10. mist water on the durarock
11. apply the thinset to the wall ~ 41" wide & as high as the kerdi will go. [what size trowel & notches do you recommend?]
12. apply the piece of kerdi, from top to bottom, and lightly press it all over. Attempt to attach kerdi to valve assembly with kerdifix if possible; make sure kerdi will be completely under the final valve trim and sealed to the trim with the foam provided on the trim piece.
13. go back over the kerdi, top to bottom, and press it into the thinset so that no bright orange spots remain. Smooth out any lumps/valleys under the kerdi, and feather the thinset if it comes out from under the edges
14. this will put us about 2.5" from the back right corner. I think it would work best to skip over the corner and use a full piece of kerdi on the back wall, and the left side wall, then do the corners with overlap.
15. on the back wall, dry fit kerdi and cut holes smaller than pre-formed niches flanges.
16. mix up thinset; mist walls; apply thinset; apply kerdi and attach to niche flanges with kerdifix; press into thinset; fill gaps, etc. [do i have to make sure to use the outside corner pieces of kerdi with the premade niches? Or do I just need to be sure the flanges are fully covered?]
17. repeat for left side wall, running kerdi out to where tile will end in doorway
18. on the two back corners, this will leave us with about 3" on each side wall (right and left) and about 1.5" on each end of the back wall.
19. cut kerdi to cover the 4.5" remaining, plus 2" extra overlap on either side, which equals 8.5-9" wide pieces of kerdi for each of the back corners
20. mix thinset; mist corners; apply thinset; apply kerdi
that wraps up the walls I think we should do the pan next, though I suppose I may end up tiling the walls next, depending on my friendÂs availability & how confident I feel with the pan assembly. [If I tile the walls before the pan is placed, how do I know where to put the bottom row of tiles?]
21. cut the 48x48" pan equally on all 4 sides (3" each side) so it measures 42x42
22. cut the 48" curb by 6"
23. dry fit and mark/cut hole for drain
24. apply thinset to floor (plywood subfloor)
25. put pan into thinset & ensure coverage
26. cut first piece of kerdi to size, including drain hole, and second piece of kerdi to overlap first
27. apply thinset to pan
28. set kerdi drain
29. more thinset over drain fleece
30. apply kerdi & secure into thinset
31. apply thinset where curb will be placed, on the floor & walls [where exactly does the curb go? Does it sit on/in the pan, or outside of it/next to it?]
32. place curb
33. dry fit kerdi over all exposed edges of curb
34. apply thinset to exposed edges of curb
35. apply kerdi & secure
36. use premade kerdi corners where curb meets wall (x4) and where pan meets wall/curb (x4) and use kerdiBand along edges where pan meets the walls
I think this would be the end of the kerdi work  whew! Now on to tilingÂ
Actually, IÂll save that for another post :)
Thanks!!
Lisa


bill_vincent
toadangelOriginal Author
Related Discussions
Schluter/Kerdi shower pan question
Q
Kerdi shower tray - need advice from the experts!
Q
Three simple Kerdi question?
Q
Question about kerdi system
Q
bill_vincent
toadangelOriginal Author
bill_vincent
toadangelOriginal Author