SHOP PRODUCTS
Houzz Logo Print
mongoct

Kerdi Shower

MongoCT
16 years ago

Okay,

There are ways and there are ways. This post shows a couple of ways to do it.

Shower is a walk-in, about 5' by 7'. Door is at a 45 degree angle.

Walk in to the shower and on the short wall to the immediate right are two supply valves, the lower one supplies the wall mounted handheld, the upper supplies an overhead 12" rainshower head.

Moving counterclockwise from that wall, the long wall on the right is on an exterior wall, nothing but tile.

The short back wall has a 2-shelf niche, about 36" wide and 30" tall. The lower niche space is 15" high, the shelf itself is 4" thick, the upper niche space is 11" high.

The last wall, the long wall to the left as you enter, has the wall-mounted hand-held. If I recall, the sliding bar is 40" tall.

Tile backer? I prefer cement board on the walls. Wonderboard or Durock. I used Wonderboard on these walls. The ceiling and niche is done in Hardie, as Hardie is less brittle so for me it's easier to cut into narrow strips to trim out the niche, and not as prone to snapping when installing full sheets overhead.


Comments (152)

  • MongoCT
    Original Author
    16 years ago
    last modified: 9 years ago

    I'll be in ATL from mid-Feb to mid-March. I get thirsty when in ATL!

    If you're into north Georgia brewing, do you know or have you heard of Phil Farrell? He's a buddy of mine from the Air Force, we were in the same fighter squadron years ago.

    Mongo

  • jodierd
    16 years ago
    last modified: 9 years ago

    LOL! Phil's in my brew club! Makes some FINE beer and has won way more ribbons than I! Oh, and came in second as Beerdrinker of the Year last year.

    Jodie

  • Related Discussions

    Kerdi shower question

    Q

    Comments (17)
    According to the technical service person at Laticrete that I emailed over the weekend, their pans can be cut to size. Have you ever done that? Recommended? I mud all my pans, and then install the membrane over the mud. AS for cuttung the pan trays, I don't see a problem with it. The company is KBRS Innovative Shower Systems (linked below). Do you know if this company is reputable? I've never heard of them before right now. DH says he's interested in this Tile-ez product. He says that it seems to be the easiest to install. Any feedback on this product (linked below)? Another one I've never heard of. One other thing to think about-- if you use someone else's materials for ANY part of the installation, Laticrete won't honor the warranty. Nor will Kerdi, if you go that route.
    ...See More

    Marble Walk-in Shower - Kerdi Shower Pan?
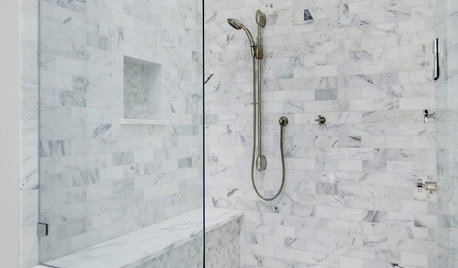
    Q

    Comments (8)
    When you said that the labor is ALOT more time consuming, does that mean you have to be more careful cutting and setting the tiles due to the "less forgiving material"? That's part of it. When it comes to stone, especially polished stone, if it's not perfect, you'll see it, and you'll feel it. I've said many times it's all in the reflection, because reflections don't lie. Look at the picture above of the reflection in the shower wall tile. See how the reflection is continuous from one tile to the next? If the tile isn't set perfectly flat, that reflection will be broken all to hell. That takes alot of time (as well as alot of skill) to get it that perfect. I don't mean to be tooting my own horn here. I'm trying to help you understand why the need for the extra time, and therefore, the added expense. Just because someone can set tile, doesn't necessarily mean they're competent to set stone. what marble was used? Any sense of the cost of materials? The white is carrara, and although I'd know the name if I heard it, I can't remember the name of the grey marble mosaics. As for cost, the carrara isn't much (as marble goes!)-- maybe 6-7.00 a foot. The chair rali, pencil liner, and mosaic listello, on the other hand, are a different story. Each chair rail and pencil liner is about 22.00 a piece, and the mosaic listello's 32.00 a foot. so for every linear foot of that wainscot, the price is 76.00. This is not exactly an economy bathroom! LOL I know the greymosaics weren't cheap, either, and they're also used on the floor for the "dots" as well as that piece on the wall.
    ...See More

    Kerdi shower pan - drain not centered; is it really a problem?

    Q

    Comments (8)
    Thanks Mongo, You've made my night! I was awake until 1:00 this morning, going around in circles in my head planning my tile layout and how to best deal with the drain, so I'm happy this idea is sound. I actually was considering your second suggestion of floating the tiles up a bit to get a better match, but I like your suggestion of feathering out the thinset below the membrane. I have a hard enough time with the thinset squeezing out with mosaics. I don't need to make it even harder on myself. Now that that is figured out, I'm sure I'll find many other things to obsess about in the three weeks until we have time to do this project! Actually, I do have one other question (for now!): the shower will have two full walls and two curbs at right angles. I have two Kerdi curbs (the gray ones that are reinforced inside) and felt fine about those until I saw someone on a forum somewhere worrying about whether those would be able to support their frameless glass walls. We are planning frameless glass walls too, so I started researching that and couldn't find anyone who had actually talked about combining the two. Kerdi says they are strong enough (and I have an email in to the glass dealer to check), but just wondering if anyone has actual experience putting frameless glass walls on the Kerdi curbs? I checked the glass doors/walls we're getting and it looks like most of the support will come from the anchors set into the walls and there aren't any holes that need to be drilled into the curb (the walls rest on silicone shims), so it seems like it should be fine?
    ...See More

    Wood Subfloor over Concrete Slab under Kerdi Shower Tray

    Q

    Comments (1)
    tear it out now while youve only wasted a few hundred $ and a few hrs..... and make a smart hiring decision going fwd. Maybe wait til after twins:) and until you can afford to have it done correctly. But be ready first to get FURTHER misinfotmed on this forum.
    ...See More
  • MongoCT
    Original Author
    16 years ago
    last modified: 9 years ago

    If you see him, tell him "Mongo from the Green Demons" said howdy!

  • jodierd
    16 years ago
    last modified: 9 years ago

    Will do!

  • sgoldfield
    16 years ago
    last modified: 9 years ago

    HI all, thanks so much for the explanations, I'm totally convinced we need to ask for the Kerdi in the new house build. A few months ago it looked like Flyleft researched this, does anyone have a recommended installer in Portland Oregon (or someone who wants to travel)? Microbrews and/or good coffee and muffins optional.
    Thanks!
    susan

  • Shaggus
    16 years ago
    last modified: 9 years ago

    Bump

  • MongoCT
    Original Author
    16 years ago
    last modified: 9 years ago

    First, credit for this photo goes to Joe, it was originally posted by him on his thread. On his thread I used MS Paint to "illustrate it" a bit, I'm going to repost the picture here due to the large number of emails I've gotten over the past few days regarding the drain. Hopefully this will consolodate things a bit...so the following is a sort of cut and paste from his thread:

    The drain ring and the drain cylinder are two separate pieces that connect together. The fingers on the ring grip the cylinder, so you can slide the ring up and down the cylinder and that sliding up and down action allows you to adjust the height of the square metal drain cap.

    In Joe's picture, the Kerdi flange has already been installed and it's covered with Kerdi. The depression that the gray drain ring is sitting in is part of the already installed flange.

    Looking at the picture, if you pressed down on the square metal plate, the cylinder would slide downwards through the ring. You'll do that to set the top of the metal plate flush with the top surface of your floor tile.

    Again, if Joe's floor were tiled up to the drain, when it's time to set the drain I would:

    1) Remove the gray drain assembly, which when all snapped together includes the gray ring, the gray cylinder and the square metal plate.

    2) lay a ring of thinset around the open drain hole, in the "depression" of the Kerdi flange.

    3) Place the gray drain assembly back in the drain flange, pushing it into the ring of thinset. Thinset will ooze through the holes in that gray ring.

    4) If needed, at this time a little more thinset can be placed on TOP of that gray ring, right up against the gray cylinder, between the ring and the square metal plate. You won't need much.

    5) Now push down on the metal plate, gently. The pressure will force the cylinder down through the gray ring, causing the height of the metal plate to go lower. Keep pressing until the top of the metal plate is flush, or just slightly below, the height of the adjacent tiles. This may cause some thinset to squeeze out, that's desired, as it means you have complete thinset coverage and support underneath the square metal plate.

    You want to think of setting the square metal plate as if it were just another piece of tile. Thinset under it, push it down in place so it's the same height as the neighboring tiles, and clean up and squeeze out.

    Mongo

  • cintijen
    15 years ago
    last modified: 9 years ago

    Mongo,

    Many thanks for all your hard work! I don't want this to disappear before we get to our shower so...

    *bump*

    cintijen

  • ggoose
    15 years ago
    last modified: 9 years ago

    Mongo,
    A little advice if you please.
    I have been attempting to do a tub surround with Kerdi/band/fix and when I peel back the Kerdi to check thinset coverage I see lots of trowel marks. No amount of smoothing with my drywall knife seems to help. I was forced to peel off a sheet of Kerdi and discard it. Pricey. My thinset mix is "fluid" as they recommend, like cake batter. I am using hardi for the backer. I misted the walls prior to beginning, though I notice the hardie soaks up the water quickly. Any suggestions would be most appreciated.
    Thanks,
    ggoose
    p.s. Did I read in one of these posts you were in a "squadron"? If so, which?

  • eagle100
    15 years ago
    last modified: 9 years ago

    Thanks so much for this post and all of the useful information. However, I'm thinking it would just be best if you'd come and do our shower, please please!!!

  • bill_vincent
    15 years ago
    last modified: 9 years ago

    ggoose-- let me ask you-- when you went to peel off that piece of Kerdi you threw out-- did it come off easily?

  • ggoose
    15 years ago
    last modified: 9 years ago

    Hello Bill,
    The thinset hadn't set completely, so it came off easily. After repeated attemps to properly seat it, and pulling a corner back to check, and still seeing trowel marks where ther was no thinset, I pulled it off while still damp so as to try another day. I read on another thread the hardi must be sponged down, as it is very thirst. Also, the writer of the other thread said to mist the membrane itself. Perhaps that was my problem.
    ggoose

  • MongoCT
    Original Author
    15 years ago
    last modified: 9 years ago

    ggoose,

    My thinset is thicker than cake batter. Thick enough so it won't self-level if poured in the floor. But thinner than a typical mix.

    I apply the thinset to the walls with the flat side of the trowel and work it into the texture of the board, leaving a thin layer on the board, maybe an eighth-inch plus.

    I then comb it with the notched side, which removes the excess. If you are troweling with the trowel at too low of an angle against the hardie, you might effectively be taking too much thinset off the board. The lower your angle, the smaller the ridges and the less thinset you leave behind.

    If you are troweling at the proper angle, then the notches on your trowel might be too small, or your thinset so loose that there is too much water and not enough solids going on the wall.

    What size trowel are you using, and is it "V" or square?

    Squadrons? I was in several over the years. Operationally off the top of my head the 356th, 25th, 357th, 358th. Training the only one I remember is the 433rd.

    I think most every fighter squadron had a...

    Mongo

  • ggoose
    15 years ago
    last modified: 9 years ago

    Hi Mongo,
    I'm using the recommended 3/16 X 1/4 inch V-notch trowel. I think my trowel angle is OK, as I got good adhesion where the hardie wasn't (like over seams that had been reinforced w/mesh and thinset). I just couldn't get the ridges to fill in the troughs in the feild, no matter how much coaxing I did with my drywall knife. I'm beginning to think the hardie drew too much water too fast, and it began to set a bit.

    A warthog driver, perhaps?

    ggoose

  • MongoCT
    Original Author
    15 years ago
    last modified: 9 years ago

    It could be.

    I've installed Kerdi over cement board (wonderboard or durock) 90% of the time, and only on fiber-cement (hardie) occasionally.

    You could go to a larger notched trowel and give that a shot. Test it out on a small sample board. You can clean off the Kerdi and reuse it unless the thinset has cured.

    Yup, I be a hog driver. How 'bout yourself?

    Mongo

  • ggoose
    15 years ago
    last modified: 9 years ago

    "You can clean off the Kerdi and reuse it unless the thinset has cured."

    Wish I knowed that then. Think I'll look for a slightly larger trowell, and maybe warm up with half-sheets instead of full tub-to-ceiling sheets.

    Me, just a lowly faip.

    ggoose

  • bill_vincent
    15 years ago
    last modified: 9 years ago

    I can't speak to using hardiboard, as I use it as little as possible (just a personal preference), but I HAVE heard that it needs to be misted. However, this is the first time I've heard of wetting down the Kerdi. As for consistency, I usually mix mine like loose pancake batter. Mine WON'T hold its shape. As fot trowel size, 3/16x1/4 should be big enough, but if you're having problems, try going to 1/4x1/4, or even 1/4x1/4 v-notch.

  • ggoose
    15 years ago
    last modified: 9 years ago

    Thanks Bill,
    My thinset sounds just a little thicker than that. As I mentioned, on another thread they said sponging the hardi proved effective, so I think I'll try that w/a 1/4 X 1/4 trowel and see what happens. I have 2 bathrooms to do so the next one will be hardi-less. Thanks for thr reply,
    ggoose

  • bill_vincent
    15 years ago
    last modified: 9 years ago

    No problem. I take it by your "handle" that you're also a military pilot?

  • ggoose
    15 years ago
    last modified: 9 years ago

    Once upon a time...now I'm just a Kerdi-hangin' wanna-be.

  • MongoCT
    Original Author
    15 years ago
    last modified: 9 years ago

    Where and when did you faip? 37s or 38s? Or whatever they are flying these days? Did you do ATC the entire time in? I did UPT at Reese, 85-02.

    And yeah, after reading Bill's question and going back and reading your previous post...do not mist the Kerdi. Mist the hardie, let it absorb the water, then trowel and comb your thinset, then hang the Kerdi.

    Then repeat.

    Then repeat again and again until everything is orange.

    Then you stop, clean the thinset out of your hair, clean your tools, and drink beer.

    Mongo

  • ggoose
    15 years ago
    last modified: 9 years ago

    T-38's at Reese (UPT also, class 87-05). I probably knew some of your faip classmates. Did my faip tour and went to Delta with a 2 yr C-5 stint at Kelly (reserves).

    I think I need to "mist" a little more aggressively, as the only reason I can see for the thinset ridges not collapsing behind the kerdi is moisture wicking out too quickly. I'll try again monday. Happy 4th!

    ggoose

  • MongoCT
    Original Author
    15 years ago
    last modified: 9 years ago

    The first time I mist the board I wet it good, going over it twice, to the point where water is running down the face.

    Then I mix my thinset.

    While the thinset is slaking, I mist again.

    You do need to work fast, so get the thinset on the wall with the flat side of the trowel, I work floor to ceiling, then comb it with the notched side. Then immediately hand-hang the Kerdi and pat it down with your hands. Then embed it with a trowel or drywall knife.

    Hell, if you can survive as a faip you can hang Kerdi!

    Spanky Barber (-38 faip) was a classmate of mine. I'm 7ER with the bankrupt widget. Maybe I'll see you on the NAT tracks some day. So we don't thrash the thread with off-topic chatter, email me off my "MongoCT" name/link if you want.

    Mongo

  • ggoose
    15 years ago
    last modified: 9 years ago

    I can see my misting was insufficient. I need to saturated the hardi a bit more. I've noticed as I've been hacking away at these first attempts that where there is dry thinset over the hardie the kerdi adheres quite well. I'm guessing it doesn't wick moisture away as quickly. I'm tempted just to skimcoat the hardi with some thinset and be done with the problem.

    Good ol' Spanky...hadn't thought about him in a while!

    ggoose

  • MongoCT
    Original Author
    15 years ago
    last modified: 9 years ago

    I use wonderboard or durock cement board for most everything. I do find that when cutting this strips, like those needed to line the shelves of a niche, it's easier to use hardie, as the fiber-cement takes screws better than a true cement board like durock or wonderboard. Thin strips of cement boards can fracture easier than fiber-cement when screws are driven through them.

    In this photo, I lined the niche with hardie, then skim coated it with thinset before going over it with Kerdi.

  • heatheron40
    15 years ago
    last modified: 9 years ago

    Thank you so much for all the steps and trouble shooting!

    Somehow I knew you were either teachers or military men Mondo and Bill!!!

    Sent this to Hubby- hopefully he'll see what I am talking about now..........

    Thanks Again!
    Heather

  • ggoose
    15 years ago
    last modified: 9 years ago

    Hi Mongo,

    The thinset skim coat and heavy "misting" seemed to do the trick, and the kerdi is going up nicely. Thanks for the help. Any chance you might post a picture of the niche in your shower?

    ggoose

  • MongoCT
    Original Author
    15 years ago
    last modified: 9 years ago

    Here's a shot of the niche in this thread after it was framed but before the cement board went up. The niche wall was skinned with 3/4" ply before the cement board went up.

    {{gwi:1429439}}

    {{gwi:1447306}}

    Here it is after it was tiled:

    Mongo

  • ggoose
    15 years ago
    last modified: 9 years ago

    WOW.
    Most impressive. It is difficult to discern any slope to the shelves in the tiled pic. Was the slope built up with thinset or via the actual framing, pre-cbu?

    ...maybe you should quit your day job.

    ggoose

  • oruboris
    15 years ago
    last modified: 9 years ago

    Have to admit, I'm nervous as a cat at the dog show about doing my first shower-- I've laid enough floor tile to be comfortable with tile and thinset, but the only vertical I've ever done was a backsplash.

    My showers and tub surrounds were done in plain white gyp board by my builder, who is in the hospital, may not get out. I'm tempted to pull it out, replace it with hardi or similar. I know its *supposed* to be OK to go over the whiteboard, but tell me, pros: Would you? Does the fact that I'm in a low-humidity environment matter either way?

    I thought I was clear on using only unmodified thinset on kerdi, but their web video says to use something 'appropriate to the substrate'. What would that be, for white gyp board? I don't currently have a 1/4x3/16 v-notch, don't mind buying one if it will be genuinely better than my 1/4x1/4 square: will it?

    Has anyone tried the plastic corner mouldings that replace caulked corners?

    Dryset is reccomended in the video about installing the tray, but thinset is mentioned in the one about installing the drain flange separately. Which should I use?

    I'm worried that I'll go to the site the next morning, and all the wall tile will have fallen off, ruining the schlutter pan. Does it matter which unmodified thinset I use?

    It would lift a great load off me if anyone can answer any of these questions-- I'm feeling really stressed...

  • MongoCT
    Original Author
    15 years ago
    last modified: 9 years ago

    ggoose,

    The framing is pitched. The way I feel today I'm contemplating quitting ALL my jobs.

    Oruboris,

    I think you can feel confident going over white board.

    Thinset? Over drywall or cement board you can use a lightly modified thinset should you want. Most thinset manufacturers offer unmodified (~$8 a bag), modified (~$15 a bag), and highly modified (~$30 a bag) in their product lines.

    the only time I'll absolutely not use a modified thinset with Kerdi or Ditra is when using large format tiles.

    Trowel size? Buy the correctly sized one.

    I've never used the corner strips. Bill has posted several pictures of jobs he's used them on.

    "Dryset is recommended in the video about installing the tray, but thinset is mentioned in the one about installing the drain flange separately. Which should I use?"

    "Dryset" is unmodified thinset, so dryset is thinset.

    Mongo

  • bill_vincent
    15 years ago
    last modified: 9 years ago

    The way I feel today I'm contemplating quitting ALL my jobs.

    Been there, done that. :-) Tomorrow's another day, my friend. :-)

  • MongoCT
    Original Author
    15 years ago
    last modified: 9 years ago

    Hopefully it won't be a Bill Murray "Groundhog Day"!

  • oruboris
    15 years ago
    last modified: 9 years ago

    Thanks for the reassurance-- I *thought* dryset and thinset were the same, but the video used 'thinset' right up to the drain flange install, and that threw me.

    I think I was getting overwhelmed by un-assimilated info, and after re-reading parts of this, and re-watching the videos, I'm feeling much better...

    Thanks again.

  • ggoose
    15 years ago
    last modified: 9 years ago

    Is it an acceptable practice to feather out overlaps in the kerdi with thinset as one might do with drywall mud on sheetrock? This, of course, in an effort to help level the tiling plane.
    Thanks,

    ggoose

  • bill_vincent
    15 years ago
    last modified: 9 years ago

    No need. You're only talking about 1/16". Or atleast you SHOULD be. :-)

    Has anyone ever checked Kerdi for Radon?

    :-)

  • ggoose
    15 years ago
    last modified: 9 years ago

    Just completed the shower-in-tub-surround-overkill-with-kerdi application. I'm reasonably pleased. However, I'm wondering if I made amistake with the thinset. I was at Lowes and got the unmodified Laticrete product, but now notice the packaging says "Floor Adhesive". Is this acceptable for use to hang kerdi and tile over it? The Lowe's assoc. said it is their only unmodified thinset. Also said I can only use it on the walls to hang 6X6 tiles - no larger. Is this true?
    Hoping I didn't go anywhere near the pooch,

    ggoose

  • MongoCT
    Original Author
    15 years ago
    last modified: 9 years ago

    For tiling on Kerdi, you have tile larger than 6x6 and want to use unmodified?

    If so, then the pooch is safe, Gus.

    Do realize for walls you'll want tile spacers to prevent any creep on the walls. Unmodified creeps a bit more than some of the other modified or lightweight thinsets, but unmodified is what you want with Kerdi.

    Regular "X" shims are okay for the most part with an occasional micro-tweak as required. Tile spikes (tapered shims) allow a bit more +/- flexibility. For a one-time use, the inexpensive white plastic X's are fine.

    Mongo

  • ggoose
    15 years ago
    last modified: 9 years ago

    I am using mostly 6X6 tiles, with just a few that are larger, on the walls. Have spacers at the ready. Was curious if the Laticrete "Floor Adhesive" thinset is acceptable to use to hang the kerdi and the tiles...that's all the unmodified Lowe's had, so that's what I used (to hang the kerdi), and planned on using to hang the tiles...

    ggoose

  • MongoCT
    Original Author
    15 years ago
    last modified: 9 years ago

    I'm not familiar with that particular product so I went on Laticrete's website to view the pdf. Found out it's a "lowe's only" product.

    And the sheet does specifically say that it is "not for walls". I'm not sure what the mix is, if it's a little light on portland or what.

    Lowes also carries Mapei, did they have any unmodified in their line?

    Do you have a Home Depot nearby? They carry Custom's line and they usually have unmodified in stock.

  • oruboris
    15 years ago
    last modified: 9 years ago

    First, we have to figure a way to keep this thread alive, and preserve as much of the info herein [including replies to questions] after it hits its limit, still 150, IIRC.

    Second, question on time: basicly, I have none. Hiring a tile guy to hang the walls, but he hasn't done kerdi before, so I'm supposed to do that before he gets here.

    How long should I allow the kerdi to cure before we do tile?

    He's a biiig guy, wondering if I should have the floor done before the walls so he doesn't hurt the foam pan by standing on it, or dropping a tile or some such. Good idea, or not necessary?

  • mahatmacat1
    15 years ago
    last modified: 9 years ago

    oruboris, I saved all the pics separately, and saved the text...this must not die. Nor do I want g'web to appropriate it and sell it as a book...

  • MongoCT
    Original Author
    15 years ago
    last modified: 9 years ago

    "Nor do I want g'web to appropriate it and sell it as a book..."

    John Bridge already beat them to it. He's using my photos on his updated site.

    Someone emailed me a while ago and told about the 150 post execution. No worries. Maybe I'll consolidate and start another thread, maybe have one thread for the photos and one for discussion? Might take a few days for me to get round to it.

    And just what is the "gallery". Is it just for photos? Do "gallery" threads die?

    Oh, and whoever makes the 150th post to this thread before I remodel and repost will die...

    Mongo

  • egon
    15 years ago
    last modified: 9 years ago

    Mongo,

    Thanks for the excellent photos and advice.

    What angle or pitch would you recommend for shower niche shelves made of marble?

    How do you attach the cement board for the back of the niche?

    Would you recommend installing a furring strip on a wall framed in 2x3 metal studs when placing 9"x18" tiles horizontally?

  • PRO
    Avanti Tile & Stone / Stonetech
    15 years ago
    last modified: 9 years ago

    Mongo....That would be me. An EXCELLENT tutorial on Kerdi showers and I figgured that JB Forums would benefit from your expertise.

  • golddust
    15 years ago
    last modified: 9 years ago

    We're putting in a custom shower and this can not get lost before we're ready so another giant thank you to Mongo and ... another Bump!
    golddust

  • yumpin
    15 years ago
    last modified: 9 years ago

    Posted by Yumpin Jim1mckenna@yahoo.com

    Thnk you for all theinfo great stuff. I am doing Keri for the first time I am confused about the thin set . The tile place I bought from sold me Maipei Karabond Premium Grade Dryset Mortar for the kerdi, North American adhesive Premium ahesive prmix for the tile on the walls. (all of it Not to cheap) they also wanted to sell me another thinset for setting the floor that is 1x1 mosaic tile. not sure if I have the right stuff or not. Can you tel me what I should use. For the job? to set shower Pan,Kerdi,wall tiles witch are 10x13, and floor tiles witch are 1x1 Mosaic. agin thank you muuuch

  • bill_vincent
    15 years ago
    last modified: 9 years ago

    Bring back the premixed crap. All you need is the Kerabond for ALL of it-- installing the Kerdi, the wall tile, and the mosaics on the floor.

  • lous_crew_yahoo_com
    13 years ago
    last modified: 9 years ago

    Mongo, Unfortunately the pics are no longer part of this thread. Would love to see them as the text is very descriptive and I am working on tub deck shower combo. Do you have a link to the photos? I am located in SE CT and not far from you.

  • MongoCT
    Original Author
    7 years ago

    For those interested, the dropped photos have been reloaded on this new thread, Kerdi Shower Part Three.