


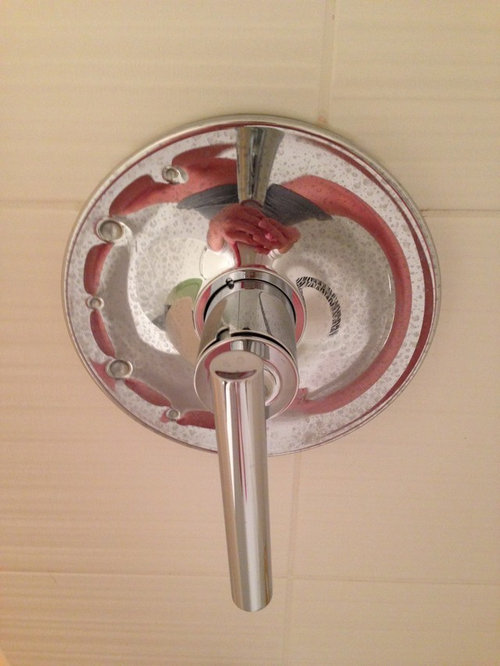
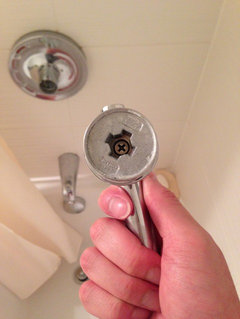
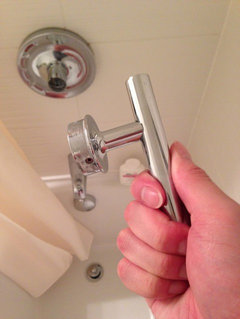
Shower faucet handle fell off, how to reattach?
Raident
9 years ago
Featured Answer
Comments (9)

Raident
9 years agoMongoCT
9 years agoRelated Discussions
How to replace a shower faucet/trim
Comments (8)Our 4 yr old Delta (model# 132900 ) works as you describe. It is stamped "Delta" on the trim plate and the handle, and the trim plate screw holes are at 1:00 and 7:00 (actually closer to 2:00 and 8:00, but not quite.) Anyway, I would suggest taking both the trim plate and the handle off and take them with you to a big box store to match them up. The key is matching the holes on the trim plate, as well as the turning "stops" on the backside of the handle (so take the handle out of the package and look at the back of it closely). If they don't match, try a real plumbing supply, since the trim plate holes and stops can be different even for the same brands. This is how it is with Moen. Sometimes I buy a trim kit from a plumbing supply, other times the big box version, and sometimes I even have to parts from each place to freshen up a bathroom. (If I want a shiny new Moen tub spout, it's almost the same cost at my local plumbing supply to buy the entire trim kit vs. the spout by itself.) Good luck....See MoreDoes it matter what order you turn off the faucets/shower diverte
Comments (5)I'm pretty positive not. There are only 11 units; only 9 resident families (one's a duplex; one's empty). There's no room in the units to be installing devices; it's pretty tight. My big question isn't really "what's causing this?" bcs I'm pretty sure the plumber will figure it out. (I think it's a check-valve that has gone bad; we had the same problem 10 years ago when the plumber put in new water heaters & put the valve in backwards. He fixed that--but this problem is SO much like it, that's my theory--a failing check valve) But I'm just wondering--does it really matter whether you turn the shower diverter down AFTER you turn off the faucet at the handles, or BEFORE? I always thought it didn't matter, and I'd like to confirm it....See MoreKenmore strainer's handle fell off
Comments (32)This handle can be re-attached with rivets. Solid, tubular (eyelets), or semi-tubular rivets may be used. I recommend the solid or semi-tubular type. However, the semi-tubular type must be of proper lenght to work right. If you do not have such, choose solid. Heading a solid rivet requires more peening, but it is the most simple rivet and is strong. Solid rivets can be cut to length as required. The cut end does not have to be pretty since it is going to be hammered over. Rivet materials: Do not use steel. Corrosion is a problem. Since the colander is made of stainless (probably the 400 series), a soft stainless rivet is good, but you may not be able to find one to suit. Other rivet materials are aluminum and brass. Aluninum is corrosion resistant due to an oxide film on it; Aluminum in contact with stainless may sacificially corrode and fail. This leaves brass. Select the rivets and drill holes: Two holes at each end of the handle. Dry fit the parts to insure that everything is ready. Joint sealer: A joint sealer is recommended. Mix up some clear to light colored epoxy for this. Put some epoxy in the joint and on the rivet. The object is to seal the joint and rivet holes. The sealer keeps water and crud from collecting in the joint, and reduces potential for toxins (from bacteria). After the handle is tightly riveted, wipe off the excess epoxy with paper toweling. After the epoxy has well set, the colander is ready for use. you may consider tagging the colander with the message, "Do not use in oven". I don't know why one would put a colander in the oven, or any other very hot place, but such a reminder is a good precaution. Many 5-minute epoxies soften at 150 F and melts with a little more temperature. Epoxies resistant to higher temperatures usually require longer setting times, some running more than an hour. But these epoxies can fail at 350 F. The best policy to preserve your good repair is to not heat it to high temperature and smoke the adhesive. A weather sealed joint can last the lifetime of the item....See MoreRe-attaching soap dish on tile shower wall
Comments (3)I would rough up the backer with a grinder (or just put some notches in it), then use thinset one more time. You'll have more surface area that way, and it will be "cleaner" so the thinset adheres. I'd probably replace the soapdish, too, since they're cheap and will give you a clean surface w/ more space for the thinset. After it cures, seal the perimeter with adhesive caulk. This post was edited by homebound on Mon, Jun 3, 13 at 9:34...See Morenumbersjunkie
9 years agoRaident
9 years ago
millworkman
9 years ago
tibbrix
9 years agojerzeegirl
9 years agoHU-785670367
2 months ago
Related Stories
KITCHEN DESIGNHow to Pick a New Kitchen Faucet
Learn all about mounting styles, handles, finishes and quality to get the kitchen faucet that best fits your needs
Full Story
DIY PROJECTSHow to Replace Your Kitchen Faucet
Swap out an old faucet to give your kitchen a new look — it's a DIY project even a beginner can do
Full Story
HOUZZ TOURSMy Houzz: Vision Pays Off in a Vibrant Live-Work Space
A plain box becomes a creative, eclectic home at the hands of hardworking homeowners and their remodeling team
Full Story
REMODELING GUIDESOriginal Home Details: What to Keep, What to Cast Off
Renovate an older home without regrets with this insight on the details worth preserving
Full Story
DECORATING GUIDES8 Reasons to Jump Off the DIY Bandwagon
You heard right. Stop beating yourself up for not making stuff yourself, and start seeing the bright side of buying from others
Full Story
REMODELING GUIDESFinish Your Remodel Right: 10 Tasks to Check Off
Nail down these key details to ensure that everything works properly and you’re all set for the future
Full Story
LIFESlow Living 101: Tips for Turning Off the Chaos
It may feel as though you're too busy to slow down and enjoy life. But even little changes can have a big effect
Full Story
BATHROOM DESIGNYour Bath: Faucet Finale
Complement your Sink with Functional and Chic Hardware
Full Story
BATHROOM DESIGNA Crash Course in Bathroom Faucet Finishes
Learn the pros and cons of 9 popular faucet finishes
Full Story
KITCHEN SINKSWhich Faucet Goes With a Farmhouse Sink?
A variety of faucet styles work with the classic farmhouse sink. Here’s how to find the right one for your kitchen
Full StorySponsored
Your Custom Bath Designers & Remodelers in Columbus I 10X Best Houzz

RaidentOriginal Author