


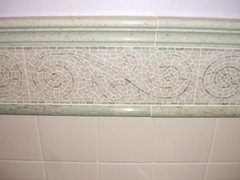
Another ming green copycat bath
mlk58
15 years ago
Featured Answer
Sort by:Oldest
Comments (24)

mlk58
15 years agopharaoh
15 years agoRelated Discussions
Mongo, would you give me some specs on your fab bath??
Comments (11)I thought I had a more comprehensive series of photos, but I might have not brought them over when I bought new computers a few weeks ago. The following are not pretty, but they might help: ABOVE: This shows a couple of things I had to work around. High over the toilet is a jog of the vent pipe, it comes into the room because it jogs around a load bearing beam in the wall. Lighting: You see two illuminated light bulbs. Those are the sconce locations for the "new' design. The original design had two sinks, two wall mirrors, and three wall sconces. The old wall sconce locations are the covered up junction boxes. I redid the wiring so there is no live wring in those now unused j-boxes. Outlets: Look at the middle shelf in the closet on the left. In the back right corner you can see a box. I built that to house a couple of electrical outlets. Two outlets for inside the closet, another outlet that is on the closet sidewall facing the sink, you can barely see the cover plate for that box on the closet wall to the left of the drill. More electrical: In the 48" tall cabinet that hides the toilet, there are four outlets in the upper part of that cabinet box. There is one outlet that faces the sink, there is another on the opposite side that faces the toilet. There are two inside the upper cubby to provide power to items in the upper drawer. To protect those outlets, there is a false back wall in the rear of the upper cubby of that toilet cabinet. The cabinet itself is about 32" deep, the false back wall is about 10" out from the cabinet's back, affording roughly 22" of depth for the upper toilet drawer. The cabinets: Nothing fancy, 3/4" birch plywood boxes. Horizontal shelves/tops/bottoms are recessed into the cabinet sides in a 1/4" deep dado. Titebond glue and screws. Cabinet backs are 1/2" MDF, recessed into the cabinet sides/top/bottom. Glued and screwed. Recessing the cabinet backs into the cabinet helps keep the cabinet perfectly square. I typically use a 2" wide vertical stile on my cabinet face frames. I prefer my frames to be flush with the edges of the cabinet sides. With the cabinet sides being 3/4" thick, two of them make 1-1/2". So I'll use a strip of 1/2" filler between adjacent boxes to get that 2" thickness. With my face frames being flush with the inside faces of the cabinet sides, to get square face frames you need square cabinet carcasses. You can't disguise sloppy construction with this method. Toekicks: Under the cabinets you see scrap pieces of 2x4. Those were eventually covered with wood and painted black. They simply limit the depth of the hole under the cabinet to round 8", giving dust bunnies less room to hide. ABOVE: This shows the same run of cabinets with the face frames installed. You can see the electrical outlet on wall of the left closet, facing the sink. You can see the outlet on right side of the toilet cabinet, facing the toilet. ABOVE: Everyone needs a place to keep their "to do" list. I know I'll never lose this list. At least not until I cover it with the teak top. ABOVE: Remember that really small vent pipe that jogged into the room? Well, I covered it with this really big soffit. Nothing like overkill, eh? I actually used it to balance out the visual weight of the upper part of the closet on the left side of the sink. Visually, it centers things to the open area over the center of the sink. Might sound like a lot of silly voodoo design, but visually it feels comfortable to me. The band around the upper walls is backer for the crown molding. ABOVE: Speaking of teak...this is 4/4 teak, or "four quarter" teak. If you go t a lumberyard and by a "one-by-four", it'll be 3/4" thick by 3-1/2" wide. If you go to a lumberyard and order 4/4 lumber, it'll be 1" thick. For 4/4 thickness or less, I'll use one row of biscuits. For 5/4 and thicker, I'll use a double row. In this bathroom the tub deck is 2" (8/4) thick, the sink countertop is 1-1/2" (6/4) thick, and the toilet cabinet teak top is 1" (4/4) thick. ABOVE: I usually use epoxy with teak. I thought I read a recent article that the newer titebond forumations work well on teak, but hey, when you buy epoxy by the gallon, you may as well use it, right? Except that I buy Titebond 4 gallons at a time. Hmmmmmm.... Okay, anyhow, I use epoxy. Teak is an oily wood, so prior to using epoxy I'll wipe down the edges to be glued with acetone. The acetone removes the oils. I mix the epoxy, apply it to the biscuits and the edges with an acid (flux) brush, sap it all together and clamp it up. Biscuits are designed to absorb moisture from water-based glues like Titebond and expand within the cut slots, they really lock the pieces together. Although there is no moisture in epoxy for the biscuit to absorb, it still provides more surface area for the epoxy, plus the biscuits help register and align the teak during the clamping process. ABOVE: After the epoxy has cured. I'm getting ready to belt sand these with 80-grit to smooth it out. Top photo is for the "toilet" cabinet, the bottom photo is a teak window sill for the window behind the tub. So...not the greatest series of "how to" photos. But hopefully they'll help a bit. Mongo...See MoreCrazy green/yellow tiled retro bath remodel - need help please!
Comments (25)All I can say is wow, thanks for all the ideas and help. So, the new window went in and it is taller, so my GC made sure to carefully remove and store the extra tiles for me. We'll see this weekend how many I have extra now. I thought I'd maybe send one to Chippy to see if they have a match in NJ. Also, I can use one for our re-glazer, if I need to still go that route. I have the pedestal sink in hand at the house, so for now we are good. I'll let you know how the tiles end up. Please keep sending the suggestions!!...See MoreAnother Kitchen Magazine Back Issue Challange
Comments (27)Hi Mistergreen - I have also searched high and low for something similar - as I think a few others on this thread have done. I did call Lester Harry's and their price is around $800. That is just too hard to justify with all the other expenses for building a new home. I have found some similar items but most all are in the chrome/polished finish, not in bronze. I am not sure if that makes a difference to you....but if you want to check out Schonbek Geomatrix line, James Moder Tekno line, & Elk Lighting Optix line. There is a pendant by Quoizel - the Lisette Piccolo - which has the bronze finish, but it is 9 1/2" in diameter which is pretty large. There is a bronze finished pendant from Elk - Victoria line - it has red accents and can look great with a white kitchen (which is what we have). And, there is a beauty by Framburg - Empress Series 1499 - but it is about $500-$600. It has the bronze finish, but with amber crystals and it is round, rather then square. It took me a little while to try and warm up to another crystal pendant after seeing those Chandi beauties, but since they are out of my price range, I think there are some other alternatives which will give the same effect and look beautiful. Unfortunately, the Schonbek, Moder and Elk that are similar, don't come in the bronze finish and all our lighting and hardware are bronze. Hope this helps! Please let me know if you find anything else.......See MoreX post to bathrooms... ming green bath floor maintenance?
Comments (18)With the limestone I used toothpaste, nail polish remover, vinegar (we sometimes use hot water and vinegar on the porcelain tile), bleach, and I actually did think about how an "accident" would effect the tile. I didn't need to go that far since what I used destroyed the Lagos Gray completely and also, though not quite as bad a lighter limestone. Too bad, cause I loved the feel and look. I'm awaiting my ming green samples. I"ll be very disappointed if it's as bad. I see so many ming green bathrooms on houzz and we all know how popular cararra is in bathrooms. I can't imagine how THAT many people would spend such big bucks on material that can destroy like that. I could live with minimal maintenance (like wiping sealer on once a year) but beyond that... I don't think so. I also don't want to stress about what cleansers I use or if one of my grandkids use that bathroom and "miss". I'm spoiled by my soapstone counters as my introduction to natural stone cause NOTHING hurts my counter....See Moreconstanceann
15 years agomlk58
15 years agowritersblock (9b/10a)
15 years agoneesie
15 years agoannkathryn
15 years agomahatmacat1
15 years agotwogirlsbigtrouble
15 years agoraehelen
15 years agomlk58
15 years agowritersblock (9b/10a)
15 years agomlk58
15 years agoannachosaknj6b
15 years agowisrose
15 years agohouseful
15 years agoarleneb
15 years agohoffman
15 years agomlk58
15 years agomarisany
15 years agokgsd
15 years agokgsd
15 years agomlk58
15 years ago

Related Stories
REMODELING GUIDESThe Perfect Finish for Your Tile
Bullnose? Quarter round? V-cap? Demystify trim terms and finish off your kitchen and bath tile in style
Full Story
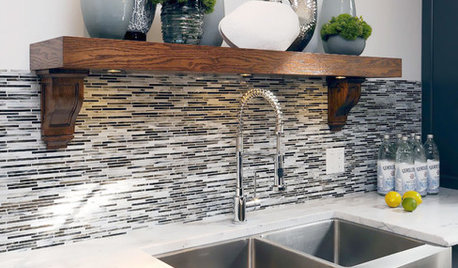
KITCHEN DESIGNKitchen Counters: Stunning, Easy-Care Engineered Quartz
There's a lot to like about this durable blend of quartz and resin for kitchen countertops, and the downsides are minimal
Full Story
CONTAINER GARDENSHappy Houseplants, Happy People
Potted plants add life and beauty to a room. Learn easy ways to keep them healthy
Full Story
KITCHEN DESIGNUsing White Marble: Hot Debate Over a Classic Beauty
Do you love perfection or patina? Here's how to see if marble's right for you
Full Story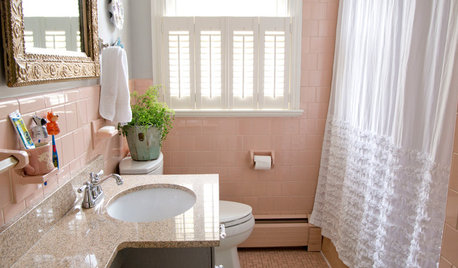
BATHROOM DESIGNHouzz Call: Have a Beautiful Small Bathroom? We Want to See It!
Corner sinks, floating vanities and tiny shelves — show us how you’ve made the most of a compact bathroom
Full Story
PETSHouzz Call: Send in the Design Cats
Post your best photo of your cat at home, in the garden or with you in your studio. It could be published in a featured ideabook
Full Story
BUDGET DECORATINGBudget Decorator: A Most Affordable Gallery Wall
Need to fill a wall on the cheap? See how to make use of something pretty cool you may already have
Full Story
INSIDE HOUZZA New Houzz Survey Reveals What You Really Want in Your Kitchen
Discover what Houzzers are planning for their new kitchens and which features are falling off the design radar
Full Story
FARMHOUSESHouzz Tour: Farmhouse Style That Feels Metro, Not Retro
Classic forms get a contemporary twist in this airy and inviting Silicon Valley home
Full Story
ACCESSORIES9 Fresh Ways to Use Classic Blue and White Ceramics
Add a crisp, clean touch to a room with a china or porcelain jar — or a collection of them
Full Story


annachosaknj6b